
Crocheting a skirt for a baby girl is a lovely way to create a handmade gift or a special addition to her wardrobe. It’s also a fantastic project for crocheters who are comfortable with basic stitches and ready to try shaping.
Here’s a detailed guide on how to make a crochet skirt for a baby girl, focusing on an easy and adaptable design.
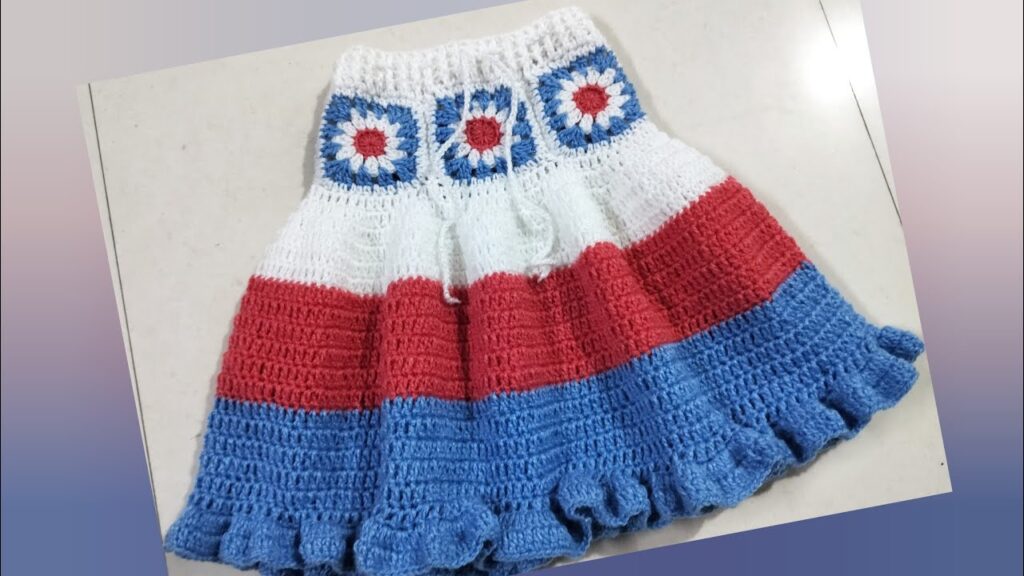
A handmade crochet skirt is not just cute; it’s a versatile piece that can be worn over a onesie, with tights, or as part of a special outfit. This tutorial will guide you through creating a charming skirt that’s both comfortable for the baby and enjoyable to make for you. We’ll focus on a simple design using basic stitches, making it perfect for those with some crochet experience.
What You’ll Need:
Before you begin, gather all your supplies. Having everything ready ensures a smooth and enjoyable crocheting experience.
- Yarn:
- DK (Double Knitting) or Light Worsted Weight Yarn: This weight is ideal for baby garments as it’s soft and not too bulky. Choose a soft acrylic, cotton, or a cotton blend. You’ll need approximately 100-150 grams, depending on the size you’re making and the length of the skirt.
- Color(s): Pick one color for a solid skirt, or multiple colors for stripes or a gradient effect.
- Crochet Hook: A hook size appropriate for your yarn. For DK yarn, a 3.5 mm (E) or 4.0 mm (G) hook is usually a good starting point. Always check your yarn label for the recommended hook size.
- Scissors: For cutting yarn.
- Yarn Needle (Tapestry Needle): Essential for weaving in ends and sewing seams (if necessary).
- Stitch Marker (Optional but Recommended): Useful for marking the beginning of rounds, especially when working in a spiral.
- Elastic (Optional): A thin piece of 1/2-inch wide elastic for the waistband, if you prefer a more secure fit. You’ll need enough to comfortably fit around the baby’s waist.
- Measuring Tape: To ensure accurate sizing.
Basic Crochet Stitches You’ll Use:
This project primarily uses common crochet stitches. If you’re new to any of these, a quick online search for video tutorials can be very helpful!
- Chain Stitch (ch): The foundation of most crochet projects.
- Slip Stitch (sl st): Used to join stitches and finish off.
- Single Crochet (sc): A compact, dense stitch.
- Half Double Crochet (hdc): A stitch that’s taller than sc but shorter than dc.
- Double Crochet (dc): A taller, looser stitch that works up quickly.
- Double Crochet Decrease (dc2tog) / Single Crochet Decrease (sc2tog) (Optional, for shaping): Used to reduce the number of stitches.

Sizing Guide (Approximate):
The number of stitches you start with and the length of your skirt will depend on the size you’re making. Here’s a general guide for the waist circumference and skirt length. Remember that every baby is different, so it’s always best to measure if you can!
| Size | Age (Approx.) | Waist Circumference | Skirt Length (Approx.) |
|---|---|---|---|
| Newborn | 0-3 Months | 14-15 inches | 5-6 inches |
| Small | 3-6 Months | 16-17 inches | 6-7 inches |
| Medium | 6-12 Months | 17-18 inches | 7-8 inches |
| Large | 12-18 Months | 18-19 inches | 8-9 inches |
| X-Large | 18-24 Months | 19-20 inches | 9-10 inches |
Export to Sheets
Let’s Get Started: The Waistband
We’ll start by crocheting the waistband, which will determine the overall fit of the skirt. This part needs to be snug enough to stay up but stretchy enough to be comfortable.
- Foundation Chain: Make a slip knot. Using your chosen hook, chain (ch) a number of stitches that, when measured, comfortably fits around the baby’s waist, without stretching the chain too much. Ensure the chain is an even number of stitches for easier patterning later.
- Tip: Aim for your chain to be about 1-2 inches shorter than the desired final waist circumference if you plan to add an elastic, as crochet tends to stretch. If no elastic, match the desired waist circumference.
- Join the Chain: Carefully join the last chain to the first chain with a slip stitch (sl st) to form a ring. Be careful not to twist your chain!
- Round 1 (Waistband Base): Chain 1 (ch 1) (this does NOT count as a stitch). Make 1 single crochet (sc) in each chain around. Join with a sl st to the first sc.
- Rounds 2-4 (or until desired waistband height):Ch 1. Make 1 sc in the back loop only (BLO) of each sc around. Join with a sl st to the first sc. Working in BLO creates a nice ribbed, stretchy waistband.
- Waistband Height: 3-5 rounds are usually sufficient for a comfortable waistband.
Building the Skirt Body
Now we’ll transition from the waistband to the wider body of the skirt. We’ll use double crochet (dc) stitches, which work up quickly and create a lovely drape.
- Round 1 (Increasing for Flare):
- Ch 2 (this counts as your first dc).
- Make 2 dc in the very first stitch (where you joined).
- Make 1 dc in the next stitch.
- Repeat
*2 dc in the next stitch, 1 dc in the next stitch*around. This increases your stitch count by 50% and starts the flare of the skirt. - Join with a sl st to the top of the beginning ch 2.
- Note: The exact increase pattern might vary slightly depending on your starting chain and desired flare. The goal is to add enough stitches to create a gentle A-line shape. If you prefer a very full skirt, you could do
*2 dc in each stitch*or*2 dc in next, 1 dc in next 2*etc. Adjust as needed.
- Subsequent Rounds (Building Length):
- Ch 2 (counts as first dc).
- Make 1 dc in each stitch around.
- Join with a sl st to the top of the beginning ch 2.
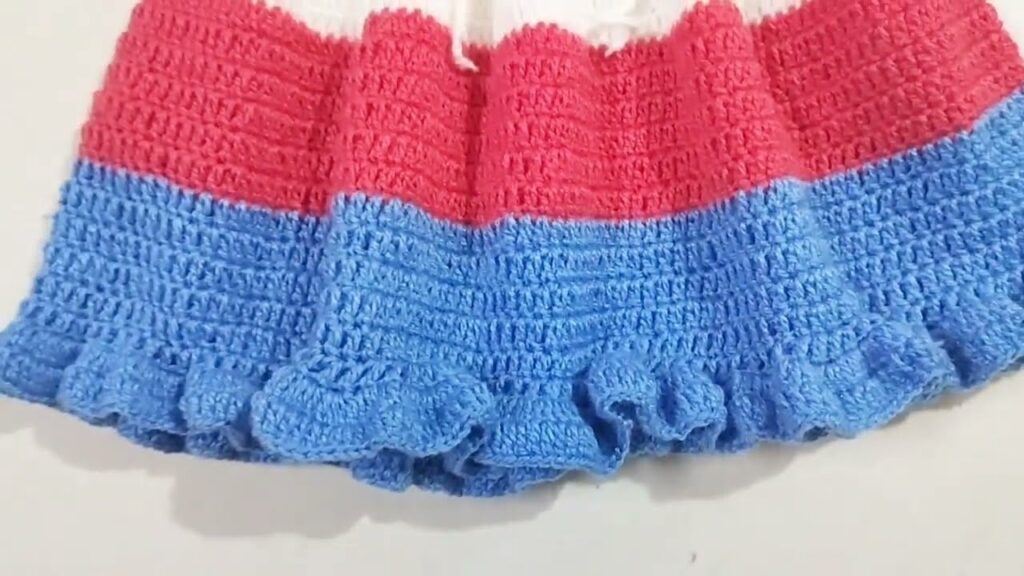
- Repeat this round until your skirt reaches the desired length (refer to the sizing guide above or measure against your baby/garment). You can change colors every few rows for stripes, or work in a solid color.
Finishing the Hem
Once your skirt reaches the desired length, you can add a simple or decorative hem.
- Simple Hem (Recommended for Beginners):
- Ch 1.
- Make 1 sc in each stitch around.
- Join with a sl st to the first sc.
- Fasten off your yarn, leaving about a 6-inch tail.
- Picot Edge (Optional Decorative Hem):
- Ch 1.
*Sc in the next stitch, ch 3, sl st into the first ch (this forms the picot)*. Skip the next stitch.- Repeat
*sc in the next stitch, ch 3, sl st into the first ch, skip next stitch*around. - Join with a sl st to the first sc.
- Fasten off.
Adding an Elastic Waistband (Optional but Recommended for Security)
Even a BLO waistband can stretch over time. Adding a thin elastic provides a secure and adjustable fit.
- Cut Elastic: Measure the elastic to comfortably fit around the baby’s waist, slightly stretched. Cut it to this length, adding about an inch for overlap.
- Form a Loop: Overlap the ends of the elastic by about an inch and securely stitch them together, forming a loop.
- Insert Elastic: Turn the skirt waistband inside out. Place the elastic loop inside the waistband, against the stitches.
- Sew in Place: Using your yarn needle and a matching piece of yarn (or sewing thread), carefully hand-stitch the elastic to the inside of the waistband. Stitch through both the crochet fabric and the elastic, working through the “valleys” of your single crochet rows so the stitching is not too visible on the outside. Stretch the elastic gently as you sew to distribute the fabric evenly.
- Tip: Stitch in a few spots around the waistband, rather than a continuous seam, to allow the crochet fabric to retain some stretch.
Final Touches:
- Weave in All Ends: Use your yarn needle to neatly weave in any loose yarn tails throughout the skirt. Take your time with this step, as well-hidden ends make for a professional-looking finish.
- Blocking (Optional): Gently wet your skirt, reshape it to the correct dimensions, and lay it flat to dry. This helps to even out your stitches and gives the skirt a more polished look.
Tips for Success:
- Check Your Gauge: While not critical for a baby skirt, checking your gauge (how many stitches and rows you get per inch) can help ensure your skirt matches the intended size. A small swatch will tell you if you need to go up or down a hook size.
- Try It On: If possible, periodically try the skirt on your baby or against another baby garment to check the fit and length as you go.
- Soft Yarn is Key: Always choose yarn that is soft and gentle against baby’s delicate skin. Avoid scratchy or overly textured yarns.
- Practice Increases/Decreases: If you’re new to shaping, practice increasing and decreasing a few stitches on a swatch first to get the hang of it.
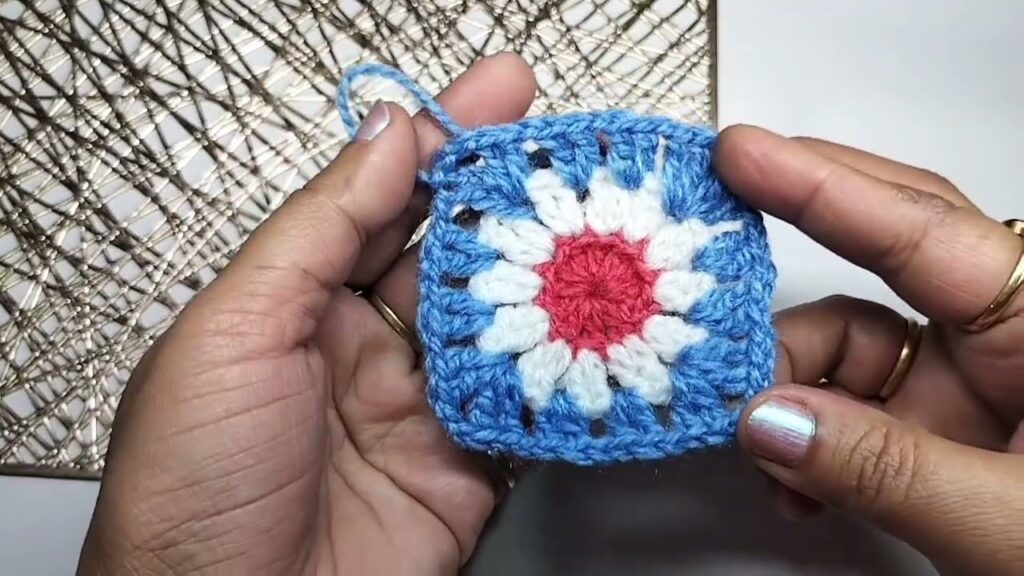
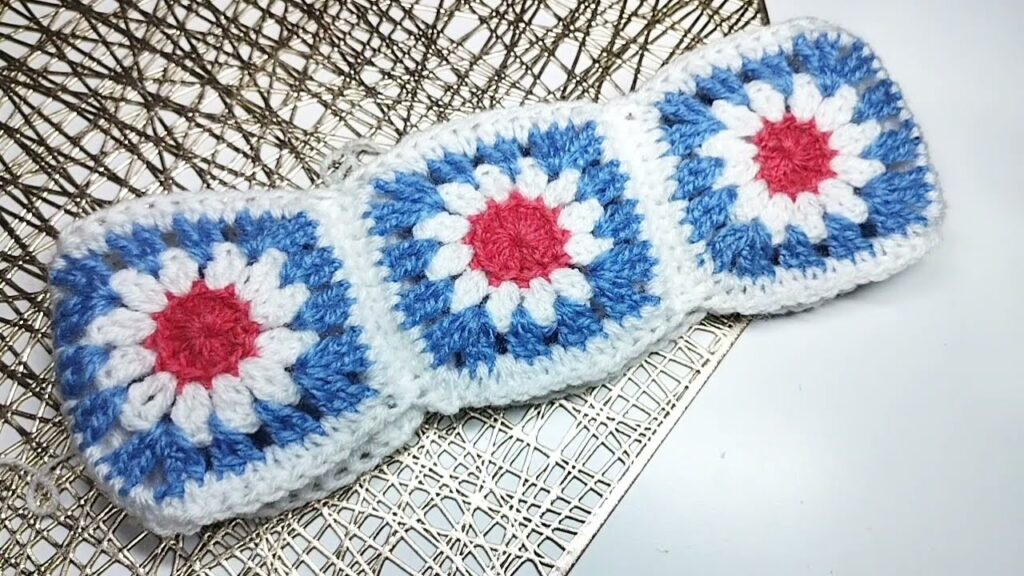
- Have Fun! Crocheting for babies is a joyful experience. Don’t be afraid to experiment with different colors or add simple embellishments like a small flower appliqué.
You’ve now successfully crocheted an adorable skirt for a baby girl! This pattern is a great foundation, and you can easily adapt it by adding lace patterns, different stitch textures, or more elaborate edgings as you gain confidence. What color will you choose for your next baby girl skirt?
Video tutorial:


