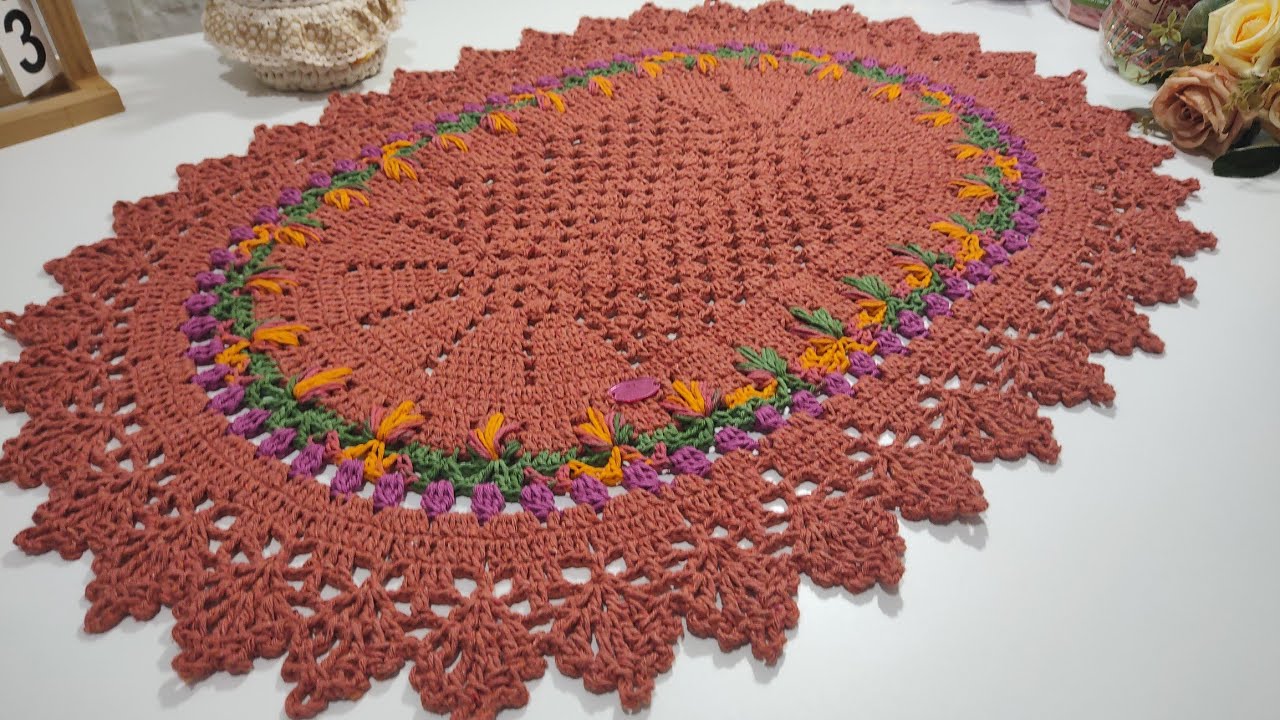
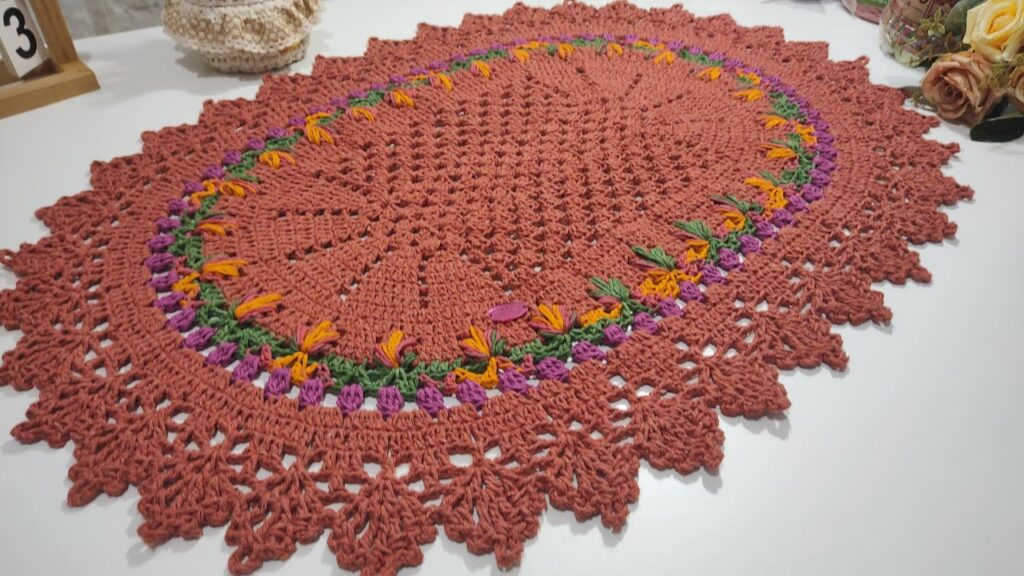
An “Oval Frutare Foliage Mat” sounds like a beautiful and unique home decor piece, likely involving a textured, possibly fruit-and-leaf inspired design, shaped into an oval. Given the descriptive name, this project probably lends itself well to techniques that create a lot of texture, such as various crochet stitches that mimic leaves and berries, or even a combination of crochet and other crafting methods like felting or appliqué.
This guide will focus on creating an Oval Frutare Foliage Mat primarily through crochet, incorporating stitches that can give a “foliage” and “frutare” (fruit-like) appearance, while building on a foundational oval shape. We’ll use a combination of basic stitches and textured stitches to achieve the desired effect.
Understanding the Concept: “Frutare Foliage Mat”
- Oval Shape: The base of the mat will be an oval, which is created by working in the round around a starting chain.
- Foliage: This suggests leaf-like textures. We can achieve this with various stitches like picots, clusters, or even specific leaf motifs worked in relief.
- Frutare (Fruit-like): This implies rounded, perhaps slightly raised elements, which can be created with bobble stitches, puff stitches, or even small stuffed crochet spheres attached later.
- Mat: Implies a relatively flat, sturdy piece suitable for a tabletop, centerpiece, or decorative accent.
Design Considerations Before You Start
- Size: How large do you want your mat to be? This will determine your starting chain length and how many rounds you crochet.
- Yarn Type:
- Cotton: Excellent choice for mats as it’s durable, absorbent, and holds shape well. It also has good stitch definition for textured stitches.
- Blends (Cotton/Acrylic, etc.): Can also work, offering durability and a good range of colors.
- Colors: Consider natural greens for foliage, and berry/fruit tones like reds, oranges, yellows, or purples. Variegated yarns can also add a natural, organic feel.
- Texture Intensity: Do you want a subtle texture or very prominent, 3D elements? This will influence your stitch choices.
- Purpose: Is it purely decorative, or will it hold hot items (requiring specific heat-resistant yarn)?
Materials You’ll Need
- Yarn:
- Main Color (for mat base/foliage): Worsted weight (or Aran) cotton yarn, approx. 200-400 yards, depending on desired mat size.
- Accent Colors (for fruits/berries): Small amounts of worsted weight yarn in red, orange, yellow, purple, etc.
- Crochet Hook: Size appropriate for your yarn (e.g., 4.0mm (G) to 5.5mm (I) for worsted weight).
- Stitch Markers: Very useful for marking the ends of your oval rounds.
- Tapestry Needle: For weaving in ends and potentially attaching small fruit elements.
- Scissors:
- Measuring Tape:
- Optional: Small amount of fiberfill if you plan to make stuffed fruit elements.
Basic Crochet Stitches Used
- Ch: Chain
- Sl St: Slip Stitch
- SC: Single Crochet
- HDC: Half Double Crochet
- DC: Double Crochet
- Inc: Increase (2 stitches in the same stitch)
- Bobble Stitch (BOB): Often creates a raised, rounded “berry” look.
- To make a 5-DC Bobble: Yarn over, insert hook into stitch, yarn over, pull up a loop, yarn over, pull through 2 loops (2 loops on hook). Repeat 4 more times into the same stitch (6 loops on hook). Yarn over, pull through all 6 loops.
- Puff Stitch (PUFF): Similar to bobble but usually pulls up more loops from the same point, creating a softer puff.
- To make a Puff Stitch: Yarn over, insert hook into stitch, pull up a loop (3 loops on hook). [Yarn over, insert hook into same stitch, pull up a loop] 2-3 more times (you’ll have 7-9 loops on hook). Yarn over, pull through all loops on hook. Ch 1 to secure (optional, but recommended to keep the puff prominent).
- Picot Stitch: Creates a small, decorative loop, good for leaf points or edges.
- To make a Picot: SC (or Sl St) into the stitch, Ch 3, Sl St into the first Ch (or into the top of the SC just made).
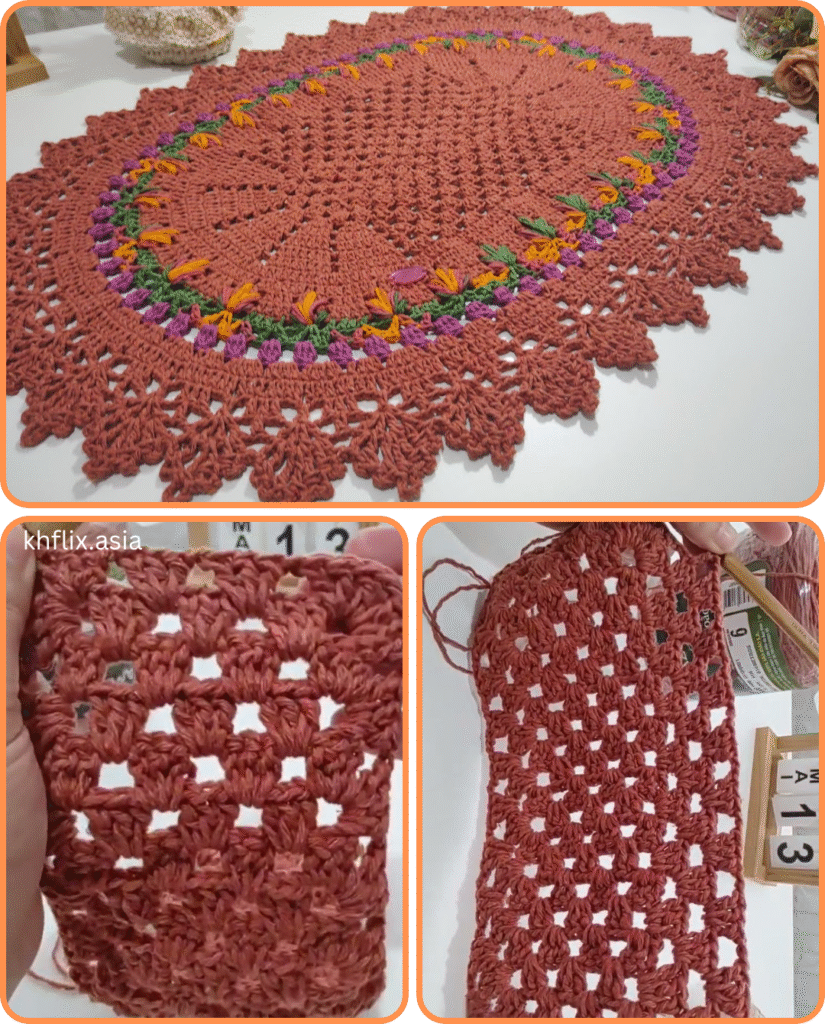
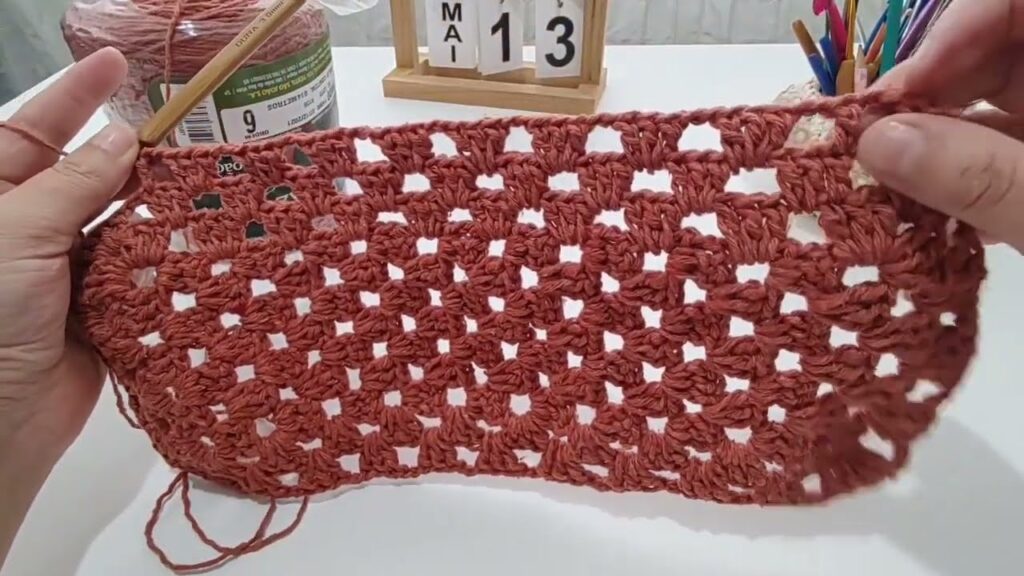
Part 1: The Oval Base (The Foundation of Your Mat)
An oval is essentially made by crocheting around a starting chain. The length of your starting chain will determine the length of your finished oval.
General Oval Formula: The number of stitches in your starting chain (minus 1) will be roughly the length of the flat sides of your oval.
Let’s aim for a medium-sized mat (approx. 12 x 8 inches / 30 x 20 cm) as an example.
- Hook: 5.0 mm (H)
- Yarn: Worsted Weight Cotton
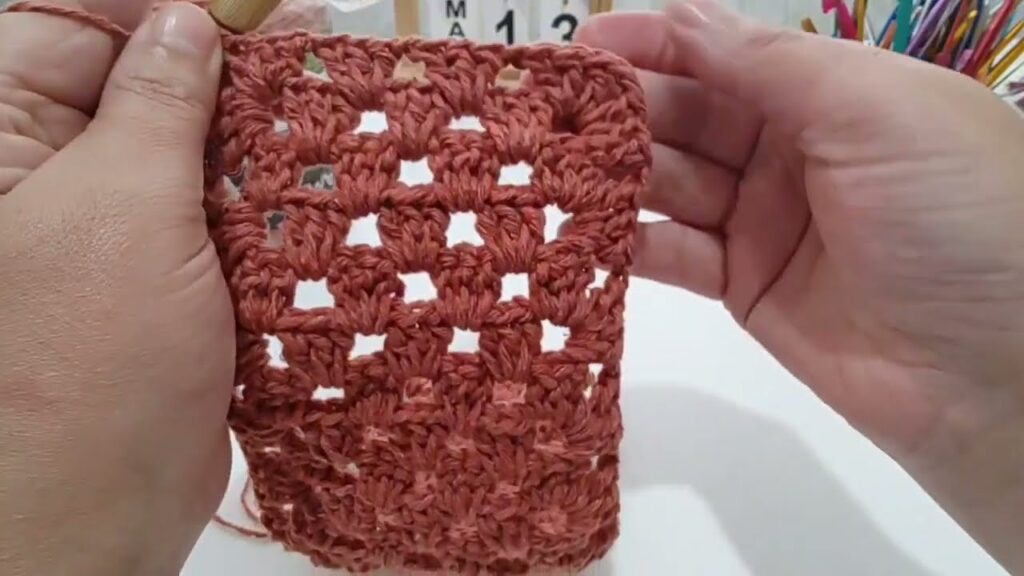
Instructions:
- Starting Chain: Ch 25. (This will give you about a 10-inch flat length before increases).
- Rnd 1:
- 2 HDC in the 3rd Ch from hook (counts as first increase).
- HDC in next 21 Chs.
- 6 HDC in the last Ch. (This forms one rounded end).
- Rotate your work 180 degrees to work along the other side of the starting chain.
- HDC in next 21 Chs (working into the bottom loops of the chain).
- 4 HDC in the very last Ch (the same Ch where you worked your first 2 HDC).
- Join with Sl St to the first HDC.
- (Total stitches for Rnd 1: 2 + 21 + 6 + 21 + 4 = 54 HDC)
- Place stitch markers in the first and last HDC of each of the rounded ends (the 6 HDC and the 4 HDC sections) to help you keep track of increases in subsequent rounds.
- Rnd 2:
- Ch 2 (does not count as st).
- HDC Inc in the next 2 sts (these are the increases from the first rounded end).
- HDC in next 21 sts.
- HDC Inc in next 6 sts (increases for the second rounded end).
- HDC in next 21 sts.
- HDC Inc in next 4 sts (increases for the remaining stitches of the first rounded end).
- Join with Sl St to the first HDC.
- (Total stitches for Rnd 2: 22 + 21 + 62 + 21 + 4*2 = 4 + 21 + 12 + 21 + 8 = 66 HDC)
- Rnd 3:
- Ch 2.
- (HDC, HDC Inc) repeated 2 times (over the 4 increase sts from Rnd 2).
- HDC in next 21 sts.
- (HDC, HDC Inc) repeated 6 times (over the 12 increase sts from Rnd 2).
- HDC in next 21 sts.
- (HDC, HDC Inc) repeated 4 times (over the 8 increase sts from Rnd 2).
- Join with Sl St.
- (Total stitches for Rnd 3: 6 + 21 + 18 + 21 + 12 = 78 HDC)
Continue increasing in this manner for the oval base until it reaches your desired overall size. The pattern is to work a regular stitch, then an increase, repeating this across the curved ends, while working straight stitches along the flat sides.
- General Oval Increase Pattern:
- Flat Sides: Always HDC (or chosen stitch) in each stitch. The number of stitches will remain constant.
- Curved Ends: Each round, you’ll add 2 more stitches on each curve (so 4 stitches per curve if you started with 2 on one end and 4 on the other initially, or 6 if you started with 6 uniformly). You achieve this by inserting an increase stitch (HDC Inc) into a specific pattern.
- Example for curved ends:
- Rnd 1: 2, 6, 4 (initial HDC count in ends)
- Rnd 2: (HDC Inc)x2, (HDC Inc)x6, (HDC Inc)x4
- Rnd 3: (HDC, HDC Inc)x2, (HDC, HDC Inc)x6, (HDC, HDC Inc)x4
- Rnd 4: (HDC in 2, HDC Inc)x2, (HDC in 2, HDC Inc)x6, (HDC in 2, HDC Inc)x4
- And so on.
Once your oval base is the right size, fasten off. This will be the foundation upon which you add the “frutare foliage.”
Part 2: Adding the Foliage (Textured Stitches)
This is where you’ll bring the mat to life with texture. You can work these elements directly onto the oval base or create separate motifs and attach them.
Method 1: Working Directly onto the Base (Recommended for integrated look)
You will attach your yarn at various points on the oval and work “leafy” rounds or sections.
- Option A: Raised Leaf Texture with Front Post Stitches:
- Join your main green yarn with a Sl St anywhere on your oval base. Ch 1.
- Work 1-2 rounds of HDC.
- In the next round, strategically work FPDC (Front Post Double Crochet) or FPHDC (Front Post Half Double Crochet) stitches to create raised “veins” or “stems.” You could do a pattern like: FPHDC in next st, HDC in next 2 sts, repeating to create subtle lines.
- To create larger, more defined “leaves,” you can use a combination of stitches:
- Join yarn, Ch 3. Work 2 DC, Ch 2, 2 DC into the same stitch (creating a small V-shape). Sl St into the next few stitches to travel, then repeat.
- Or, work Cluster stitches or Puff stitches in groups to create a more organic, bumpy leaf texture.
- Option B: Picot Edging for a Leafy Effect:
- Work a round of SC around the edge of your oval.
- In the next round, work SC in next 2 sts, Picot, SC in next 2 sts. Repeat around the entire edge. This creates a delicate, leafy border.
- Option C: Bobble/Puff Stitch Clusters for Density:
- Work rounds of HDC, then strategically add Bobble or Puff stitches.
- Example: HDC in next 3 sts, BOB (or PUFF) in next st, HDC in next 3 sts. Repeat around. You can offset these in subsequent rounds to create a dense, textured “mossy” or “foliage” feel. Use varying shades of green for depth.
Method 2: Crocheting Separate Leaf Motifs and Attaching Them
This gives more control over placement and a more 3D effect.
Simple Crochet Leaf Pattern:
- Ch 8.
- Sl St in 2nd Ch from hook, SC in next Ch, HDC in next Ch, DC in next 2 Chs, HDC in next Ch, SC in last Ch.
- Ch 2. Sl St in the 2nd Ch from hook (to create a small point at the top of the leaf).
- Rotate to work along the other side of the starting chain.
- SC in next Ch, HDC in next Ch, DC in next 2 Chs, HDC in next Ch, SC in next Ch, Sl St in last Ch.
- Fasten off, leaving a long tail for sewing.
- Make several leaves in various shades of green. Vary the starting chain length for different sized leaves.
- Arrange and stitch these leaves onto your oval base using your tapestry needle, overlapping them for a natural, abundant foliage look.
Part 3: Adding the Frutare (Fruit/Berry Elements)
This is where you add the “fruit” aspect.
Method 1: Integrated Bobble/Puff Stitches
- As you are working your foliage rounds (especially using Method 1, Option C), simply switch to an accent color (red, orange, etc.) for your Bobble or Puff stitches.
- Example: When you encounter a stitch where you want a “berry,” change to your berry color, work your BOB/PUFF stitch, then switch back to your green yarn for the next stitches. This creates integrated berries.
Method 2: Crocheting Small Separate “Berries”
This gives a more raised, distinct fruit look.
Simple Berry Pattern (Mini Amigurumi Style):
- Berry Color Yarn.
- Rnd 1: MR, 6 SC into ring. (6 SC)
- Rnd 2: SC Inc in each st around. (12 SC)
- Rnd 3: SC in each st around. (12 SC)
- Rnd 4: SC Dec 6 times around. (6 SC)
- Optional: Lightly stuff with a tiny bit of fiberfill before fully closing.
- Fasten off, leaving a long tail. Use the tail to sew the hole closed and then to sew the berry onto your mat.
- Make several berries in different fruit colors (red, orange, yellow, purple, etc.).
- Arrange and stitch these berries onto your mat, tucking them among the leaves, or clustering them in strategic areas.
Part 4: Assembly and Finishing
- Arrange and Pin: Lay out your oval base. If you crocheted separate leaves and berries, arrange them on the mat until you are happy with the composition. Pin them in place.
- Sewing: Using your tapestry needle and the long tails from your separate motifs, carefully sew each leaf and berry onto the oval base. Hide your knots on the underside.
- Weave in All Ends: This is the most crucial finishing step. Ensure all yarn tails are neatly and securely woven into the fabric. For a mat, you want the underside to be as flat and neat as possible.
- Blocking (Highly Recommended):
- Wet the entire mat thoroughly (you can submerge it in lukewarm water or spray it generously).
- Gently squeeze out excess water (do not wring or twist).
- Lay the mat flat on blocking mats or a clean, dry towel.
- Gently stretch and shape the oval to your desired dimensions. Pin it in place if needed to maintain the shape, especially if it’s curling.
- Allow to air dry completely. This can take 24-48 hours. Blocking helps to even out stitches, open up the texture, and set the final shape of your mat.
Customization and Variations
- Different Stitch Combinations: Experiment with popcorn stitches, crocodile stitch (for a more scaly/leafy look), or even surface crochet for vines.
- Yarn Blends: Use a shiny yarn for berries to mimic a “wet” look, or a fuzzy yarn for a soft, mossy texture.
- Embroidered Details: After the mat is done, use embroidery floss to add tiny veins on leaves or highlights on fruits.
- Border: Add a simple SC or crab stitch (reverse SC) border around the entire oval for a clean, finished edge.
- Varying Shades: Use 2-3 shades of green for leaves and multiple shades of reds/oranges for fruits to add depth and realism.
- Functional Additions: For a hot pad, ensure you use 100% cotton yarn and a dense stitch.
By following these steps and letting your creativity guide you in terms of color and stitch arrangement, you can create a unique and beautiful Oval Frutare Foliage Mat that will add a charming, handcrafted touch to your home decor. Happy crocheting!
Video tutorial:


