
Introduction: The Perfect Blend of Comfort and Craftsmanship
Welcome to a new crafting adventure! Today, we’re sharing a delightful and incredibly popular pattern for a Crochet Baby Romper (Overall). This design is loved for its soft drape, comfortable fit, and simple construction that makes it perfect even for beginners who are familiar with basic double crochet.
Using a beautiful, repeating block stitch (similar to a modern Granny Square technique), this romper works up quickly and results in a wonderfully stretchy and comfortable garment. We’ll be working the top panel (the yoke) in flat rows to create two identical pieces, which are then seamlessly joined before moving onto the legs.

This romper can be made in any color—solid, variegated, or stripes—and makes an exceptional gift or a cherished piece of handmade baby wear. Let’s gather our supplies and start stitching this adorable piece for the little one in your life!
Section 1: Materials, Tools, and Sizing
The key to the beautiful drape of this overall is a slightly lighter yarn weight paired with a moderately sized hook.
| Material/Tool | Recommendation | Notes |
| Yarn | Double Knitting (DK) Weight, Category 3 Light Worsted (approx. 200-300g for the main color) | Choose a soft, machine-washable blend (e.g., acrylic or cotton blend). |
| Hook | 4.0 mm (G/6) Crochet Hook | This size is used for all sizes to maintain consistency. |
| Notions | Yarn Needle, Scissors, 2 Buttons (approx. 2cm wide), Stitch Markers (optional). | You only need 1 ball of the main color and a small amount of a contrast color if desired. |
Vital Sizing Chart: Yoke Rows
The size of the overall is determined by the number of rows you work in the initial yoke panel. You will need to make two identical pieces based on the chart below.
| Baby Size | Total Yoke Rows Needed (Each Panel) |
| 0-3 Months | 8 Rows |
| 3-6 Months | 9 Rows (Demonstrated Size) |
| 6-12 Months | 11 Rows |
| 1-2 Years | 12 Rows |
Section 2: Stitches and Techniques
This pattern relies heavily on the Double Crochet (DC) and Post Stitch Ribbing for the trim and straps.
| Abbreviation | Full Name | Notes |
| CH | Chain | |
| SL ST | Slip Stitch | |
| DC | Double Crochet | |
| CH-SP | Chain Space | |
| FPDC | Front Post Double Crochet | Creates a raised ridge for ribbing (worked around the post of the stitch). |
| BPDC | Back Post Double Crochet | Creates a recessed ridge for ribbing (worked around the post of the stitch). |
| DC Cluster | 3 Double Crochet stitches worked into the same space. | This is the foundation block of the pattern. |
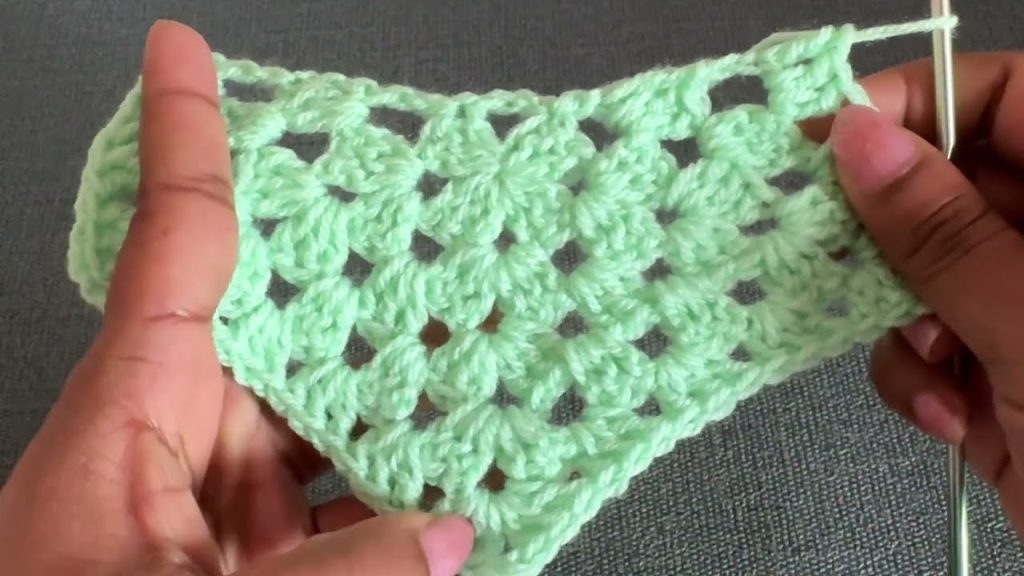
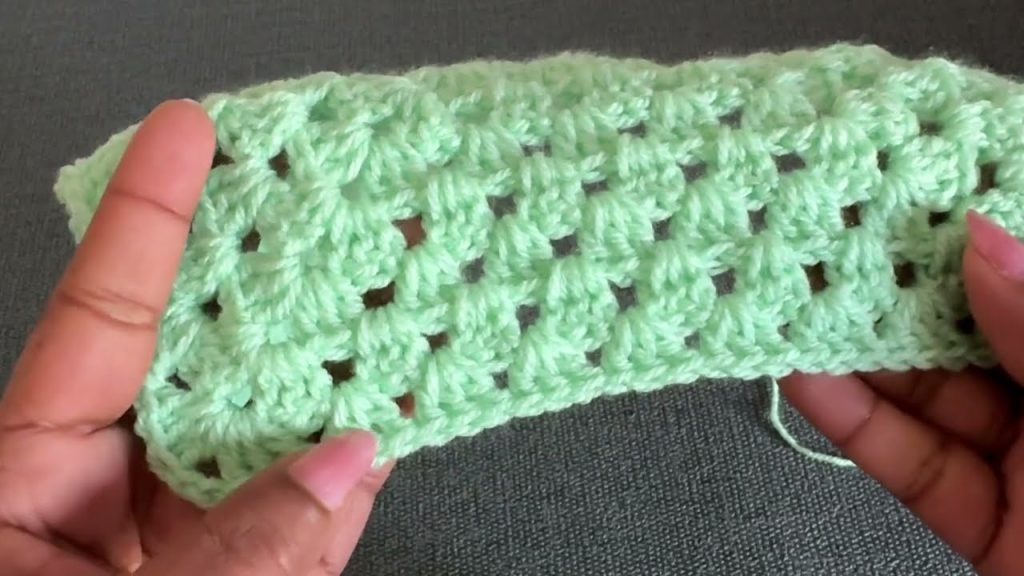
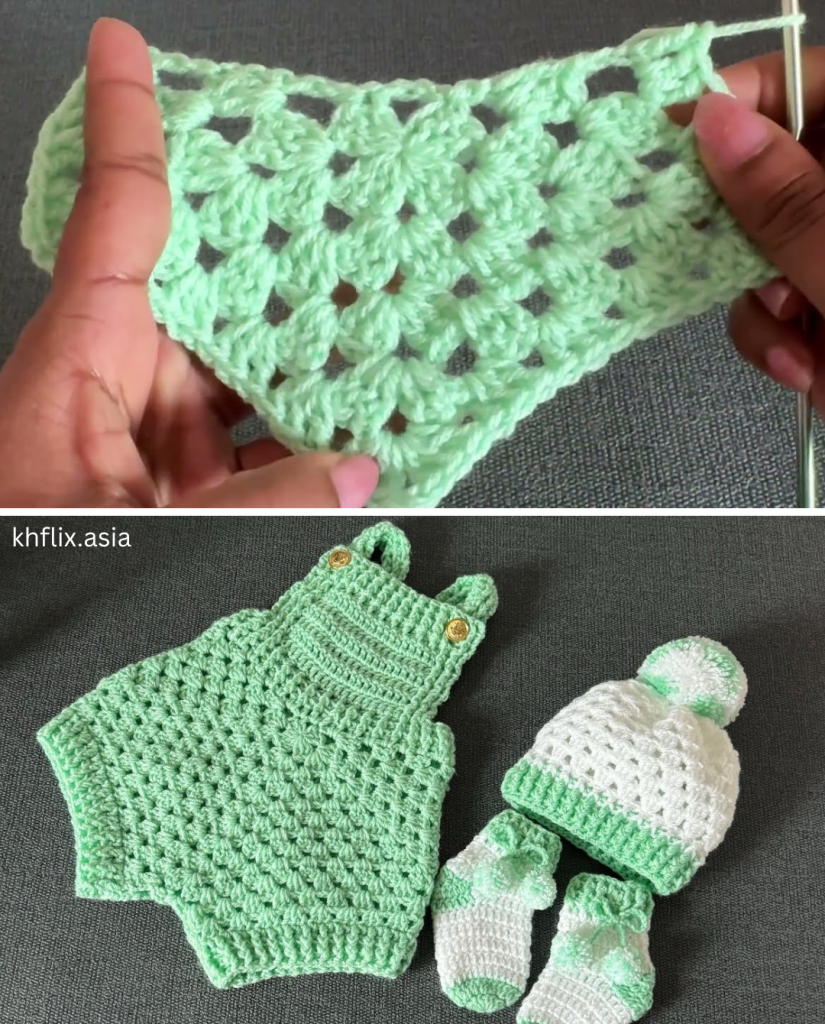
Step 1: The Yoke (Top Panel) Construction
You will create a flat, three-cornered piece. Remember to make two identical pieces!
Foundation: Begin with a Magic Ring.
Row 1 (Right Side – RS):
- CH 3 (counts as 1st DC). DC 2 into the ring. (First DC Cluster)
- CH 2 (First Corner). DC 3 into the ring.
- CH 2 (Second Corner). DC 3 into the ring.
- CH 2 (Third Corner). DC 3 into the ring.
- CH 2 (Fourth/Last Corner, but we will modify this).
- Gently pull the tail to close the Magic Ring.
- SL ST into the top of the beginning CH 3. (You will have 4 clusters and 4 chain-2 spaces)
Row 2 (Starting the Flat Row):
- CH 4 (counts as DC + CH 1). Turn your work.
- Skip the next 3 DC.
- Into the next CH-2 corner space: (DC 3, CH 2, DC 3). (This is your first true corner)
- Skip the next 3 DC. Into the next CH-2 space: (DC 3, CH 2, DC 3). (Second true corner)
- Skip the next 3 DC. Into the next CH-2 space: (DC 3, CH 2, DC 3). (Third true corner)
- Skip the next 3 DC. CH 1. DC into the top of the starting CH 3 of the previous row. (This creates the flat edge and the turning space)
Row 3:
- CH 3 (counts as 1st DC). Turn your work.
- DC 2 into the CH-1 space created by the CH 4 turn. (First DC Cluster on the flat edge)
- DC 3 into the next CH-1 space between the DC clusters.
- Continue DC 3 into each space until you reach the next CH-2 corner space.
- Corner Repeat: Into the corner space, work (DC 3, CH 2, DC 3).
- DC 3 into the next CH-1 space, repeating across the side.
- Repeat the Corner Repeat (DC 3, CH 2, DC 3) for the remaining two corners.
- At the end of the row, into the turning CH-4 space, work: DC 2. DC into the 3rd chain of the starting CH 4 from the previous row.
Row 4:
- CH 4 (counts as DC + CH 1). Turn your work.
- DC 3 into the next space between DC clusters.
- Continue DC 3 into each space until the CH-2 corner.
- Corner Repeat: Into the corner space, work (DC 3, CH 2, DC 3).
- Continue DC 3 in all spaces and repeat the Corner Repeat at the remaining two corners.
- At the end of the row, CH 1. DC into the top of the starting CH 3 of the previous row.
Continue Pattern:
- Odd Rows (RS): Start with CH 3, end with DC 2 + 1 DC into the turning chain.
- Even Rows (WS): Start with CH 4, end with CH 1 + 1 DC into the turning chain.
- Repeat Rows 3 & 4 until you have reached the total number of rows required for your size (see Sizing Chart).
Step 2: Joining the Bodice Pieces
- Once both pieces are complete, place them right sides together, aligning the edges.
- Using your yarn needle and a long tail of yarn, seam the two pieces along the top and down the side using the Whipstitch or Mattress Stitch (working through the back loop of one piece and the front loop of the other) for a neat, flat finish.
- The three open corners from the yoke are now the bottom of the romper, which we will use to start the legs.
Step 3: Creating the Pant Legs
We will now work around one of the open leg holes in continuous rounds.
Round 1 (Starting the Leg):
- Attach yarn at the center of the inner seam (where the two panels were joined).
- CH 3 (counts as 1st DC). DC 2 into the same space. (First DC Cluster)
- DC 3 into the next available space between clusters, and continue around the entire leg opening until you reach the next corner.
- Closing the Crotch Gap (Crucial Step): The next two DC are worked by joining the two front corners together.
- DC 1 into the CH-2 corner space of the first panel.
- DC 1 by inserting the hook through both corner chain spaces (one from each panel) and completing the DC. (This is the center stitch that closes the gap.)
- SL ST to the top of the starting CH 3 to join the round.
Rounds 2 – 6 (Leg Body):
- SL ST into the next DC, and SL ST into the space between the clusters.
- CH 3, DC 2 into the same space.
- DC 3 into every space between the DC clusters around the leg.
- SL ST to join at the top of the starting CH 3.
- Continue repeating this pattern until the leg reaches the desired length before the cuff (e.g., 6 rounds for 0-6 months).
The Ribbed Cuff
- Round 7 (Transition to DC): CH 3 (counts as 1st DC). DC in every stitch around the entire leg. SL ST to join. (This prepares for the post stitches)
- Round 8 (Ribbing Start): CH 3 (counts as 1st DC). *(FPDC around the next DC post, BPDC around the next DC post)* repeat from * to * around. SL ST to join.
- Round 9 & 10: CH 3. Continue working FPDC over FPDC and BPDC over BPDC. SL ST to join.
- Fasten off and weave in ends.
Repeat Step 3 for the second leg.
Step 4: The Waistband and Bib
The overall is worked downwards, but we now return to the top opening to create the ribbed waist and front bib.
The Ribbed Waistband (Rounds)
- Attach yarn to the edge of the top opening (the area that was Row 1 of the yoke).
- Round 1 (Waistband Base): CH 3 (counts as 1st DC). Work DC stitches evenly around the entire opening. (Aim to work 2 DC into the side of each DC block/row edge for a snug fit. The exact number of stitches should be a multiple of two for the ribbing.) SL ST to join.
- Round 2 (Ribbing Start): CH 3. Work FPDC and BPDC alternately around the entire round. SL ST to join.
- Round 3: CH 3. Continue working FPDC over FPDC and BPDC over BPDC. SL ST to join.
The Front Bib (Flat Rows)
- The bib is worked in flat rows across the front center panel of the overall.
- Mark Your Stitches: On the finished Round 3 of the waistband, count the center stitches you need for your size (e.g., 19 DC for 3-6 months) and mark the beginning and end points.
- Row 1 (Setup): Attach yarn at your first stitch marker. CH 3 (counts as 1st DC). DC in each marked stitch across the front panel. Turn.
- Rows 2 – 7 (Bib Height): CH 3. DC in every stitch across. Turn. (Work 7 rows total of plain DC for the main bib height).
- Row 8 (Ribbing Start): CH 3. Work alternating FPDC and BPDC across the row. Turn.
- Row 9 & 10 (Ribbing): CH 3. Continue working FPDC over FPDC and BPDC over BPDC. Turn.
Finishing: Fasten off and weave in ends.
Step 5: The Straps (The Belts)
The straps are made using the same comfortable ribbed pattern and are attached to the top back corners of the overall.
- Mark Your Strap Placement: On the top back edge, skip the first 5 stitches from the edge and mark the next 6 stitches for the strap width.
- Row 1: Attach yarn to the first marked stitch. CH 3 (counts as 1st DC). Work FPDC/BPDC alternately across the 6 marked stitches. Turn.
- Row 2: CH 3. Continue working FPDC over FPDC and BPDC over BPDC across the 6 stitches. Turn.
- Continue Repeating Row 2 until the strap reaches the necessary length (e.g., 22 rows for 0-6 months, or approximately 10-12 inches).
- Fasten off and weave in ends.
- Repeat the entire strap process on the opposite back corner.
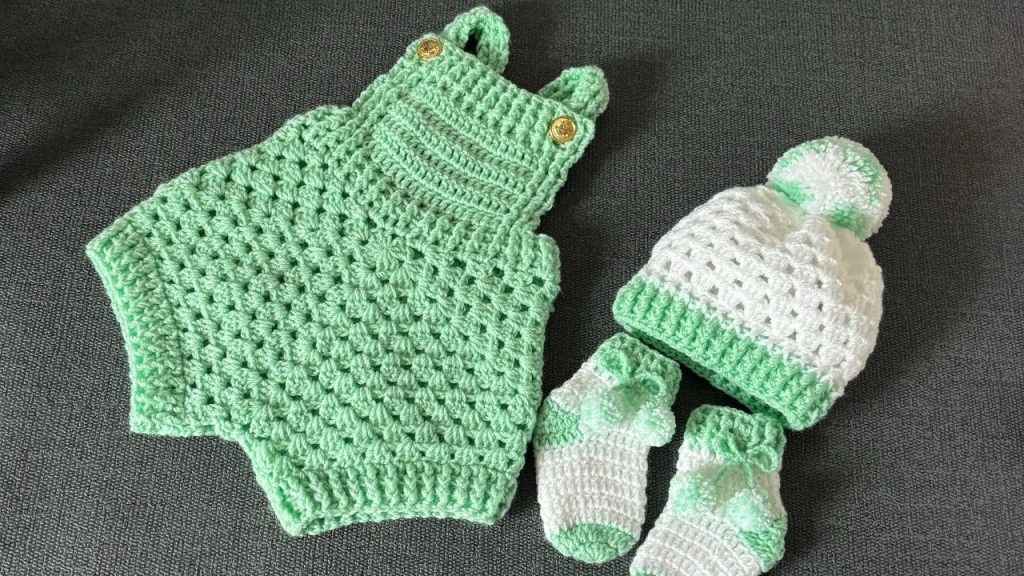
Final Touches
- Attach your buttons securely to the bottom corners of the front bib panel.
- Because the strap is worked in post stitches, the natural gaps between the posts can serve as the buttonholes, meaning no extra buttonhole row is needed! Simply loop the strap around the button to secure.
Conclusion: A Cherished Keepsake
Congratulations! You have successfully crocheted a beautiful, textured, and functional baby overall. This simple block stitch design yields a final product that looks intricate and durable.
This pattern is easily adjustable for any size, making it a versatile classic. Now all that’s left is to find the perfect little person to wear your handcrafted overall!
If you enjoyed this tutorial, be sure to share your finished project and check out more easy-to-follow patterns! Happy hooking!
Video tutorial:


