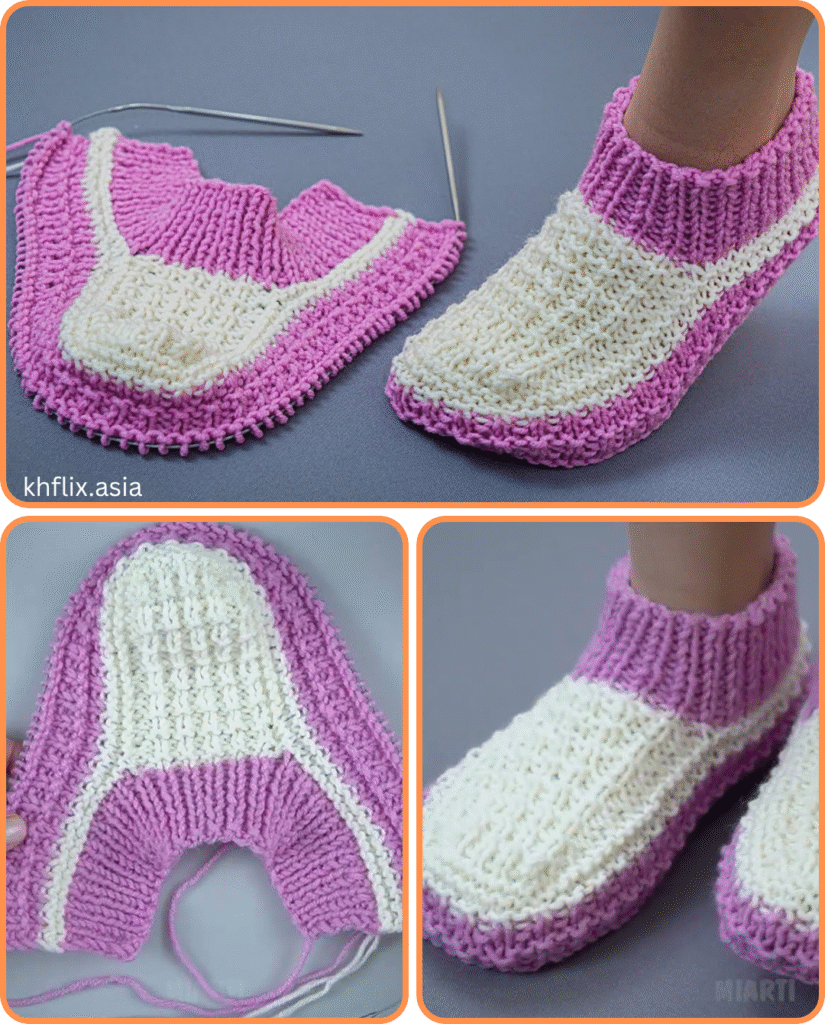
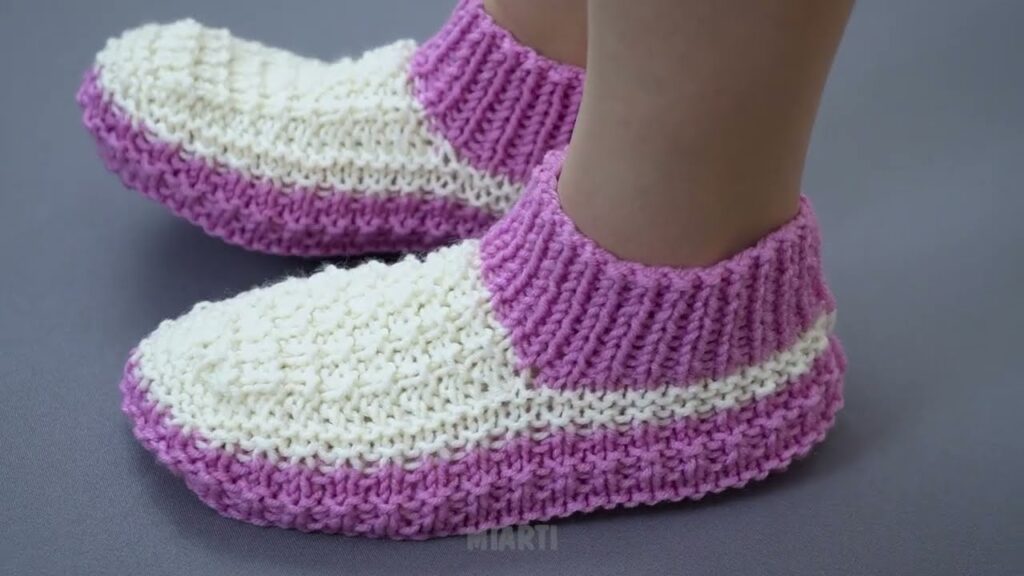
Knitting slippers without a seam on the sole is a wonderfully comfortable and satisfying project. The absence of a ridge underfoot makes for a truly luxurious feel. This detailed guide will walk you through creating a pair of seamless knitted slippers, which we’ll call the “Seamless Blossom” design, as a nod to the “Orchid” inspiration. We’ll focus on techniques that create a continuous, smooth fabric from the sole up, and suggest ways to incorporate a delicate, floral aesthetic.

Why Seamless Slippers?
- Ultimate Comfort: No bulky seam to rub or cause discomfort under your foot.
- Cleaner Finish: A more professional and polished look.
- Faster to Finish: Eliminates the need for seaming the sole, which can be tedious.
Before You Begin: Essential Information
- Skill Level: Intermediate (requires familiarity with knitting in the round, short rows, and basic decreases).
- Finished Size: Customizable (instructions for a women’s size 7-8 US, with notes on adjusting).
- Gauge: Crucial for sizing! Always check your gauge.
- Estimated Time: 6-10 hours, depending on your speed and embellishments.
Materials You’ll Need:
- Yarn:
- Worsted Weight (Aran/10-ply) yarn, approximately 200-250 yards.
- Recommended: Soft acrylic, wool, or a wool blend for warmth and comfort. Choose a color that evokes an orchid (e.g., lavender, deep purple, fuchsia, or a creamy white). A contrasting color for accents is optional.
- Knitting Needles:
- DPNs (Double-Pointed Needles) or Magic Loop Method: Two sets of 4.5 mm (US 7) knitting needles, or size needed to obtain gauge. You’ll need either 5 DPNs or two circular needles for the Magic Loop.
- Tapestry Needle: For weaving in ends.
- Scissors: For cutting yarn.
- Stitch Markers (optional but recommended): Especially helpful for marking the beginning of rounds or turning points in short rows.
- Non-Slip Fabric Paint or Suede Patches (optional but highly recommended): For added safety on smooth floors.
Abbreviations (US Knitting Terms):
- CO: Cast On
- BO: Bind Off
- k: knit
- p: purl
- st(s): stitch(es)
- rnd(s): round(s)
- pm: place marker
- sm: slip marker
- k2tog: knit 2 stitches together (right-leaning decrease)
- ssk: slip, slip, knit (left-leaning decrease)
- w&t: wrap and turn (for short rows)
- PU&K: pick up and knit (for short row wraps)
- RS: right side
- WS: wrong side
Understanding the Seamless Construction
These slippers are typically constructed in one piece, starting with the sole, then building up the sides, instep, and ankle. The key to the seamless sole is often achieved by knitting the initial stitches flat to form the base, then joining in the round, or by using short rows to shape the heel and toe without separate seaming. This pattern will primarily use a flat knitted base that is then picked up around.
Part 1: The Slipper Sole (Knitted Flat)
We will knit the sole flat first, then pick up stitches around its perimeter to form the sides.
Gauge Check (VERY IMPORTANT!): Before you begin, make a small swatch. CO 22 sts. Work in Stockinette stitch (k on RS, p on WS) for 15 rows. Your swatch should measure approximately 4 inches (10 cm) wide by 2.5 inches (6.5 cm) tall. Adjust needle size if necessary.
Instructions (Make 2):
- CO 10 stitches. (This determines the width of your sole. Adjust for wider/narrower feet).
- Row 1 (RS): K all sts.
- Row 2 (WS): P all sts.
- Increase Section (Toe Shaping):
- Row 3 (RS): K1, M1L (make one left), K to last st, M1R (make one right), K1. (12 sts)
- Row 4 (WS): P all sts.
- Row 5 (RS): K1, M1L, K to last st, M1R, K1. (14 sts)
- Row 6 (WS): P all sts.
- Row 7 (RS): K1, M1L, K to last st, M1R, K1. (16 sts)
- Row 8 (WS): P all sts.
- You should now have 16 stitches on your needle. This forms the wider part of the toe.
- Straight Section (Mid-Foot):
- Work in Stockinette stitch (k RS, p WS) for 20-24 rows (approx. 4-5 inches or 10-12 cm), or until the sole reaches the ball of your foot. Adjust for your desired length.
- Decrease Section (Heel Shaping):
- Next Row (RS): K1, k2tog, K to last 3 sts, ssk, K1. (14 sts)
- Next Row (WS): P all sts.
- Next Row (RS): K1, k2tog, K to last 3 sts, ssk, K1. (12 sts)
- Next Row (WS): P all sts.
- Next Row (RS): K1, k2tog, K to last 3 sts, ssk, K1. (10 sts)
- Next Row (WS): P all sts.
- BO all 10 stitches.
- You now have a flat, oval-shaped sole. Do not cut yarn yet if you plan to immediately pick up stitches from here. Otherwise, cut yarn leaving a long tail for later use.
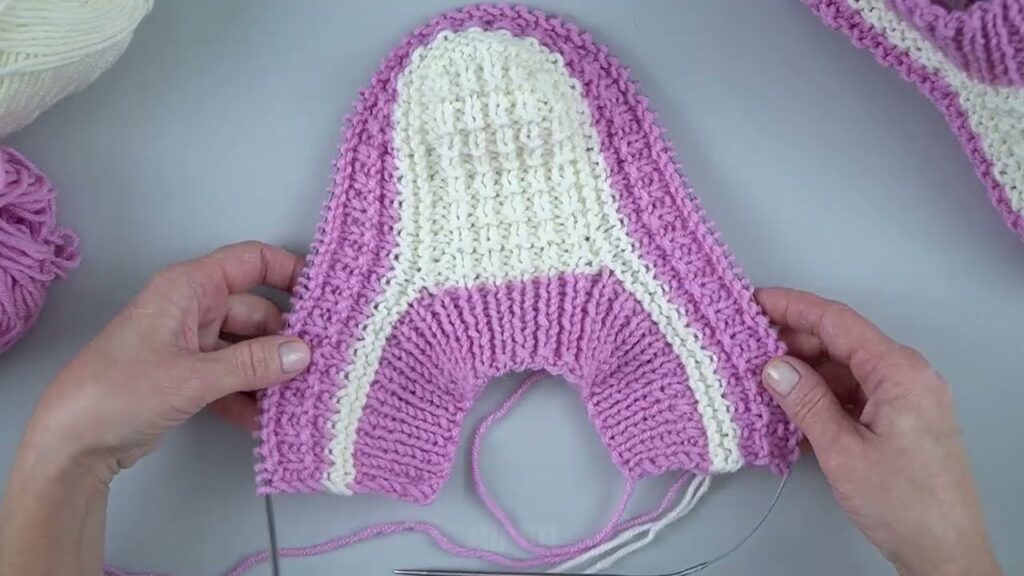
Part 2: Picking Up Stitches & Joining in the Round
This is the key step to creating the seamless body of the slipper.
Instructions:
- With the RS of your knitted sole facing you, begin picking up stitches.
- Using your DPNs or circular needle for Magic Loop, pick up and knit stitches evenly around the entire perimeter of the sole.
- Start at the center back of the heel (where you BO). Pick up 1 stitch in each bound-off stitch. (10 sts)
- Along the long side: Pick up 1 stitch for every row worked along the straight edge (approximately 28-32 stitches, depending on how many rows you did for the straight section). Aim for a neat edge.
- Around the toe: Pick up 1 stitch for every row worked around the toe increases (approximately 8-10 stitches).
- Along the other long side: Pick up the same number of stitches as the first long side (28-32 stitches).
- Around the other side of the heel: Pick up 1 stitch in each cast-on stitch. (10 sts)
- You should have approximately 84-94 stitches in total. Adjust this number to ensure it’s divisible by 2 or 4 for ribbing if you choose, but focus on picking up evenly to avoid gaps.
- Place a stitch marker to mark the beginning of the round. You are now working in the round.
Part 3: Building the Slipper Sides & Instep
We will now work the body of the slipper, tapering towards the instep.
Instructions:
- Rnds 1-5: Knit every round (Stockinette stitch in the round). This forms the initial wall of the slipper.
- Try on the slipper. It should start to cup your foot.
- Rnd 6 (Start of Instep Shaping):
- The number of stitches you decrease will depend on your total stitch count. The goal is to reduce stitches evenly across the top of the foot (the instep) while keeping the sides and heel consistent.
- Knit to the point where the toe begins to curve upwards (approximately 1/3 of your total stitches from the beginning of the round).
- Instep Decrease Section: K2tog, K to the point where the toe curve ends on the other side of the foot, ssk.
- Knit to the end of the round.
- Example: If you have 90 stitches, knit 30, k2tog, k 28, ssk, knit 28. (88 sts)
- Rnd 7: Knit every round.
- Rnd 8 (Repeat Instep Decrease): Repeat Rnd 6 decrease.
- Repeat these two rounds (decrease round, knit round) 2-4 more times, or until the slipper fits snugly over the top of your foot and feels secure. Continuously try it on!
- Important Note on Fit: This is where personal adjustment is key. The number of decreases and where you place them will dictate how high or low the instep comes up on your foot. Aim for a comfortable, snug fit without being too tight.
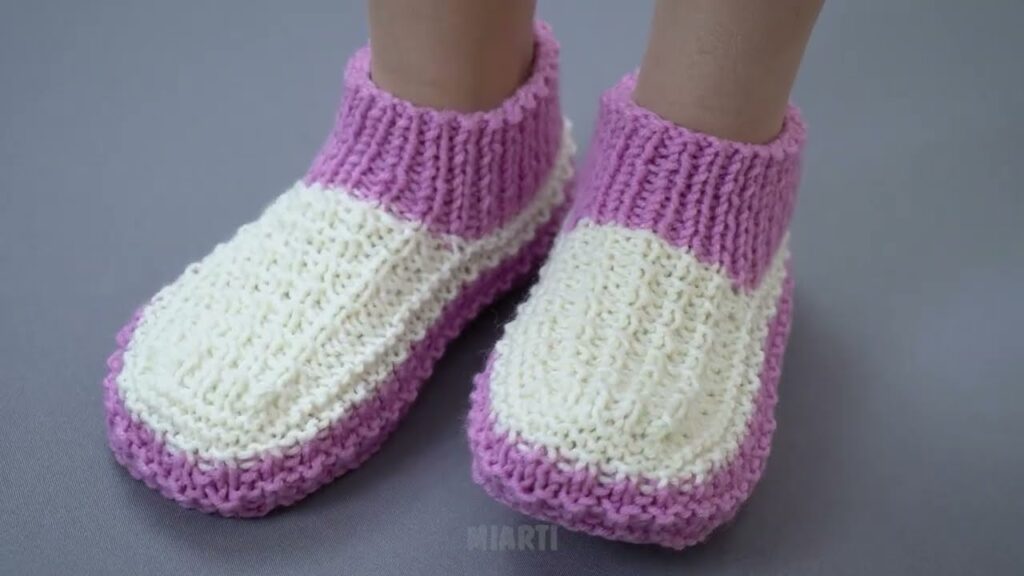
Part 4: The Ankle Cuff
This section adds height and a finished edge around the ankle.
Instructions:
- Work in k2, p2 ribbing (or k1, p1 ribbing, or garter stitch in the round by alternating knit and purl rounds for a rolled edge) for 10-15 rounds, or until the cuff reaches your desired height. Ribbing creates a stretchy and snug cuff that helps the slipper stay on.
- Make sure your stitch count is divisible by 4 for k2, p2 ribbing. If not, make a few strategic k2tog or M1 stitches on the first ribbing round to adjust, ensuring they are not too visible.
- BO in ribbing. Using a stretchy bind-off method (like Jenny’s Surprisingly Stretchy Bind-Off or a standard bind-off that mimics the ribbing) will ensure the cuff isn’t too tight.
Part 5: Finishing Touches & “Orchid” Embellishments
This is where you bring the “Blossom” to your seamless slippers!
- Weave in all ends: Use your tapestry needle to neatly weave in any loose yarn tails.
- Add Non-Slip Soles (Highly Recommended):
- Turn your slipper inside out (if using paint) or work on the bottom of the sole.
- Apply non-slip fabric paint in dots, lines, or a fun pattern on the bottom of the sole. Follow the manufacturer’s instructions for drying time. This prevents slipping on smooth floors.
- Alternatively, you can hand-stitch or glue a piece of suede or non-slip material to the sole.
- “Orchid” Embellishments:
- Color Choice: Your initial yarn color can set the tone (lavender, fuchsia, deep purple, or even a soft green for leaves).
- Simple Knitted Flower: Knit a small, flat flower (there are many free patterns for knitted flowers online) and sew it onto the top of the instep or on the side of the ankle. Use a contrasting color (e.g., a darker purple on a lighter purple slipper, or a yellow center for a white orchid).
- Embroidered Details: Using a finer yarn or embroidery floss, embroider small lines or dots on the instep to suggest orchid petals or veins.
- Beads: Sew on a few small, iridescent beads onto the knitted flower or directly onto the slipper for a touch of sparkle, mimicking dew drops or the intricate centers of some orchids.
- Lace/Eyelets in Cuff: For a more delicate look, incorporate a simple eyelet row into your cuff (k2tog, yo) or choose a more elaborate lace pattern for the cuff if you’re an experienced knitter. This can suggest the delicate nature of orchid petals.

Caring for Your Knitted Slippers:
- Hand Wash: Most yarn is best hand-washed in cool water with a mild detergent.
- Gently Squeeze: Don’t wring them out. Gently squeeze excess water.
- Reshape and Air Dry Flat: Lay flat on a clean towel or drying rack. Avoid direct heat or sunlight which can shrink or damage the yarn.
- Non-Slip Paint Care: If you used fabric paint, check the product’s care instructions.
Tips for Success:
- Read Through: Read the entire pattern before you start to familiarize yourself with the steps.
- Count Your Stitches: Always count your stitches at the end of each section/round to ensure accuracy.
- Try On Frequently: This is a personalized item. Trying it on as you go is the best way to ensure a perfect fit, especially during the instep shaping.
- Don’t Fear Mistakes: Knitting is forgiving. If you make a mistake, it’s often easy to unravel a few rows and try again.
- Be Patient with DPNs/Magic Loop: If you’re new to these methods, it can take a little practice, but they are essential for seamless knitting.
- Enjoy the Process! The beauty of handmade items lies in the care and effort you put into them.
These seamless knitted slippers will provide unparalleled comfort, and with your “Orchid” inspired embellishments, they’ll be a beautiful addition to your loungewear! Happy knitting!
Video tutorial: