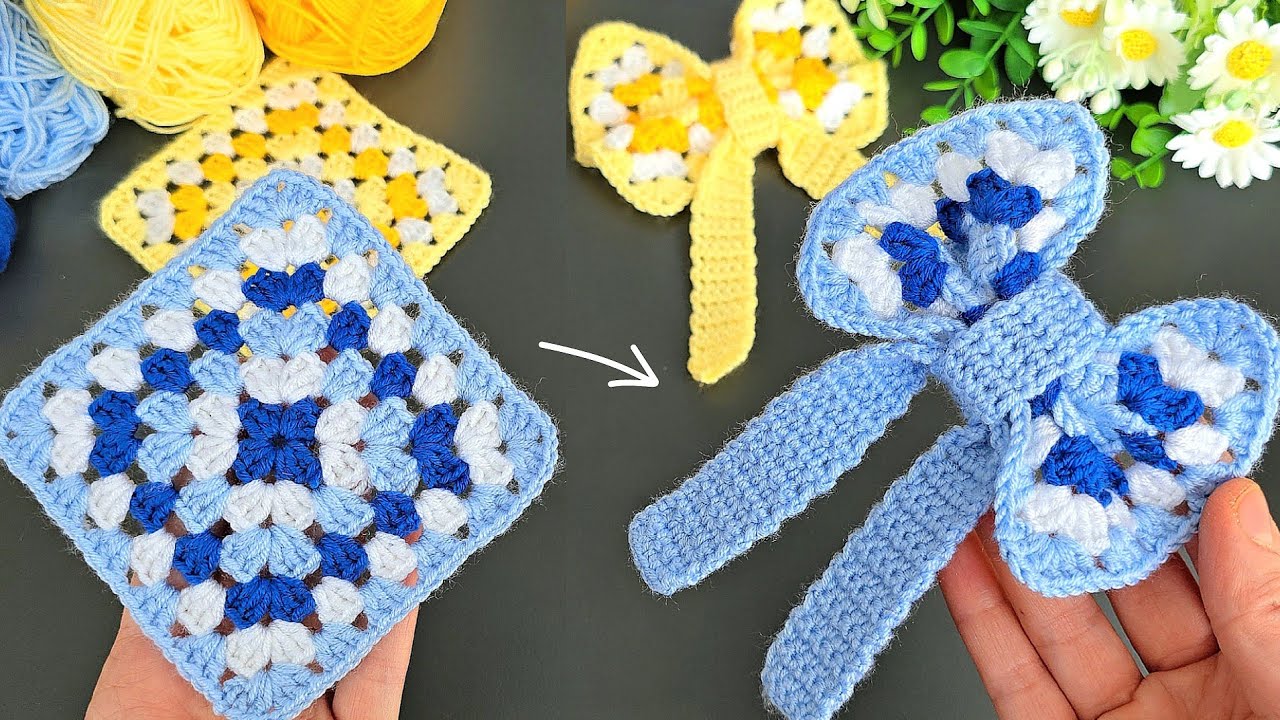
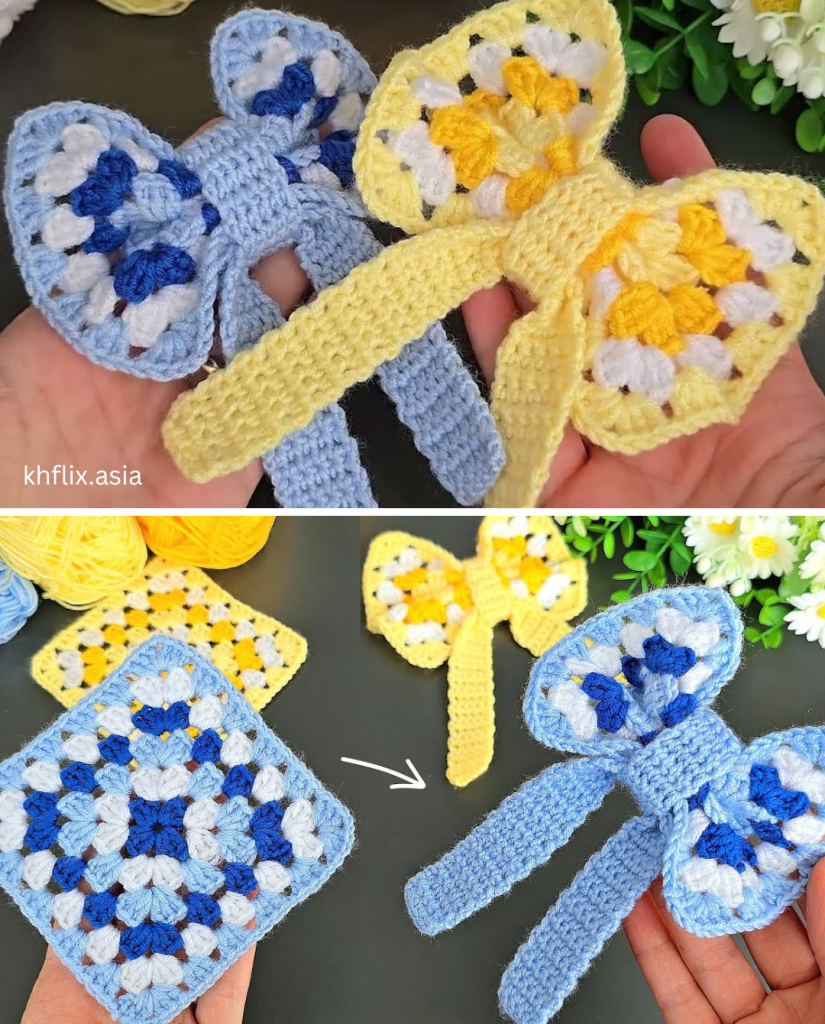
In the world of handmade crafts, the “Granny Square” is a timeless icon. But what happens when you take that classic motif and give it a modern, trendy twist? You get the Crochet Granny Square Bow—a viral “WOW Idea” that is taking the crafting community by storm as we move into 2025 and 2026.
Inspired by the brilliant tutorial from Knitting Love, this project is the perfect marriage of vintage charm and contemporary style. Whether you’re looking for a fast project to sell at local markets or a heartfelt handmade gift, this pattern is your new secret weapon.

Why You’ll Love This Project
- Zero-Waste Friendly: It’s a fantastic “scrap buster” for those leftover bits of yarn.
- Beginner-Approved: If you can crochet a square, you can make this bow.
- High Profit Margin: Minimal materials + fast production time = a great item for your Etsy shop.
- Versatile: Use it as a hair clip, a bag charm, an ornament, or even a stylish gift topper.
The Shopping List (Materials)
Before you start, gather these essentials. The key to a professional look is choosing colors that pop!
- Yarn: Light-weight cotton or acrylic (Category 3 or 4).
- Crochet Hook: A 3.5mm or 4.0mm hook usually works best for structure.
- Darning Needle: For weaving in those pesky ends.
- Scissors: To snip your success.
- Accessories: Alligator clips (for hair), keyrings, or twine for ornaments.
The Pattern: Step-by-Step Instructions
Phase 1: The Foundation Square
We begin with a traditional granny square base. This provides the “body” of your bow.
- Start: Create a magic ring or chain 4 and join with a slip stitch to form a circle.
- Round 1: Chain 3 (counts as 1 DC). Work 2 DC into the ring, Chain 2. Work 3 DC, Chain 2 three more times. Slip stitch to the top of the starting chain. (You should have 4 clusters of 3 DC).
- Round 2: Slip stitch to the first corner space. Chain 3, 2 DC, Ch 2, 3 DC in the same space (this is your first corner). Chain 1, then work (3 DC, Ch 2, 3 DC) in the next corner. Repeat from * to * for the remaining corners.
- Round 3: Continue the pattern for one more round to ensure the bow has enough surface area to “pinch” effectively. Fasten off and weave in ends.

Phase 2: From Square to Bow (The Magic Step)
This is where the “WOW” happens!
- The Pinch: Lay your square flat. Pinch the center of the square tightly, pulling the top and bottom edges toward the middle. This naturally creates the “butterfly” or “bow” shape.
- The Bind: Take a long strand of matching yarn and wrap it tightly around the pinched center several times. Tie it securely at the back.

Phase 3: The Center Band
To give it that polished, professional finish, we create a small rectangular band to cover the binding.
- The Band: Chain 6. Work single crochets (SC) in each stitch across for 4–5 rows (or until it’s long enough to wrap around the center of your bow).
- Assembly: Wrap the band around the center and sew the ends together at the back of the bow.

Making it Profitable: 3 Pro Tips for Sellers
If you’re following the Knitting Love philosophy of “Make & Sell,” keep these tips in mind:
- The “Bundle” Strategy: Instead of selling one bow for $5, sell a “Seasonal Trio” for $12. Customers love curated color palettes (e.g., Pastels for Spring, Earth Tones for Fall).
- Add Value with Packaging: Pin the bows onto a piece of branded cardstock. A simple “Handmade with Love” stamp can increase the perceived value significantly.
- Cross-Platform Marketing: Use the hashtags mentioned in the referral video, such as
#CrochetBow,#DIYGift, and#Crochet2025, to reach a wider audience on Instagram and TikTok.
Final Thoughts
The Crochet Granny Square Bow is more than just an accessory—it’s a testament to how simple techniques can produce extraordinary results. It captures the heart of the “Slow Made” movement while being efficient enough for a busy crafter’s schedule.
Video tutorial:


