
In the delightful world of crafting, few things combine charm, creativity, and a touch of heartfelt whimsy quite like crochet. And among the myriad of possibilities, crochet daisy flowers with faces stand out as a particularly endearing and versatile decoration. These cheerful little blooms, imbued with personality through their embroidered or appliquéd expressions, offer a unique way to brighten any space and bring a smile to anyone’s face.
More Than Just a Flower: A Personality in Petals
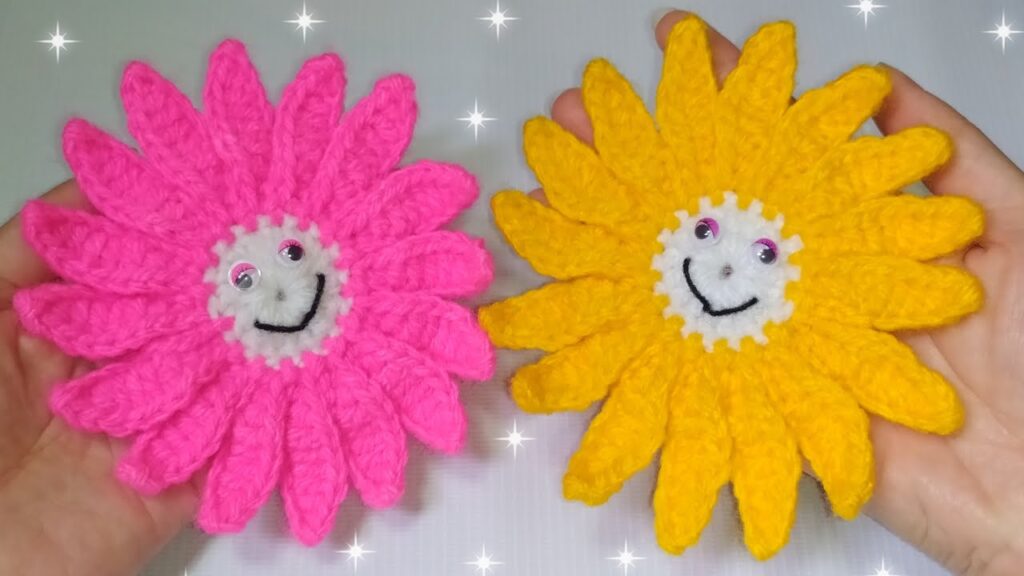
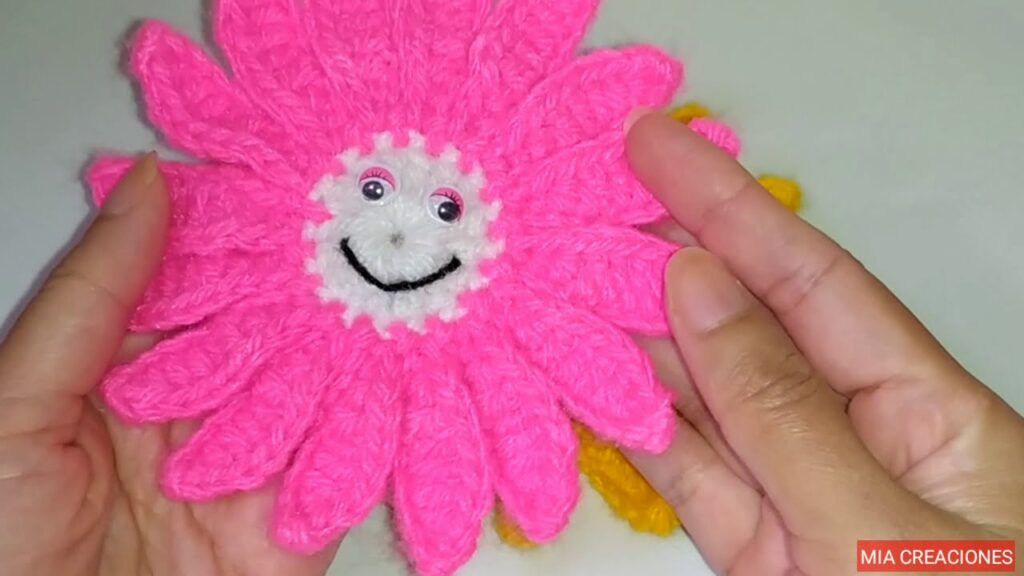
What elevates a simple crochet daisy to a captivating decorative piece is the addition of a face. These aren’t just generic floral motifs; they become characters, each with its own subtle expression. From sleepy eyelids and rosy cheeks to wide-eyed wonder and mischievous grins, the faces transform a two-dimensional object into something that feels alive and interactive.
This humanization of a natural form taps into a universal appeal. We are drawn to faces, and when they appear in unexpected places, they spark joy and curiosity. For crafters, it’s an opportunity to express their creativity beyond just stitches, delving into character design and storytelling through thread.
The Allure of the Crochet Daisy
Before we delve into the “faces,” let’s appreciate the humble crochet daisy itself. Daisies are iconic symbols of innocence, purity, and new beginnings. Their simple, symmetrical form with a bright yellow center and contrasting white (or colorful) petals makes them instantly recognizable and universally loved.
In crochet, the daisy is a relatively straightforward pattern, making it accessible to beginners while still offering enough scope for experienced crocheters to experiment with different yarn weights, hook sizes, and petal variations. This ease of creation is a significant factor in their popularity as decorative items.
Crafting a Character: Bringing Faces to Life
The magic truly begins when you add the face. There are several popular methods for doing this, each offering a distinct aesthetic:
- Embroidered Faces: This is perhaps the most common and versatile method. Using embroidery floss, you can create a wide range of expressions. Simple French knots for eyes, a straight stitch for a smiling mouth, or a few satin stitches for rosy cheeks can instantly bring a daisy to life. The beauty of embroidery is the precision and detail it allows, letting you create delicate expressions.
- Safety Eyes and Noses: For a more three-dimensional and toy-like feel, safety eyes and noses (typically used in amigurumi) can be incorporated. These plastic components snap securely into the fabric, providing a durable and child-safe option. While they offer less expressive flexibility than embroidery, they create a distinctively charming look.
- Felt Appliqué: Small pieces of felt can be cut and stitched onto the daisy to create eyes, mouths, and cheeks. This method adds a lovely textural contrast and allows for bolder, more graphic expressions. You can layer different colors of felt to create depth and intricate details.
- Fabric Paint/Markers: For a quick and easy approach, fabric paint or markers can be used to draw on faces. While this might lack the tactile quality of other methods, it’s a good option for those looking for a fast way to add personality.
Versatile Decorations for Every Space
The beauty of crochet daisy flowers with faces lies in their incredible versatility as decorative elements. Their compact size and inherent cheerfulness make them suitable for a vast array of applications:
- Home Decor:
- Garlands and Banners: String them together to create a whimsical garland for a child’s room, a nursery, or even a patio.
- Coasters and Trivets: Larger versions can serve as charming coasters or trivets, adding a pop of color and personality to your tabletop.
- Pillow Embellishments: Stitch them onto throw pillows to instantly add a touch of handmade charm and unique character to your living space.
- Curtain Tie-Backs: Use them to hold back curtains, bringing a playful element to your windows.
- Framed Art: Arrange a cluster of different-faced daisies in a shadow box or frame for a unique piece of wall art.
- Vase Fillers: Create a “bouquet” of stemmed crochet daisies with faces for a never-wilting, endlessly cheerful floral arrangement.
- Fashion and Accessories:
- Brooches and Pins: Attach a pin back to the reverse to create adorable brooches for jackets, bags, or hats.
- Hair Accessories: Secure them to hair clips, headbands, or elastic ties for delightful hair ornaments.
- Bag Charms: Use them as cheerful charms to adorn handbags, backpacks, or keychains.
- Gifts and Favors:
- Gift Toppers: Attach them to wrapped gifts for a personalized and extra-special touch.
- Party Favors: Give them as delightful and memorable party favors for birthdays, baby showers, or garden parties.
- Bookmark Companions: Attach them to a sturdy piece of ribbon to create unique and charming bookmarks.
- Nursery and Children’s Items:
- Mobile Elements: Incorporate them into a baby mobile for a soothing and engaging visual experience.
- Teethers and Rattles: (Ensure all components are securely attached and child-safe if making for babies).
- Playroom Decor: Adorn toy storage bins, shelves, or play mats with these friendly faces.
Tips for Crocheting Your Own Faced Daisies
- Yarn Choice: Cotton yarn is often preferred for its crisp stitch definition and durability, especially for items that might be handled frequently. Acrylic yarn is also a good, affordable option with a wide range of colors.
- Hook Size: Match your hook size to your yarn weight to achieve the desired tension and fabric density.
- Facial Expressions: Experiment with different eye shapes (dots, sleepy lines, open circles), mouth shapes (smiles, ovals, straight lines), and blush placement to create a variety of personalities. Look at emojis or cartoon characters for inspiration.
- Stiffening (Optional): For decorations that need to hold their shape, consider lightly stiffening your finished daisies with a fabric stiffener or a diluted PVA glue solution.
- Attachment Methods: For attaching to other items, use a yarn needle to securely stitch them in place, or hot glue for a quicker, though less durable, option (especially if the item will be washed).
The Enduring Appeal
In a world increasingly dominated by mass-produced items, the charm of handmade crochet daisy flowers with faces stands out. They offer a touch of warmth, personality, and bespoke artistry that machine-made decorations simply cannot replicate. Whether you’re a seasoned crocheter or a curious beginner, embarking on the creation of these cheerful blooms is a rewarding experience that promises to infuse your surroundings with a delightful dose of handmade happiness. So grab your hook, choose your yarn, and let your imagination blossom into a field of smiling crochet daisies!
How to make Crochet Daisy Flowers with Faces for Decorations
You’re ready to dive into making your own adorable crochet daisy flowers with faces! That’s fantastic. While I can’t physically show you how to crochet, I can provide you with a detailed step-by-step guide and essential tips to get you started.
Before You Begin: Essential Supplies
Here’s what you’ll need to gather:
- Yarn:
- Yellow yarn: For the daisy center. A bright yellow is classic!
- White yarn: For the petals.
- Black or dark brown embroidery floss: For embroidering the eyes and mouth.
- Pink or light red embroidery floss (optional): For rosy cheeks.
- Crochet Hook: Choose a hook size that is appropriate for your yarn weight. The yarn label will usually recommend a hook size. For smaller, more delicate flowers, use a smaller hook (e.g., 2.5mm or 3.0mm with DK weight yarn). For larger, sturdier flowers, use a larger hook.
- Tapestry Needle (Yarn Needle): Essential for weaving in ends and, most importantly, for embroidering the faces.
- Scissors: For cutting yarn.
- Stitch Marker (optional but recommended): Especially helpful for working in rounds to keep track of your stitches.
- Polyester Fiberfill (optional): If you want a slightly puffed-out center for your daisy.
Basic Crochet Stitches You’ll Need to Know
Most daisy patterns use these common stitches (US crochet terminology):
- Chain (ch): The foundation of your work.
- Slip Stitch (sl st): Used to join rounds and finish off.
- Single Crochet (sc): A basic, tight stitch.
- Half Double Crochet (hdc): Taller than an sc, shorter than a dc.
- Double Crochet (dc): A common, taller stitch.
- Magic Ring (or Magic Circle/Adjustable Ring): A common way to start working in the round without a hole in the center. If you’re new to this, search for “magic ring tutorial” on YouTube – it’s a game-changer!
General Pattern Structure for a Daisy Flower
Most crochet daisies follow a similar structure:
- Center: A small yellow circle.
- Petals: White (or colored) petals worked around the yellow center.
Step-by-Step: Crocheting a Basic Daisy (and then adding a face!)
Here’s a common pattern. You can find many variations online, but this will give you a solid foundation.
Part 1: The Yellow Center
- Start with a Magic Ring: Using your yellow yarn, create a magic ring.
- Alternative: Ch 2, then work all stitches into the 2nd chain from your hook.
- Round 1: Ch 1 (does not count as a stitch), then work 6 single crochet (sc) stitches into the magic ring. Pull the tail of the magic ring tight to close the hole. Join with a slip stitch (sl st) to the first sc. (6 stitches)
- Round 2: Ch 1, then work 2 sc in each stitch around. Join with a sl st to the first sc. (12 stitches)
- For a slightly larger center: You could add another round: Ch 1, (sc in next stitch, 2 sc in next stitch) repeat 6 times around. Join with a sl st. (18 stitches)
- Fasten Off: Cut your yellow yarn, leaving a tail of about 6 inches. Pull the tail through the loop on your hook to secure the stitch. Weave in the starting tail of the magic ring securely. You can also weave in the finishing tail of the yellow center now, or wait until after the petals are added, especially if you’re stuffing it.
Part 2: The White Petals
- Join White Yarn: Attach your white yarn to any stitch on the edge of your yellow center using a slip stitch.
- Create Petals (Method 1: Chain and Slip Stitch Petals)
- This method creates a simple, rounded petal.
- Ch 5 (this will be the height of your petal).
- Work a slip stitch (sl st) into the 2nd chain from your hook.
- Work a single crochet (sc) into the next chain.
- Work a half double crochet (hdc) into the next chain.
- Work a double crochet (dc) into the last chain.
- Now, sl st into the next stitch on the yellow center. This completes one petal.
- Repeat the entire petal sequence (Ch 5, sl st, sc, hdc, dc, then sl st into the next stitch on the yellow center) until you have petals all around the yellow center. You should have 6 or 12 petals depending on your center size and how many stitches you skip.
- Join with a sl st to the beginning.
- Create Petals (Method 2: Cluster Petals)
- This method creates a slightly puffier petal.
- Ch 2 (counts as first hdc). Work 2 more hdc into the same stitch.
- Then, ch 2 and sl st into the same stitch. This forms one petal.
- Sl st into the next stitch on the yellow center.
- Repeat the entire petal sequence (Sl st into next stitch, Ch 2, 2 hdc in same stitch, Ch 2, sl st in same stitch) around the yellow center.
- Join with a sl st to the beginning.
- Fasten Off: Cut your white yarn, leaving a tail long enough to weave in securely. Pull the tail through the loop on your hook to secure. Weave in all remaining loose ends.
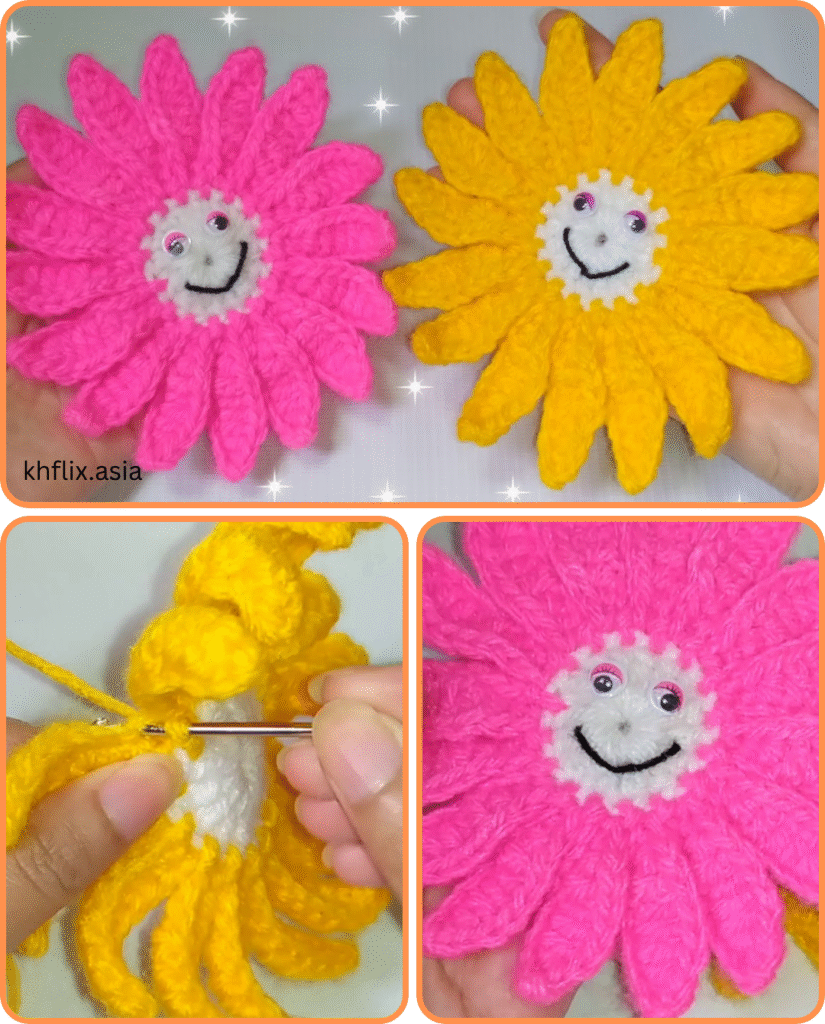
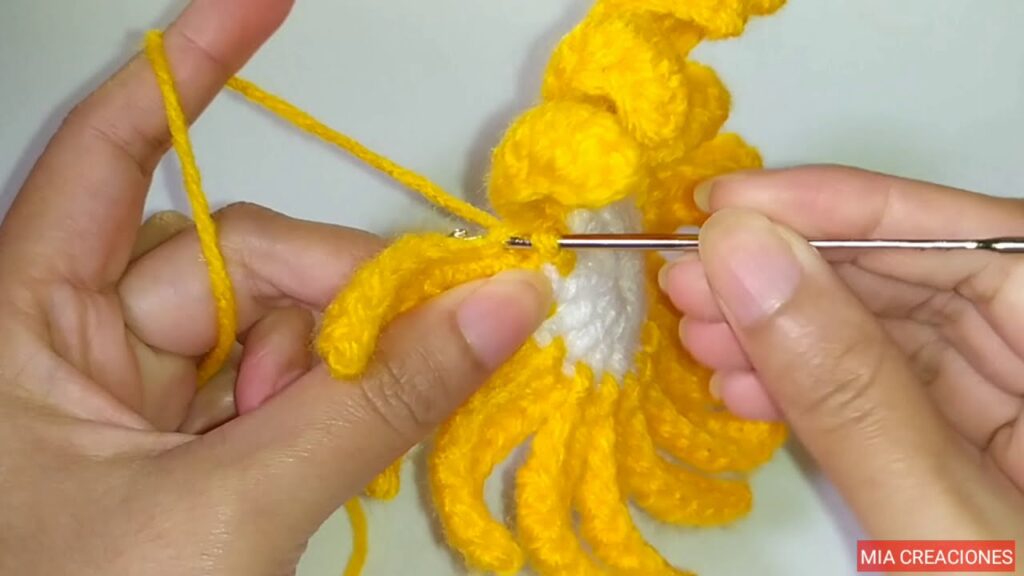
Part 3: Adding the Face (The Fun Part!)
This is where your daisy gets its personality! You’ll use your tapestry needle and embroidery floss.
- Gather Your Embroidery Floss: Cut a piece of black or dark brown embroidery floss (about 12-18 inches long). You’ll usually want to use 2-3 strands of embroidery floss for the eyes and mouth for better visibility, rather than the full 6 strands.
- Thread Your Tapestry Needle: Thread the floss through your tapestry needle.
- Positioning: Decide where you want the eyes and mouth to be. Generally, the eyes are slightly above the center line of the yellow circle, and the mouth is below them.
- Embroidering the Eyes:
- Insert your needle from the back of the daisy (between the stitches, not splitting the yarn) so the knot is hidden on the back. Bring the needle up to where you want the first eye to be.
- Simple Dot Eyes: Make a small stitch, or a French knot for a slightly raised dot.
- Sleepy Eyes: Make a small, slightly curved stitch.
- Open Eyes: Create small circles using a few stitches or an outline stitch.
- Repeat for the second eye, ensuring they are symmetrical.
- Embroidering the Mouth:
- Bring your needle up from the back, just below the eyes.
- Simple Smile: Make an upward curved stitch for a classic smile. You might make a couple of small stitches to form the curve.
- Straight Line Mouth: A simple horizontal stitch.
- “O” Mouth: A small circle for a surprised or singing expression.
- Adding Rosy Cheeks (Optional):
- Switch to your pink or light red embroidery floss.
- Bring your needle up on one side of the face, slightly below the eyes. Make a few small, satin stitches (parallel stitches in the same direction) to create a rosy blush.
- Repeat for the other cheek.
- Securing the Embroidery:
- Once you’re happy with the face, bring your needle to the back of the daisy.
- Tie off the embroidery floss securely by making a small knot around a few stitches on the back of the daisy.
- Weave in the remaining tails of the embroidery floss into the yellow center to hide them completely.
Part 4: Finishing Touches and Assembly (for specific decorations)
Now that you have your faced daisy, you can turn it into various decorations!
- For an Appliqué: Just the finished daisy itself. You can sew or glue it onto blankets, bags, hats, etc.
- For a Brooch/Pin: Purchase a small brooch pin back (available at craft stores). Hand-stitch or hot glue it securely to the back of your daisy.
- For a Garland: Make several daisies with faces. Then, using your crochet hook and green yarn (or any color), chain a long strip. Attach the daisies by slip stitching or sewing them onto the chain at regular intervals.
- For a Hair Clip/Headband: Hot glue the daisy securely to a plain hair clip or headband.
- For a Stuffed Daisy (Amigurumi-style): If you want a puffier daisy, you can stuff the yellow center before closing off the last petal round, or sew two daisy centers together, stuff, and then add petals.
Tips for Success:
- Practice Basic Stitches: If you’re new to crochet, practice your chain, single crochet, and slip stitch until you feel comfortable.
- Watch Video Tutorials: YouTube is an amazing resource for visual learners. Search for “crochet daisy tutorial” or “magic ring crochet tutorial.”
- Read Patterns Carefully: Pay attention to stitch counts and any specific instructions.
- Don’t Be Afraid to Experiment: Try different yarn colors for petals, different facial expressions, and varying sizes.
- Weave in Ends Neatly: This makes your finished product look professional and prevents it from unraveling.
- Safety First: If making for children, ensure all components (especially embroidered features) are very securely attached. Avoid small buttons or plastic eyes if the item is for very young children who might put it in their mouths.
Enjoy the process of bringing these cheerful little daisies to life! Each one will have its own unique personality, making them truly special decorations.
Video tutorial:


