
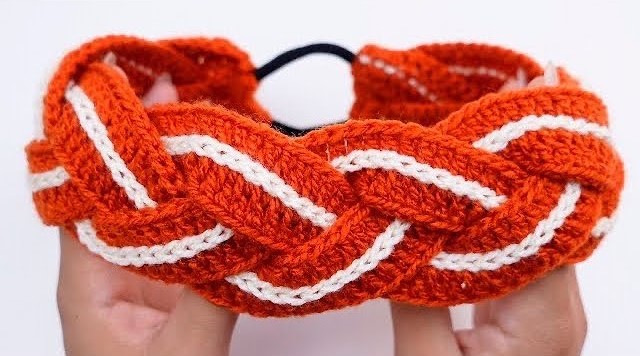
Headbands are a timeless accessory, offering both practical hair management and a touch of personal style. Among the myriad of options, the crochet braided headband stands out for its unique texture, handcrafted charm, and remarkable versatility. Combining the warmth and softness of yarn with the classic appeal of a braid, these headbands are a delightful addition to any wardrobe, equally cherished by playful girls and stylish ladies.
It’s Thursday, June 12, 2025, and handmade accessories continue to trend, valuing unique craftsmanship and personal expression. A crochet braided headband embodies this spirit perfectly.
Why Choose a Crochet Braided Headband?
The appeal of a crochet braided headband goes beyond its pretty appearance:
- Handcrafted Uniqueness: Each headband is a labor of love, offering a personal touch that mass-produced items simply can’t replicate. You can customize every aspect, from yarn choice to braid style.
- Custom Fit & Comfort: Unlike rigid headbands, crocheted versions offer natural stretch and softness, conforming comfortably to any head size without pinching or slipping. This makes them ideal for prolonged wear.
- Versatility in Style: From casual boho chic to refined elegance, the look of a braided headband can transform with yarn color, thickness, and braid complexity.
- Warmth Without Bulk: They provide a surprising amount of warmth for the ears and forehead on chilly days without the bulk of a full hat, perfect for transitional weather.
- Hair Management: Whether keeping bangs out of eyes for active girls or taming a “bad hair day” for ladies, they are a stylish solution.
- Sustainable Choice: Using natural fibers or recycled yarns makes this a more eco-conscious accessory choice.
Versatility for Every Age: Girls and Ladies Alike
The beauty of the crochet braided headband lies in its ability to adapt to different ages and aesthetics:
- For Girls: Bright, playful colors (pinks, purples, rainbow variegated yarns) turn a simple headband into a fun statement. They are perfect for keeping hair neat during play, school, or sports, adding a touch of cuteness without fuss. A softer yarn is key for sensitive young skin.
- For Ladies: The choice of yarn can elevate the look from casual to sophisticated. Muted tones, elegant jewel tones, or subtle variegated yarns can create a chic accessory that complements various outfits. A wider headband can offer more coverage and a bolder statement, while a narrower one provides a delicate accent. They’re perfect for adding a touch of bohemian flair, a cozy element to fall outfits, or simply a quick way to look put-together.
Understanding the Construction: How It’s Made
While specific patterns vary, the fundamental principle behind most crochet braided headbands involves two main steps:
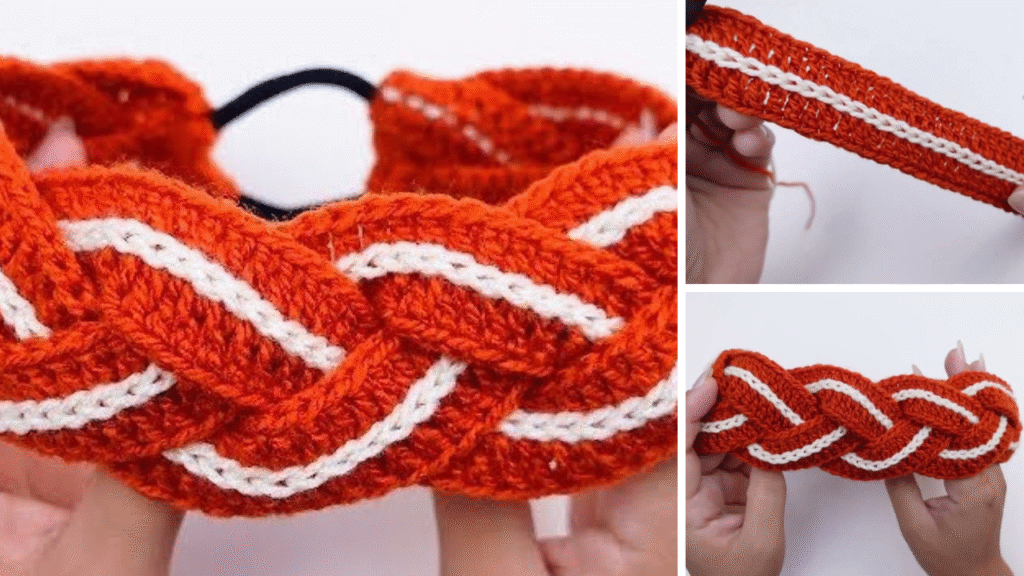
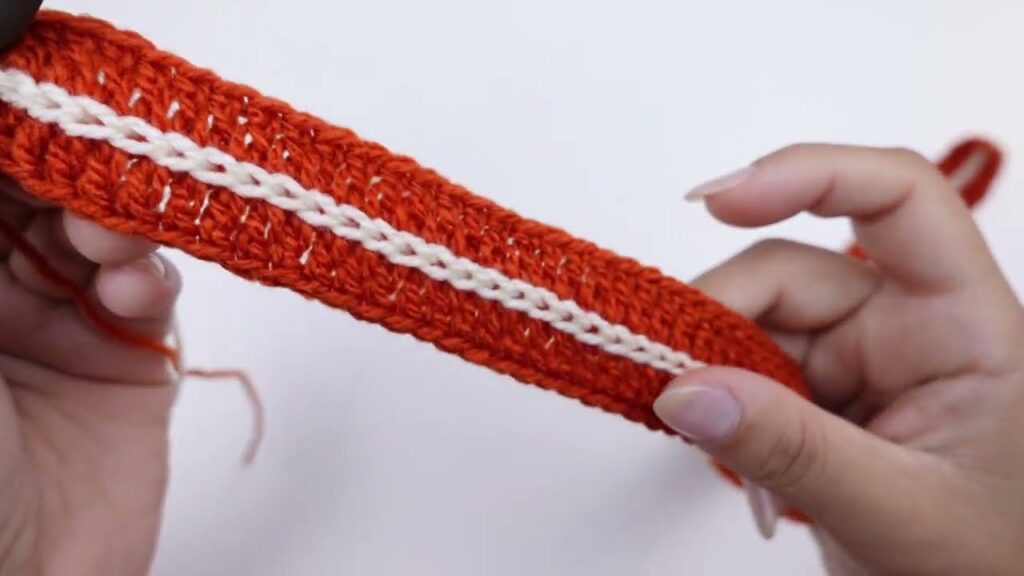
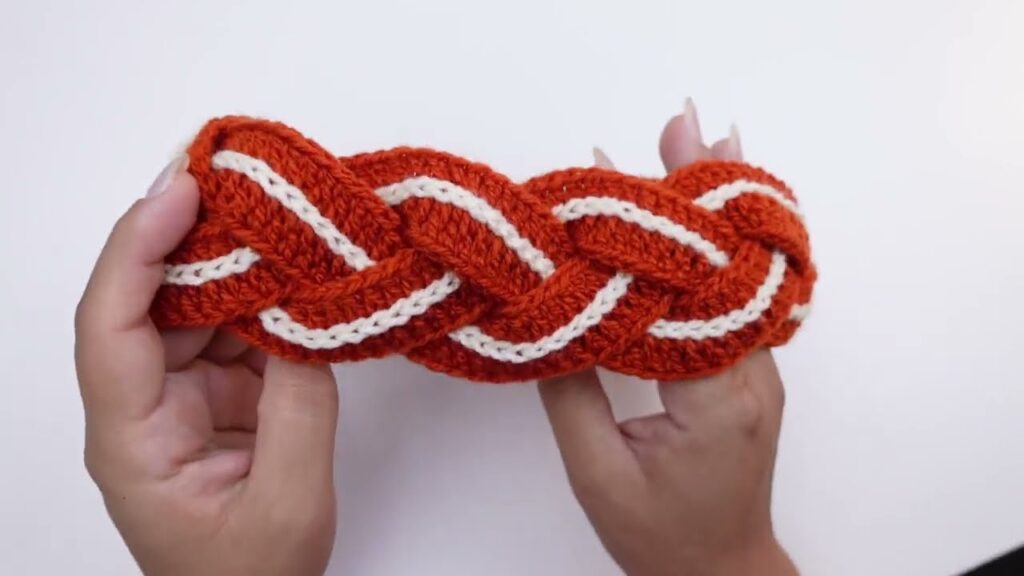
- Crocheting the Strands: Instead of working one continuous piece, you typically crochet individual strips or “strands” of yarn. The number of strands usually dictates the braid type (e.g., three for a classic braid, four for a flat braid, six for a more intricate cross-braid). These strands are generally worked in simple, consistent stitches like single crochet (SC) or half double crochet (HDC) to create a smooth, flexible fabric. The length of these strands is crucial, as they will shorten significantly once braided. They need to be long enough to wrap around the head comfortably, plus extra length to accommodate the braiding process.
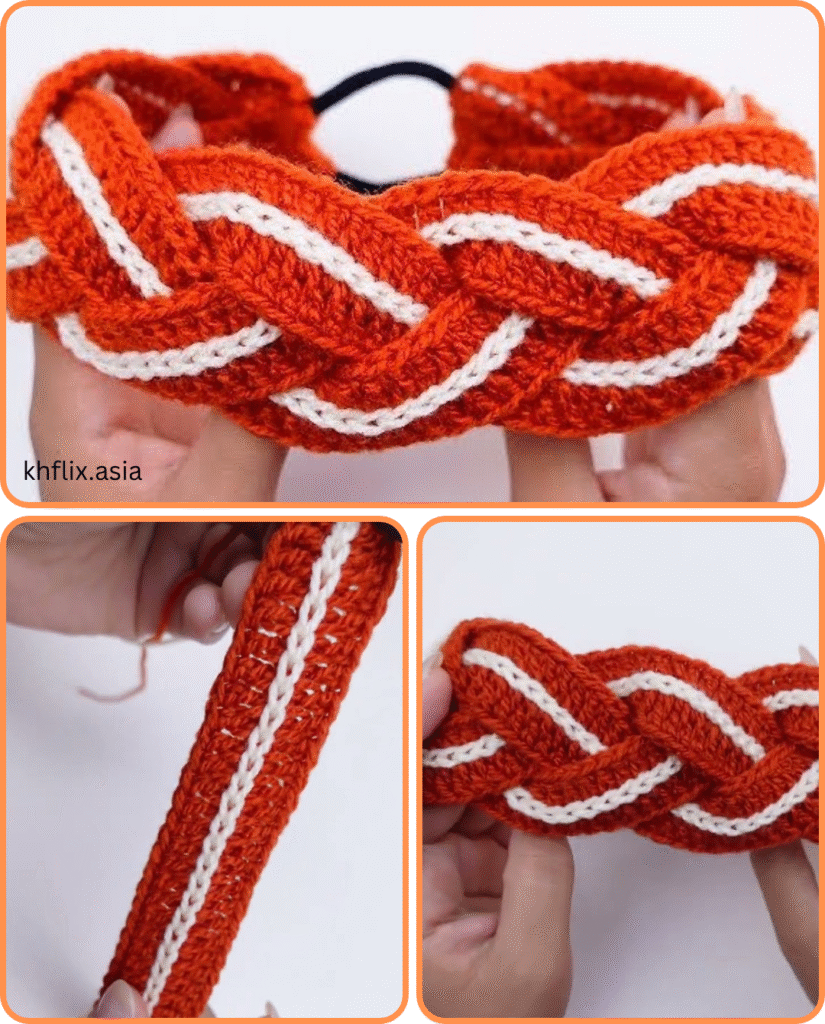
- Braiding and Assembly: Once the strands are crocheted, you physically braid or weave them together. This is where the “braided” look comes to life. After braiding to the desired length (which should now fit your head circumference), the ends of the braided section are joined together. This can be done by carefully sewing them with a tapestry needle, crocheting them together, or by attaching a piece of elastic at the back for added stretch and ease of wear.
Popular Braided Styles to Explore
- The Classic 3-Strand Braid: This is the most common and easiest to execute. You crochet three identical strips and then braid them as you would hair. The result is a simple yet elegant braided band.
- The Flat 4-Strand Braid: For a slightly wider and flatter headband, four strands can be braided using a specific four-strand braiding technique. This creates a denser, more substantial look.
- The Interwoven (Faux) Braid: Some patterns create the “braided” effect directly within the crochet fabric itself, often using techniques like post stitches or specific stitch combinations that make stitches appear to weave over and under each other. This results in a continuous piece of crochet that looks braided without requiring separate strips to be physically braided.
- Complex Cross Braids (e.g., 6-Strand): As seen in previous discussions, more intricate braiding techniques can be applied by crocheting more strands (e.g., six) and then weaving them in a specific pattern. These create highly textured and visually complex headbands.

Materials You’ll Need
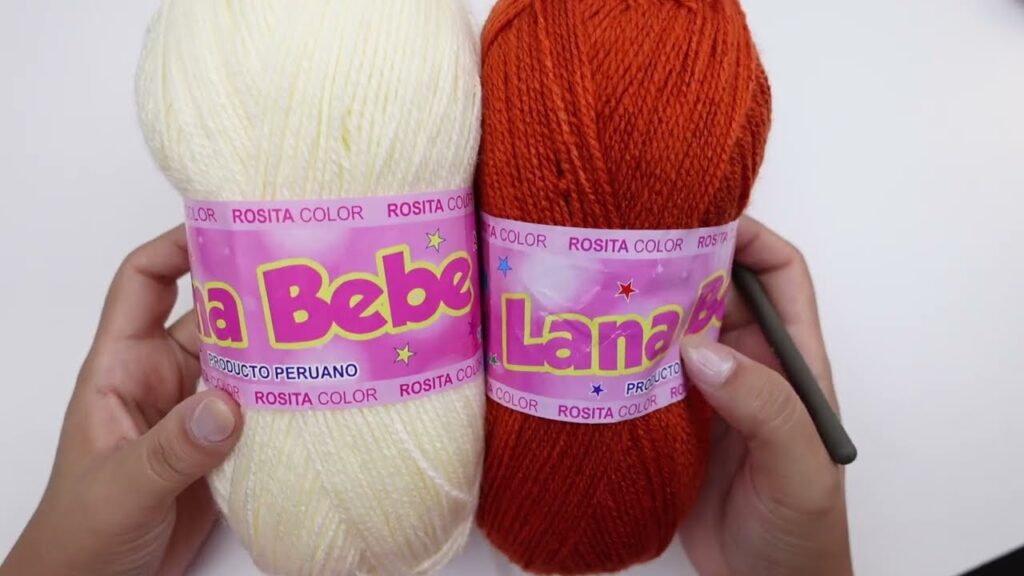
- Yarn:
- Fiber: Cotton (breathable, great stitch definition), acrylic (durable, wide color range, easy care), or blends are excellent choices. Wool or wool blends offer extra warmth.
- Weight: Light worsted (DK) or worsted weight yarn is generally versatile. For a thinner, more delicate headband, sport or fingering weight could be used.
- Color: Solid colors highlight the braid texture, while variegated or striped yarns create vibrant, multi-tonal effects.
- Crochet Hook: Size appropriate for your yarn (check the yarn label for recommendations).
- Tapestry Needle: Essential for weaving in ends and neatly joining the braided ends.
- Scissors:
- Measuring Tape: To ensure a perfect fit.
- Elastic (Optional): For a stretchy back band, if the pattern calls for it.
Tips for Crocheting Your Braided Headband
- Gauge Matters (Somewhat): While not as critical as for garments, consistent gauge (stitch density) will ensure your strips are uniform and the final headband is the intended size.
- Consistent Tension: Maintain even tension throughout your crocheting for smooth, uniform strips that braid beautifully.
- Measure as You Go: Periodically wrap your unbraided strips (or the partially braided section) around your head to gauge length and ensure a comfortable fit. Remember that braiding shortens the overall length.
- Secure Braids Periodically: If physically braiding separate strips, use a tapestry needle and scrap yarn to make small, invisible stitches through the braided sections every few inches. This prevents the braid from unraveling and helps maintain the headband’s shape.
- Seamless Joins: Pay attention to how you join the ends. A neat, invisible seam will make your headband look professional and polished.
Care and Maintenance
Most crochet headbands made with acrylic or cotton yarn can be gently hand-washed or machine-washed on a delicate cycle in cold water. Always lay flat to dry to help the headband retain its shape and prevent stretching.
Beyond the Basics: Customization & Embellishment
Once you’ve mastered the basic braided headband, explore these ideas to make it even more unique:
- Vary Widths: Make thinner strips for a delicate look or wider ones for a statement piece.
- Add Embellishments: Sew on buttons, beads, sequins, or attach a small crocheted flower, bow, or appliqué.
- Color Blocking: Use different colors for each strand before braiding for a striking effect.
- Different Stitches: Experiment with different basic stitches for your strands (e.g., moss stitch for texture, or rows of slip stitches for a dense cord).
How to Make a Simple 3-Strand Crochet Braided Headband (Step-by-Step)
This tutorial provides general guidelines. For exact stitch counts or complex variations, you’ll still want to refer to a specific crochet pattern. However, this guide will give you all the foundational knowledge to create your own!
Difficulty Level: Beginner to Easy Intermediate
What You’ll Need:
- Yarn: Light Worsted (DK) or Worsted Weight yarn. Choose a soft fiber like acrylic, cotton, or a blend. (Approx. 50-100 yards/45-90 meters, depending on head size and desired thickness).
- Tip: A solid color will highlight the braid texture. Variegated yarn creates a fun, multi-tonal effect.
- Crochet Hook: Size recommended for your yarn (usually on the yarn label). For Worsted weight, a 4.5mm (G/7) or 5.0mm (H/8) hook is common.
- Tapestry Needle: For weaving in ends and sewing.
- Scissors:
- Measuring Tape: Crucial for sizing.
- Stitch Markers (Optional): Can help mark the ends of your rows.
Step 1: Determine Your Headband Size
- Measure Head Circumference: Use your measuring tape to measure around your head (or the head of the person you’re making it for) where you want the headband to sit. Note this measurement in inches or centimeters.
- Calculate Unbraided Length: The braiding process will shorten your strips significantly.
- As a general rule, aim for each unbraided strip to be 1.5 to 1.75 times the finished circumference of your headband.
- Example: If your head circumference is 22 inches (approx. 56 cm), your finished braided headband should be around 20-21 inches (51-53 cm) (allowing for stretch). Therefore, each unbraided strip should be approximately 30-37 inches (76-94 cm) long.
- Determine Strip Width: For a 3-strand braid, each strip can be relatively narrow. Aim for each strip to be around 0.75 to 1 inch (2 to 2.5 cm) wide. This will give you a finished braided width of approximately 1.5 to 2 inches (3.8 to 5 cm).
Step 2: Crochet Your Three Strands
You will make three identical rectangular strips.
- Choose Your Stitch:
- Single Crochet (SC): Creates a dense, sturdy strip.
- Half Double Crochet (HDC): A bit taller than SC, works up faster, and provides a slightly softer drape.
- For this tutorial, let’s use Half Double Crochet (HDC) as it’s a good balance of speed and density.
- Start Your First Strand:
- Make a slip knot on your hook.
- Chain (ch): Chain enough stitches to achieve your desired strip width (approx. 0.75 – 1 inch / 2 – 2.5 cm).
- Test: For worsted weight yarn and a 5.0mm hook, ch 5 or 6 is usually a good starting point for this width. (You’ll work into the 3rd ch from hook, so that leaves 3 or 4 stitches).
- Row 1: Hdc in the 3rd chain from your hook (the 2 skipped chains count as your first hdc). Hdc in each remaining chain across.
- You should have 3 or 4 hdc stitches in your first row.
- Row 2: Chain 2 (ch 2) (counts as first hdc). Turn your work. Hdc in each stitch across.
- Repeat Row 2: Continue repeating Row 2 until your strip reaches the calculated unbraided length (e.g., 30-37 inches / 76-94 cm).
- Fasten Off: Once you reach the desired length, cut your yarn, leaving a long tail (at least 10-12 inches / 25-30 cm) for sewing later. Pull the tail through the loop on your hook to secure.
- Create Your Remaining Two Strands:
- Repeat the exact same process (starting chain, rows, length, fastening off with a long tail) to create two more identical strips.
- You should now have three equal-length, rectangular crocheted strips.
Step 3: Prepare for Braiding
- Align the Strands: Lay your three crocheted strips side-by-side on a flat surface.
- Secure One End: Gather one end of all three strips.
- You can tie them together with a piece of scrap yarn, use a large safety pin to secure them to a cushion, or even just hold them firmly between your knees. This keeps them from shifting as you braid.
- Make sure the long yarn tails you left earlier are all at this same end, so they are not braided into the main part of the headband.
Step 4: Braid the Strands
- Start Braiding: Begin braiding the three strips just as you would braid three strands of hair.
- Take the rightmost strip and cross it over the middle strip. This new strip is now the middle.
- Take the leftmost strip and cross it over the new middle strip. This new strip is now the middle.
- Repeat this “right over middle, left over middle” process.
- Maintain Even Tension: Try to keep your braid tension consistent. Not too tight (which will make it stiff) and not too loose (which will make it flimsy).
- Secure the Braid (Crucial!): As you braid, you must periodically secure the braided sections to prevent unraveling and maintain shape.
- After every 3-4 inches (7-10 cm) of braiding, use your tapestry needle and a small piece of matching yarn. Make a few small, invisible stitches through the braided strands at that point. Stitch through a few times to secure it firmly.
- This step is vital for the headband’s durability and to keep its braided appearance.
- Braid to Desired Length: Continue braiding until the total length of the braided section (when stretched slightly) is approximately the desired finished headband circumference (e.g., 20-21 inches / 51-53 cm).
- Try it on! This is the best way to check if the length is right. Wrap it around your head. It should fit comfortably, maybe with a little snugness as it will stretch slightly with wear.
Step 5: Join the Ends
Once your braid is the correct length, you need to join the ends to form a circle.
- Trim Excess: Once you’re satisfied with the braided length, untie/unpin the initial secured end. Trim any remaining unbraided portions of the strips so you have a few inches (5-8 cm) of unbraided ends on both sides of your braided section. Keep the long yarn tails you originally left.
- Align Ends: Bring the two ends of your braided headband together so they meet perfectly, forming a loop.
- Sew Together (Recommended for Beginners):
- Thread one of the long yarn tails onto your tapestry needle.
- Carefully align the ends of the three strips from one side with the ends of the three strips from the other side.
- Begin to sew them together firmly. You can use a simple whip stitch or mattress stitch, going through all the layers of the strips to create a strong, flat seam. Try to make your stitches as invisible as possible from the front.
- Go back and forth a few times to ensure the join is very secure.
- Repeat with other yarn tails if needed, or use just one long tail to sew everything together.
Alternative Joining Method (More Advanced – Not detailed here): Some patterns will have you flatten the ends and then crochet a few rows of single crochet through both layers to join them.
Step 6: Finishing Touches
- Weave in All Ends: Use your tapestry needle to carefully weave in any remaining loose yarn tails. Thread the tail through the stitches on the back of your headband, going in one direction for an inch or two, then reversing direction for a few stitches to lock it in place. Trim any excess close to the fabric.
- Admire Your Work! Gently stretch and adjust your new braided headband.
You’ve now created a beautiful and unique crochet braided headband! Enjoy wearing your handmade accessory or gifting it to someone special.
A crochet braided headband is a rewarding project that marries practicality with artistic expression. Whether you’re making one for a little girl’s playful adventures or for a lady’s chic everyday wear, the result is a uniquely beautiful accessory created with care and creativity. Grab your hook and yarn, and braid your way to effortless style!
Video tutorial:


