Beautiful and Easy to Make Little Square: Your Next Favorite Crochet Motif
The humble crochet square might seem simple, but it’s a foundational element in countless beautiful projects, from blankets and garments to bags and home decor. Learning to create a beautiful and easy little square opens up a world of creative possibilities. This article will guide you through making a classic and versatile crochet square that’s perfect for beginners and satisfying for experienced crocheters looking for a quick and lovely motif.

Why Crochet Squares?
Crochet squares, often called “motifs,” are incredibly popular for several reasons:
- Portability: You can work on a small square anywhere without lugging a large project.
- Versatility: Once you have a collection, you can join them to create larger items or use them individually as coasters, appliques, or ornaments.
- Skill Building: They’re excellent for practicing new stitches and techniques in a manageable size.
- Stash Busting: Perfect for using up leftover yarn scraps.
- Instant Gratification: They work up quickly, giving you a sense of accomplishment.
What You’ll Need
Gathering your materials is the first step to a smooth crocheting experience.
- Yarn: Any weight of yarn will work, but for a standard small square, a worsted-weight (Aran) cotton or acrylic yarn is ideal. Choose a single color for simplicity, or experiment with multiple colors for a vibrant look.
- Crochet Hook: Select a hook size that is appropriate for your chosen yarn. This information is usually found on the yarn label. For worsted weight yarn, a 4.0 mm (G) or 5.0 mm (H) hook is common.
- Scissors: For cutting your yarn.
- Yarn Needle (Tapestry Needle): Essential for weaving in your ends neatly.
- Optional: Stitch marker (helpful if you tend to lose track of your first stitch in a round).

Understanding the Stitches
This pattern utilizes some of the most common crochet stitches. If you’re new to these, a quick online video tutorial can be very helpful.
- Chain (ch): The basic foundation stitch.
- Slip Stitch (sl st): Used to join stitches and rounds.
- Single Crochet (sc): A short, dense stitch.
- Double Crochet (dc): A taller, looser stitch, often used in granny squares.
- Treble Crochet (tr) or Triple Crochet (tc): An even taller stitch (optional for larger corners).
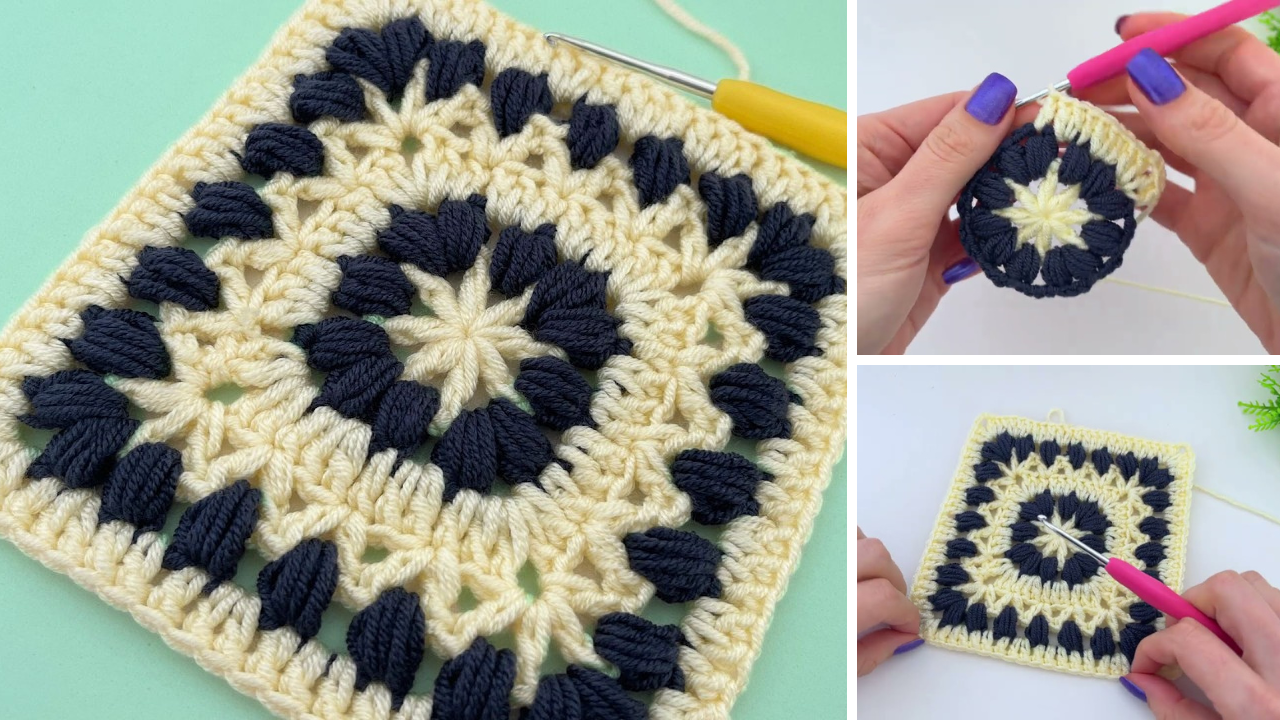
The Pattern: The Classic Granny Square Motif
The granny square is a timeless and beloved crochet motif. It’s beautiful, easy to master, and endlessly customizable. We’ll make a classic solid-center granny square.
Step 1: Starting Your Square
- Magic Ring (Recommended) or Ch 4:
- Option A: Magic Ring (for a tight center): Create a magic ring (also known as a magic circle or adjustable ring). This method creates a very neat, closed center.
- Option B: Chain 4 and Join: Ch 4, then sl st into the first chain to form a ring.
- Round 1:
- Ch 3 (counts as your first dc).
- Work 2 dc into the ring (or ch-4 space). You now have your first “cluster” of 3 dc stitches.
- Ch 2 (this creates your first corner space).
- Work 3 dc into the ring.
- Ch 2 (second corner space).
- Work 3 dc into the ring.
- Ch 2 (third corner space).
- Work 3 dc into the ring.
- Ch 2 (fourth corner space).
- Sl st into the top of the beginning ch-3 to join the round.
- You should now have 4 clusters of 3 dc, separated by 4 ch-2 spaces.

Step 2: Building the Square (Adding Rounds)
Each subsequent round builds upon the previous one, creating the square shape. We’ll work “clusters” of stitches into the chain spaces.
- Round 2:
- Sl st into the next 2 dc stitches until you reach the first ch-2 corner space. This moves your hook to the correct starting position for the next round.
- Ch 3 (counts as first dc).
- Into the same ch-2 space, work 2 dc, ch 2, 3 dc. This creates your first corner group (a cluster of 3 dc, a corner chain, and another cluster of 3 dc).
- Ch 1 (this creates the side space between corners).
- Skip the next 3 dc cluster.
- Into the next ch-2 corner space, work 3 dc, ch 2, 3 dc.
- Ch 1.
- Repeat the last two steps (working a corner, then a ch 1) two more times until you’ve worked into all four corner spaces.
- Sl st into the top of the beginning ch-3 to join the round.
- You should now have 4 corner groups (each 3 dc, ch 2, 3 dc) and 4 ch-1 side spaces.
- Round 3 and Beyond (Repeat for larger square):
- Sl st into the next 2 dc stitches until you reach the first ch-2 corner space.
- Ch 3 (counts as first dc).
- Into the same ch-2 corner space, work 2 dc, ch 2, 3 dc (this is your corner group).
- Ch 1.
- Now, you’ll encounter a ch-1 side space from the previous round. Work 3 dc into this ch-1 space.
- Ch 1.
- You’ll now be at the next ch-2 corner space. Work 3 dc, ch 2, 3 dc into this corner space.
- Ch 1.
- Repeat the sequence of (3 dc into side space, ch 1, then a corner group, ch 1) around the square.
- Sl st into the top of the beginning ch-3 to join the round.
- Continue adding rounds until your square reaches your desired size. Each round will add another 3 dc cluster to each side of the square.

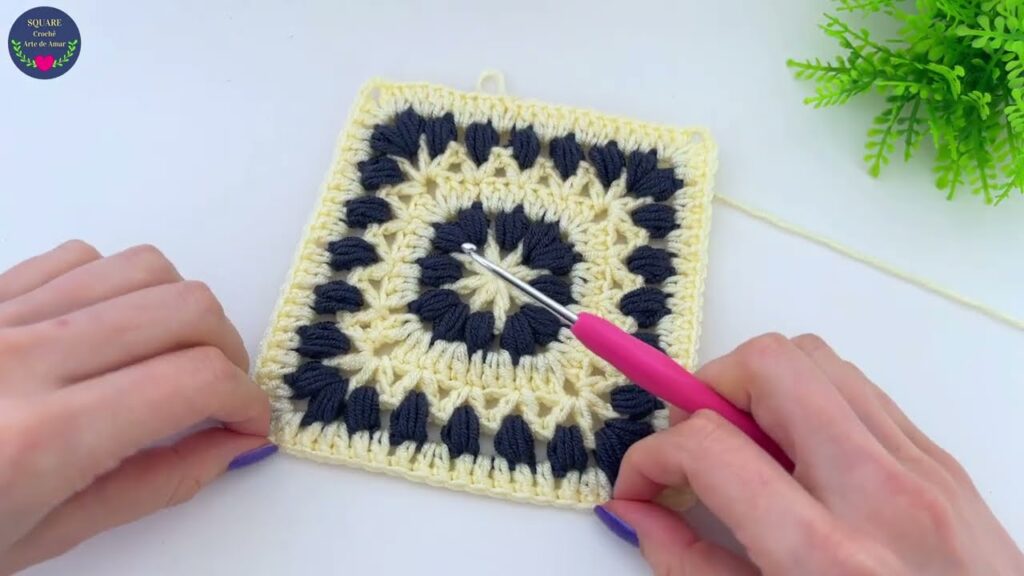
Step 3: Finishing Your Square
- Fasten Off: After joining your final round, chain 1, cut your yarn, and pull the tail through the loop on your hook to secure the knot.
- Weave in Ends: Using your yarn needle, carefully weave in all loose yarn tails. This is a crucial step for a neat and durable square. Thread the yarn tail onto the needle and pass it through several stitches, changing direction a few times to secure it.
Tips for a Beautiful Square
- Consistent Tension: Maintaining even tension throughout your work is the most important factor for a neat and beautiful square. Practice helps!
- Don’t Pull Too Tight: Especially when chaining and joining, avoid pulling too tightly, which can make your square pucker.
- Change Colors (Optional): For a multi-colored square, fasten off your yarn at the end of a round and join a new color with a slip stitch in any corner space to start the next round. This is where granny squares really shine!
- Blocking (Optional): If your square seems a bit wavy or doesn’t lie perfectly flat, “blocking” can help. Gently wet the square (or steam it), shape it to the correct dimensions, and pin it flat until it dries completely.
- Experiment: Once you’re comfortable with the basic granny square, try variations!
- Solid Granny Square: Use double crochet stitches in all the spaces instead of chain-1 spaces between clusters.
- Different Stitch Counts: Change the number of chain stitches in your corners (e.g., ch 3 instead of ch 2 for a lacier look).
- Other Stitches: Replace dc clusters with hdc or even sc clusters for a different texture.

The “Beautiful and Easy to Make Little Square” is more than just a simple motif; it’s a gateway to endless crochet creativity. Whether you make one for a coaster, a dozen for a throw, or hundreds for a stunning blanket, each little square you create will be a testament to your growing skills and a beautiful piece of handmade art. Happy crocheting!
Video tutorial:


