Crocheting a bag can be a rewarding project, resulting in a stylish and functional accessory. Whether you’re a seasoned crocheter or just starting out, this guide will walk you through creating a practical and elegant bag using simple steps. We’ll focus on a design that’s versatile enough for everyday use yet sophisticated enough for special occasions.

What You’ll Need
Before you begin, gather your materials. Choosing the right yarn and hook will significantly impact the final look and feel of your bag.
- Yarn: For a sturdy and elegant bag, consider a worsted-weight cotton or a cotton blend. These yarns offer good stitch definition and durability. You’ll likely need between 300-500 yards, depending on the desired size of your bag. Choose a color that complements your wardrobe!
- Crochet Hook: A hook size appropriate for your chosen yarn (usually indicated on the yarn label). For worsted weight, a 4.0 mm (G) or 5.0 mm (H) hook is often suitable.
- Stitch Markers: These are incredibly helpful for keeping track of your rounds, especially if you’re working in a spiral.
- Yarn Needle: For weaving in ends neatly.
- Scissors: For cutting yarn.
- Optional: Fabric lining, magnetic snap closure, or a zipper for a more finished look and added security.
Understanding Basic Stitches
This project primarily uses two fundamental crochet stitches:
- Chain (ch): The foundation of most crochet projects.
- Single Crochet (sc): A compact and sturdy stitch, perfect for bag construction.
- Slip Stitch (sl st): Used for joining rounds and finishing edges.
If you’re new to these, there are many excellent video tutorials available online to help you master them before you start.
The Pattern: Simple Rectangular Base Bag
We’ll start with a rectangular base and build up the sides. This creates a roomy bag with a stable bottom.

Step 1: Creating the Base
- Chain (ch): Start by chaining a desired length for the bottom of your bag. For a medium-sized bag, chain about 30-40 stitches. This will be the width of your bag’s base.
- Row 1 (Working around the chain):
- Sc into the second chain from the hook.
- Sc into each chain across until you reach the last chain.
- In the last chain, make 3 sc into the same stitch. This will create the curve for the end of your oval base.
- Now, rotate your work and continue crocheting along the other side of the foundation chain. Sc into each stitch, working into the bottom loop of the initial chain stitches, until you reach the very first stitch where you started.
- In that first stitch, make 2 sc into it. You now have an oval base.
- Join with a sl st to the first sc of the round.
- Round 2 (Establishing the oval shape):
- Ch 1 (does not count as a stitch).
- Sc in each of the next stitches until you reach the 3 stitches you made at the end of the previous round.
- 2 sc in each of those 3 stitches (increasing by 3 stitches at this end).
- Sc in each of the next stitches across the other side of the oval until you reach the 2 stitches you made at the beginning of the previous round.
- 2 sc in each of those 2 stitches (increasing by 2 stitches at this end).
- Join with a sl st to the first sc of the round.
- Repeat Round 2: Continue working rounds of single crochet, increasing at the ends of your oval as needed to keep the base flat. Generally, you’ll increase by working 2 sc into the corner stitches, ensuring your base remains flat and doesn’t curl. Work about 3-5 rounds for the base, or until it reaches your desired width. Use stitch markers to mark the corner stitches where you need to increase.

Step 2: Building the Sides
Once your base is complete, you’ll start working upwards to form the body of the bag.
- Round 1 (Creating the side wall):
- Ch 1 (does not count as a stitch).
- Work sc in the back loop only (BLO) of each stitch around the entire oval. This creates a defined edge for the bottom of your bag and helps the sides stand up straight.
- Join with a sl st to the first sc of the round.
- Subsequent Rounds:
- Ch 1 (does not count as a stitch).
- Work sc in both loops of each stitch around.
- Join with a sl st to the first sc of the round.
- Repeat this round until your bag reaches your desired height. Aim for at least 20-30 rounds for a practical tote.

Step 3: Creating the Handles
There are several ways to create handles. Here are two simple and elegant options:
Option 1: Integrated Handles (Recommended for beginners)
- Mark Handle Placement: Once your bag is the desired height, flatten it and use stitch markers to determine where you want your handles to be. Leave a gap of about 10-15 stitches for the opening of the bag, and mark two points on each side for the handle attachment.
- First Handle Side:
- Ch 1. Sc across to your first handle marker.
- Chain about 40-60 stitches (adjust for desired handle length).
- Skip the stitches between your two handle markers and sc into the stitch after your second handle marker.
- Continue sc across the front of the bag until you reach the placement for the second handle.
- Second Handle Side:
- Chain about 40-60 stitches.
- Skip the stitches between your two handle markers and sc into the stitch after your second handle marker.
- Sc to the end of the round.
- Join with a sl st.
- Reinforce Handles: For the next 1-2 rounds, sc across the body of the bag and sc into each chain stitch of your handles. This will reinforce them and make them sturdier.

Option 2: Separate Handles (More finished look)
- Crochet two long strips: Chain about 60-80 stitches (or desired length) and then sc into the second chain from the hook and sc across. Repeat for 2-3 rows to create a sturdy strap. Make two identical straps.
- Attach to Bag: Once your bag body is complete, position the straps evenly on the inside or outside of the bag opening. Using your yarn needle, sew them securely in place with several passes, ensuring they can withstand weight.
Step 4: Finishing Touches
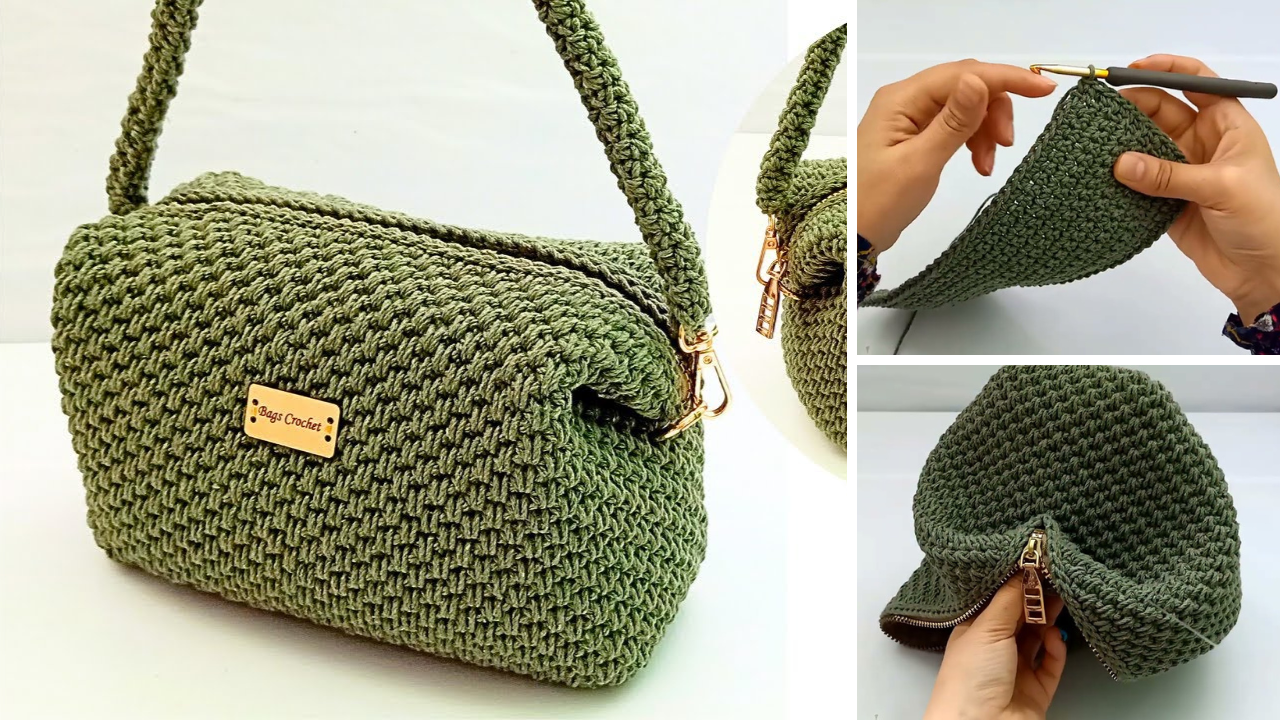
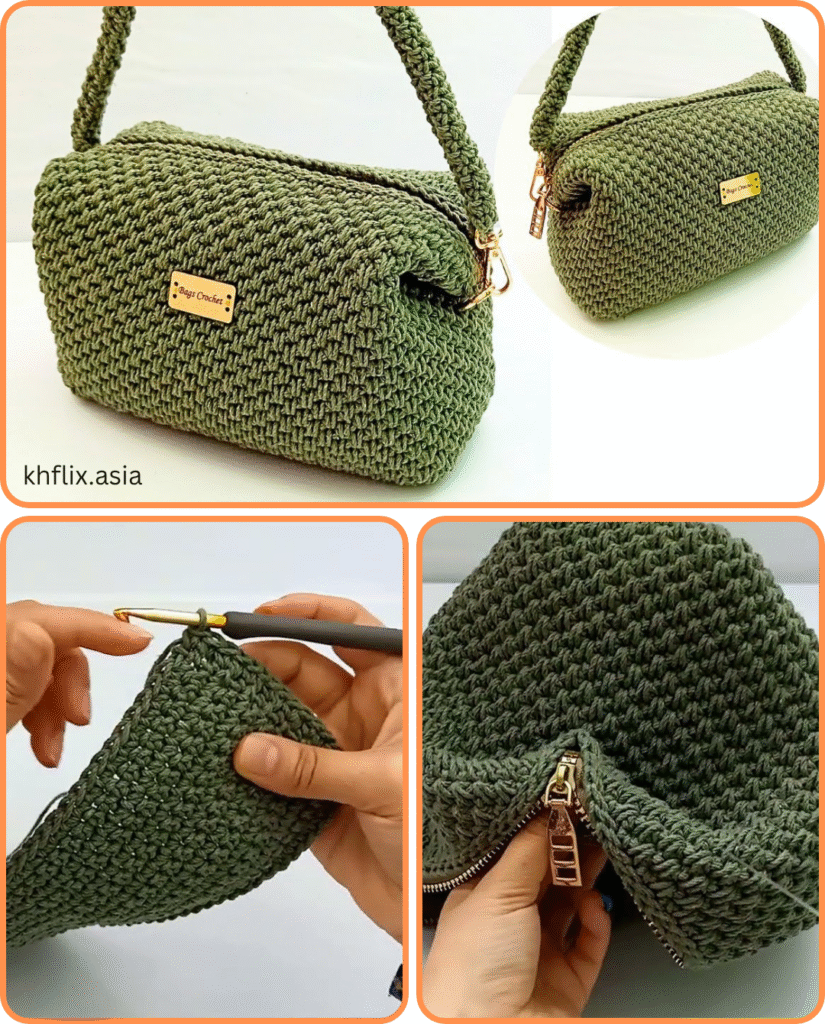
- Edging (Optional but Recommended): To give your bag a neat finish, work one or two rounds of sl st around the top opening of the bag. This creates a clean edge.
- Weave in Ends: Using your yarn needle, carefully weave in all loose yarn ends. This is crucial for a professional-looking finish and to prevent unraveling.
- Lining (Optional): If you desire a lined bag, cut fabric to match the dimensions of your bag and sew it into a pouch. Hand-sew or machine-sew the lining into your crochet bag.
- Closure (Optional): Attach a magnetic snap closure or sew in a zipper for added security.
Tips for Success
- Maintain Consistent Tension: This is key to an even and professional-looking finished product. If your stitches are too tight, the bag will be stiff; too loose, and it might be floppy.
- Count Your Stitches: Especially in the beginning rounds, regularly count your stitches to ensure your base and sides are forming correctly and you’re not accidentally increasing or decreasing.
- Use Stitch Markers: They are your best friend for marking the start of a new round or crucial stitches, especially when working in a spiral.
- Don’t Be Afraid to Experiment: Once you’ve mastered the basic structure, try different stitch patterns for the body of the bag (like half double crochet or double crochet for a looser fabric), or add decorative elements like stripes, appliques, or tassels.
- Block Your Bag (Optional): If your bag seems a bit lopsided or needs to hold its shape better, you can “block” it. Gently wet the bag, shape it to your desired dimensions, and let it air dry.
Creating your own practical and elegant crochet bag is a fulfilling project that yields a unique accessory. With these simple steps and a bit of practice, you’ll be carrying your custom-made creation with pride in no time! Happy crocheting!
Video tutorial:


