
The Mighty Mini: How to Crochet Your Own Small Bag
In the world of accessories, the crochet small bag is a true gem. It’s the perfect blend of practicality and personal style, ideal for carrying just the essentials, adding a pop of color to an outfit, or even serving as a charming gift bag. Small bags are fantastic projects for crocheters of all skill levels – quick enough for beginners to gain confidence, and a delightful, satisfying make for experienced hands.
This detailed article will guide you through creating a cute and functional crochet small bag, focusing on simple techniques and versatile designs that you can easily adapt to your taste.
Why Crochet a Small Bag?
- Quick & Satisfying: Smaller projects mean quicker finishes! You can often complete a small bag in just a few hours, offering immediate gratification.
- Perfect for Essentials: Ideal for carrying your phone, keys, cards, lip balm, and other daily necessities without the bulk of a large purse.
- Stash Buster: Have a collection of single skeins or leftover yarn bits? Small bags are perfect for turning those odds and ends into something beautiful and useful.
- Skill Booster: Practice fundamental techniques like working in the round, creating sturdy fabrics, and adding details like straps and closures.
- Customizable Style: From vibrant colors to subtle textures, you have complete creative control to make a bag that perfectly matches your aesthetic.
- Thoughtful Gift: A handmade small bag is a personal and cherished gift for birthdays, holidays, or just to show someone you care.
Key Considerations for Your Small Bag
Even for a small project, a few choices will significantly impact your bag’s look and functionality.
- Purpose & Style:
- Coin Purse? You’ll want it very small and perhaps with a zipper.
- Phone Pouch? Measure your phone! A simple rectangular design works well.
- Mini Crossbody? Needs a longer, sturdy strap.
- Evening Clutch? Consider elegant yarn and a sophisticated stitch.
- This guide will focus on a versatile small pouch/crossbody style.
- Yarn Choice (Impacts Durability & Look!):
- Fiber: For bags that hold their shape well and are durable, cotton, cotton blends, jute, or sturdy acrylic yarns are excellent. These fibers resist stretching and sagging. Avoid overly soft or fuzzy yarns if you want a firm structure.
- Weight: Worsted weight (Category 4) is highly recommended. It works up quickly, provides good structure, and is widely available. You can also use two strands of DK (Category 3) held together for a similar effect.
- Colors: Get creative! Solids will highlight stitch texture, while variegated yarns add effortless interest.
- Hook Size: To ensure your bag is sturdy and doesn’t have large gaps that allow items to slip through, use a hook size one or two sizes smaller than what the yarn label typically recommends for garments. This creates a denser fabric. For worsted weight yarn, a 4.0mm (US G/6) or 4.5mm (US 7) hook is usually ideal.
- Stitch Pattern:
- Single Crochet (sc): Creates a very dense, sturdy fabric, perfect for the main body of a small bag.
- Half Double Crochet (hdc): Works up faster than sc while still providing good density.
- Back Loop Only (BLO) / Front Post/Back Post: These can add ribbing or texture, enhancing the bag’s structure and aesthetic.
- We’ll use a combination of sc and hdc for this pattern.
- Strap & Closure:
- Strap: Crocheted straps (simple rows of sc or hdc), corded straps, or even a pre-made chain.
- Closure: A simple button and loop, a magnetic snap, a zipper, or a drawstring. This tutorial will feature a simple button and loop closure.

Materials You’ll Need
- Yarn: Approx. 80-150 yards of Worsted weight (Category 4) cotton or sturdy acrylic yarn. (One standard skein is often enough).
- Crochet Hook: Size G/6 (4.0mm) or US 7 (4.5mm) – adjust based on yarn and desired fabric density.
- Yarn Needle (Tapestry Needle): For weaving in ends and sewing on the button.
- Scissors:
- Stitch Marker (optional but helpful): For working in the round.
- 1 Button: Approx. 0.75 – 1 inch (2-2.5 cm) in diameter.
Essential Crochet Abbreviations
- ch: chain
- sl st: slip stitch
- sc: single crochet
- hdc: half double crochet
- sc inc: single crochet increase (2 sc in same st)
- st(s): stitch(es)
- BLO: back loop only
- FO: Fasten off (cut yarn and pull through loop)
- (): indicates stitch count at the end of a round/row
- …: repeat instructions within asterisks
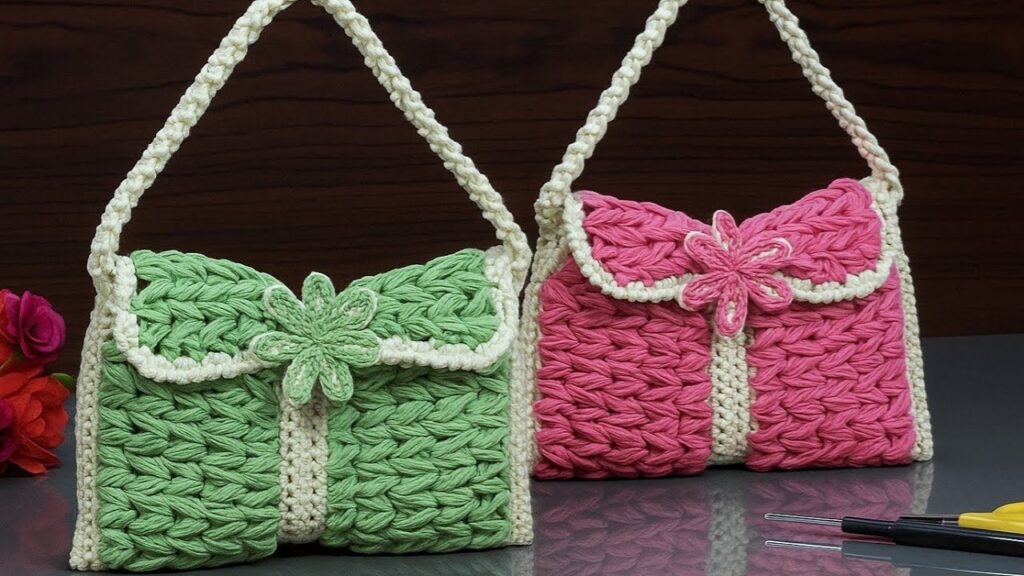
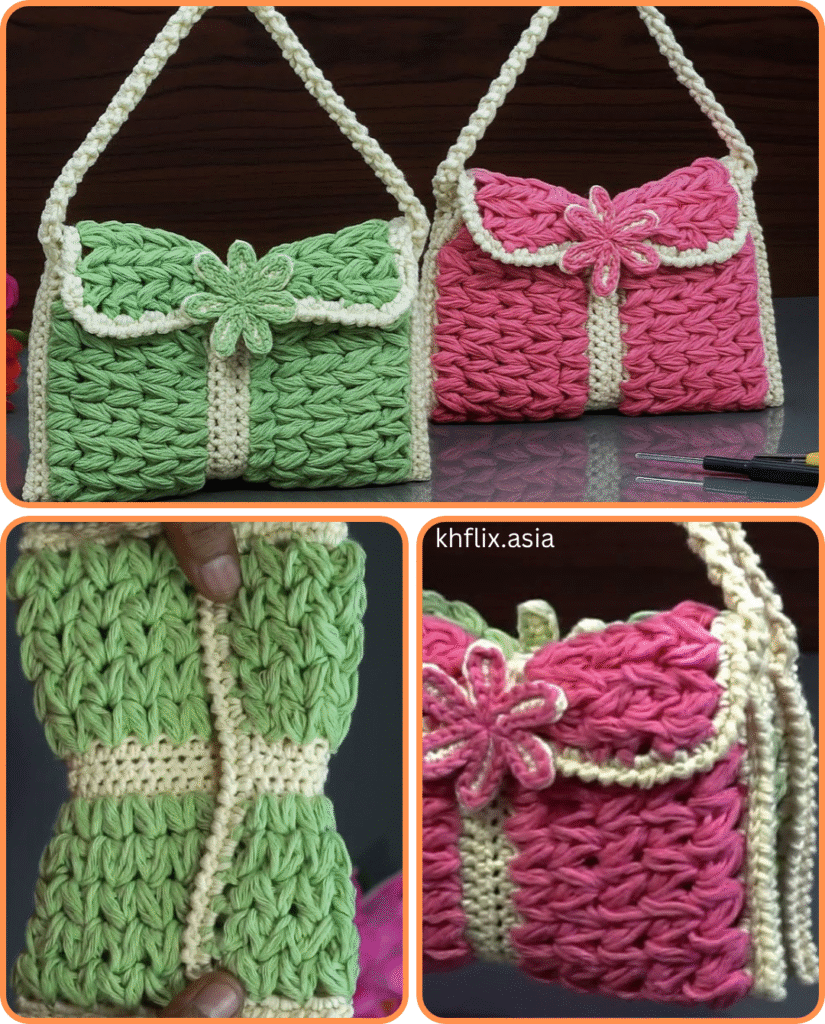
Easy Crochet Small Bag Pattern (Mini Pouch/Crossbody Style)
This pattern starts with an oval base, then builds the sides, and finishes with a flap and strap.
Target Dimensions: Approx. 5 inches (13 cm) wide x 6 inches (15 cm) tall x 1.5 inches (4 cm) deep.
Part 1: The Oval Base
This creates the sturdy bottom of your bag. We’ll work in continuous rounds.

- Starting Chain: Ch 16.
- Round 1: Sc in 2nd ch from hook. Sc in next 13 ch. Work (3 sc) in the very last ch. Working along the opposite side of the starting chain: Sc in next 13 ch. Work (2 sc) in the very first chain stitch where you made your first sc. Do NOT join with a sl st. Place stitch marker in the last sc. (31 sc)
- Round 2: Sc inc in first st. Sc in next 13 sts. Sc inc in next 3 sts. Sc in next 13 sts. Sc inc in next 2 sts. Move stitch marker. (37 sc)
- Round 3: Sc in first st. Sc inc in next st. Sc in next 13 sts. (Sc in next st, sc inc in next st) 3 times. Sc in next 13 sts. (Sc in next st, sc inc in next st) 2 times. Move stitch marker. (43 sc)
- Your base should now lie relatively flat and be approximately 5 inches (13 cm) long.
—
Part 2: Building the Bag Body
This section builds the walls of your bag, giving it height.
- Round 4 (Defining Wall): Ch 1 (does NOT count as a st). Sc in the back loop only (BLO) of each st around. Join with a sl st to the first sc. (43 sc)
- This BLO round creates a distinct ridge, making a clean separation between the base and the body, and helps the bag stand upright.
- Round 5: Ch 1. Hdc in each st around. Join with a sl st to the first hdc. (43 hdc)
- Rounds 6 – 15: Repeat Round 5 until your bag reaches your desired height (approx. 6 inches / 15 cm from the top of the base).
- FO, leaving a short tail to weave in.

—
Part 3: The Flap & Closure
Now we’ll add the closing flap for your bag.
- Flap Placement: Flatten your bag. Find the exact center back. Count 10 stitches to the left of center, attach yarn with a sl st.
- Row 1 (Flap Base): Ch 1. Sc in the same st and in next 19 sts. Turn. (20 sc)
- Row 2: Ch 1. Sc in each sc across. Turn. (20 sc)
- Rows 3 – 5: Repeat Row 2.
- Row 6 (Buttonhole): Ch 1. Sc in first 8 sts. Ch 4 (adjust chain length to fit your button). Sk 4 sts. Sc in last 8 sts. Turn. (16 sc + ch-4 sp)
- Row 7: Ch 1. Sc in first 8 sts. Work 4 sc into the ch-4 sp. Sc in last 8 sts. (20 sc)
- FO, leaving a short tail to weave in.

—
Part 4: The Strap
You can make a simple crocheted strap or use a cord.
- Crocheted Strap:
- Ch 100 (or desired length for a crossbody/shoulder bag – measure against yourself!).
- Row 1: Sc in 2nd ch from hook and in each ch across. Turn. (99 sc)
- Row 2: Ch 1. Sc in each sc across. (99 sc)
- FO, leaving a long tail (approx. 12 inches / 30 cm) at each end for sewing.
- Attaching Strap:
- Position the ends of the strap on the upper sides of your bag, just below the flap.
- Use your yarn needle to securely sew each end of the strap to the bag. Stitch multiple times to ensure durability.
—
Part 5: Finishing Touches
- Weave in All Ends: Neatly weave in every single loose yarn tail using your yarn needle. This gives your bag a polished look and prevents unraveling.
- Sew on Button: On the front of the bag, directly below the buttonhole on the flap, sew on your chosen button. Ensure it’s securely attached.
- Blocking (Optional): Gently mist your bag with water (or wet block if using cotton). Stuff the bag lightly with tissue paper or a small towel to help it hold its shape, and allow it to air dry completely. Blocking helps to even out stitches and set the overall form of the bag.
Tips for Success & Making Your Small Bag Unique:
- Consistent Tension: Maintaining even tension is key for a sturdy, well-shaped bag that won’t sag.
- Counting Stitches: Always count your stitches, especially in the base, to ensure symmetry and even shaping.
- Yarn is Key: Don’t use overly soft or flimsy yarn if you want a bag that holds its shape.
- Lining (Optional but Recommended): For added durability and to prevent stretching, consider adding a fabric lining. This elevates the bag’s finished look significantly.
- Custom Straps: Instead of a crocheted strap, consider a leather or chain strap for a different look. You can attach these with D-rings or clasps.
- Embellishments: Add a fun tassel, a crocheted charm, beads, or even some simple embroidery to personalize your bag.
You’ve now created a stylish, practical, and utterly charming crochet small bag! Enjoy carrying your essentials in your beautiful handmade creation.
Video tutorial:


