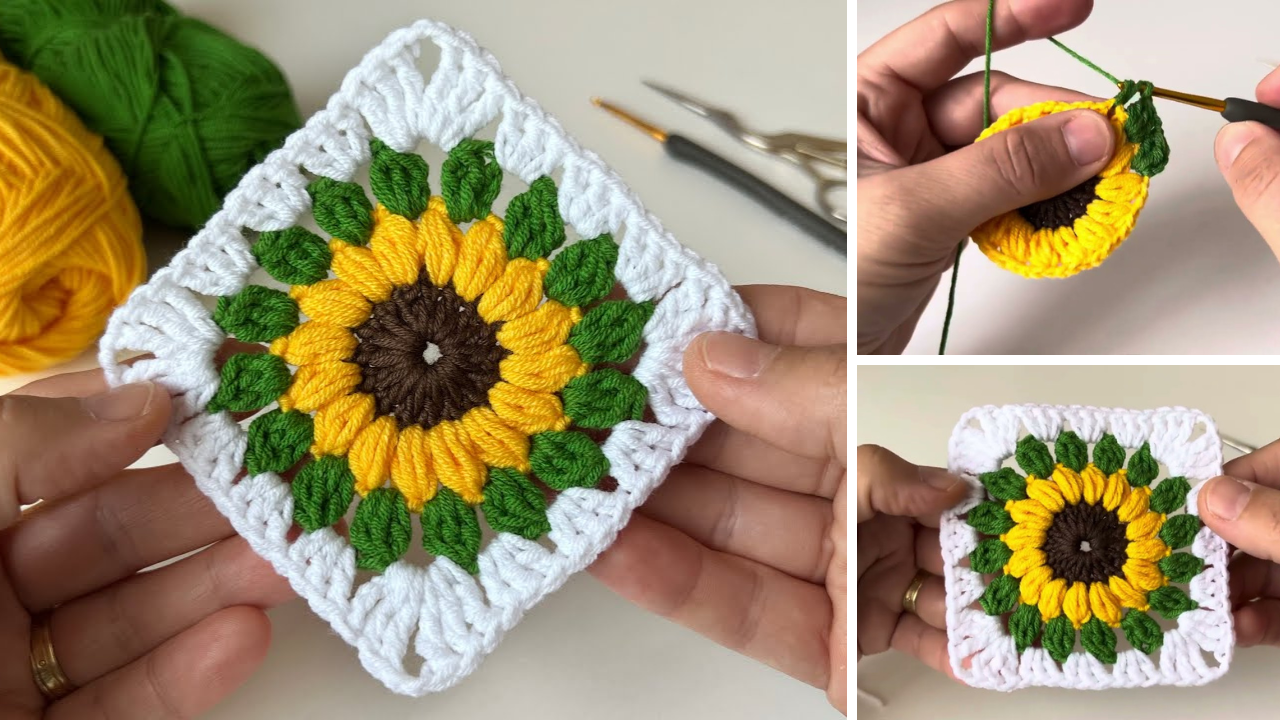
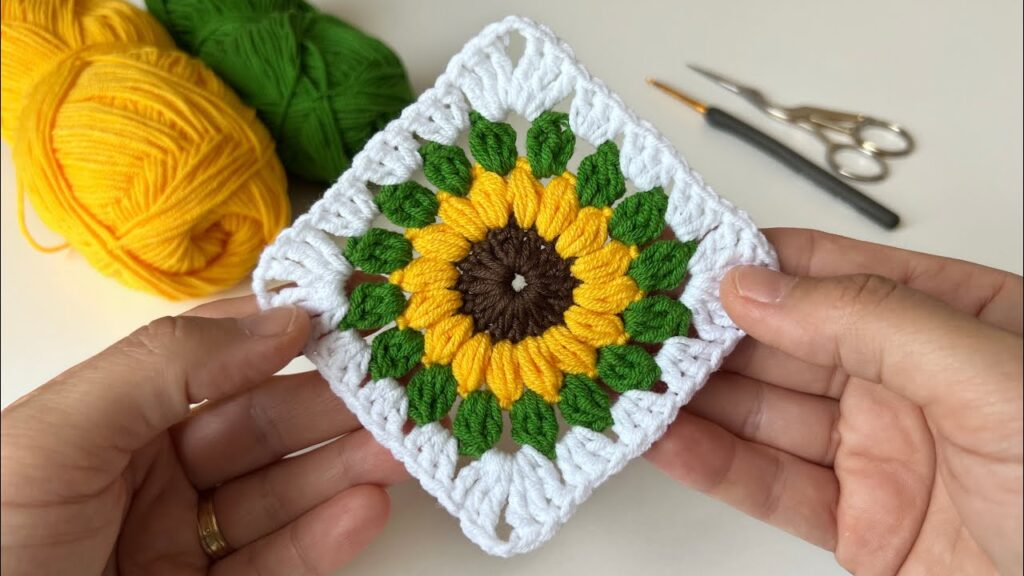
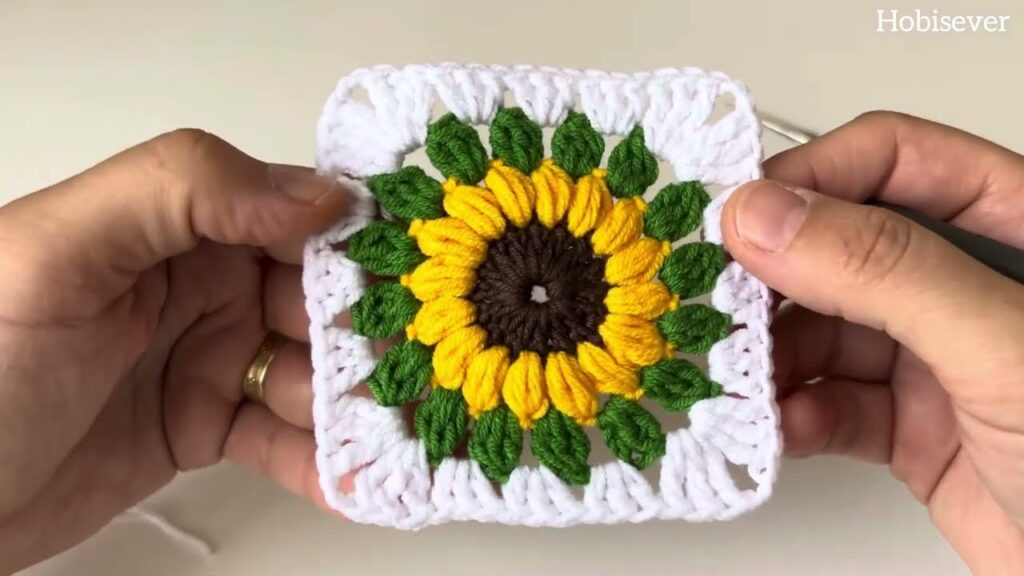
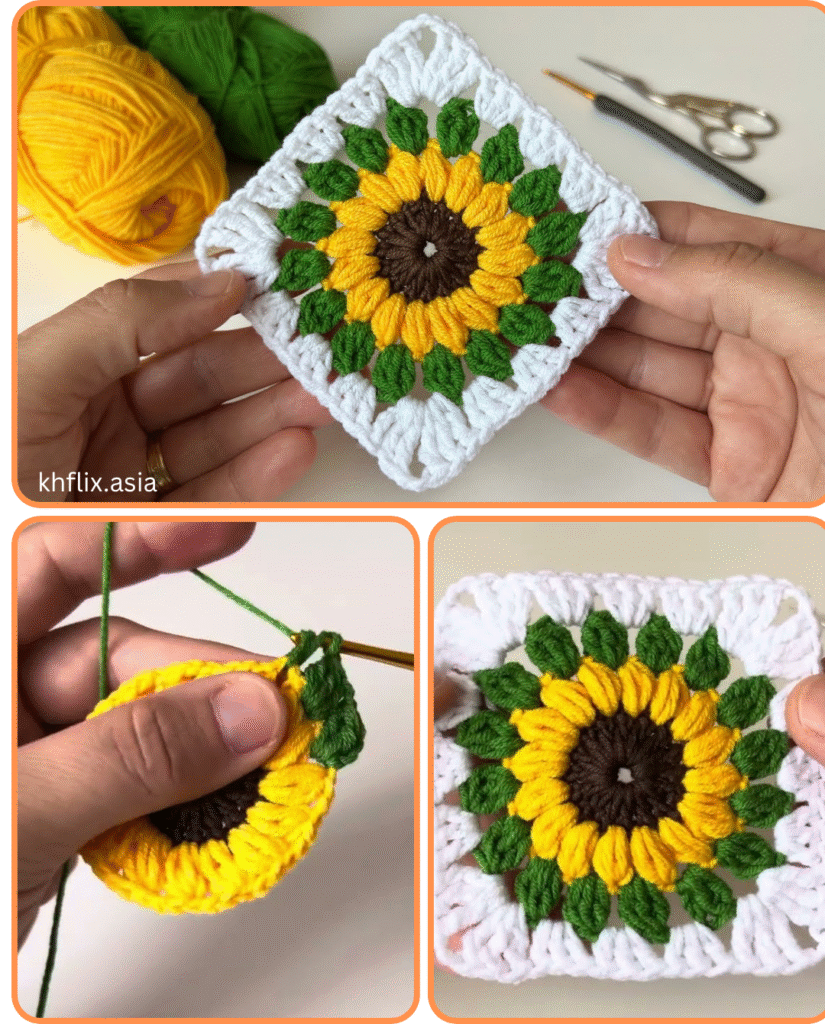
Creating a sunflower granny square is a delightful way to add a touch of summery cheer to your crochet projects. This versatile motif can be used for blankets, bags, garments, and so much more. This tutorial will guide you through each step, from the center of the sunflower to the square border, ensuring you can confidently create your own sunny squares.
Materials You’ll Need
Before you begin, gather your supplies:
- Yarn:
- Brown for the center (DK or worsted weight recommended)
- Yellow for the petals (matching weight)
- Green for the leaves/square border (matching weight)
- (Optional) A fourth color for the outer border if you desire a multi-colored square.
- Crochet Hook: A hook size appropriate for your chosen yarn (e.g., 4.0mm – 5.5mm for DK/worsted weight). Check your yarn label for recommendations.
- Scissors
- Yarn Needle for weaving in ends.
Abbreviations Used
Familiarize yourself with these common crochet abbreviations:
- Ch: Chain
- Sl St: Slip Stitch
- Sc: Single Crochet
- Hdc: Half Double Crochet
- Dc: Double Crochet
- Tr: Treble Crochet (or Triple Crochet)
- St(s): Stitch(es)
- Sp(s): Space(s)
- Sk: Skip
- FpDc: Front Post Double Crochet (Optional, used for texture)
The Sunflower Granny Square Tutorial
Let’s start crocheting! We’ll work in rounds, changing colors as we go.
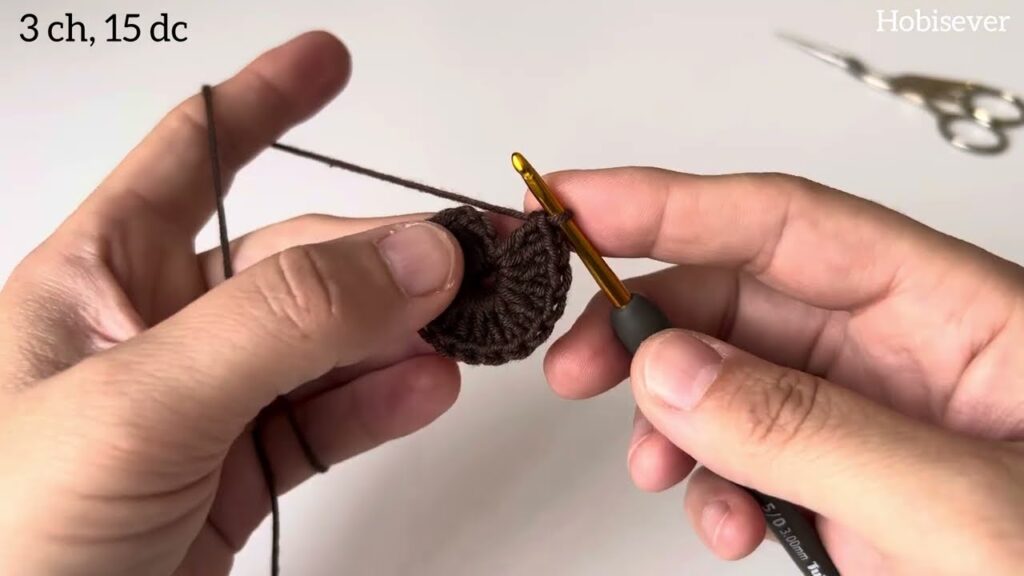
Part 1: The Brown Center
This forms the dark center of your sunflower.
- Start: With your brown yarn, make a magic ring (or Ch 4 and join with a Sl St to the first Ch to form a ring).
- Round 1: Ch 2 (counts as first Hdc here), 9 Hdc into the ring. Join with a Sl St to the top of the initial Ch 2. (10 Hdc total)
- Alternatively, you can start with 10 Sc into the ring if you prefer a tighter center.
- Fasten off and weave in your ends.

Part 2: The Yellow Petals
Now for the vibrant yellow petals!
- Attach Yellow Yarn: Join your yellow yarn with a Sl St into any Hdc from the previous round.
- Round 2 (Petals):In each Hdc around, you’ll create a petal:
- Ch 2 (counts as first Hdc)
- 1 Dc into the same st.
- Ch 2
- 1 Sl St into the same st.
- (This completes one petal.)
- Sl St into the next Hdc.
- Repeat from * until you have 10 petals.
- Join with a Sl St to the first Sl St of the round.
- Fasten off and weave in your ends.
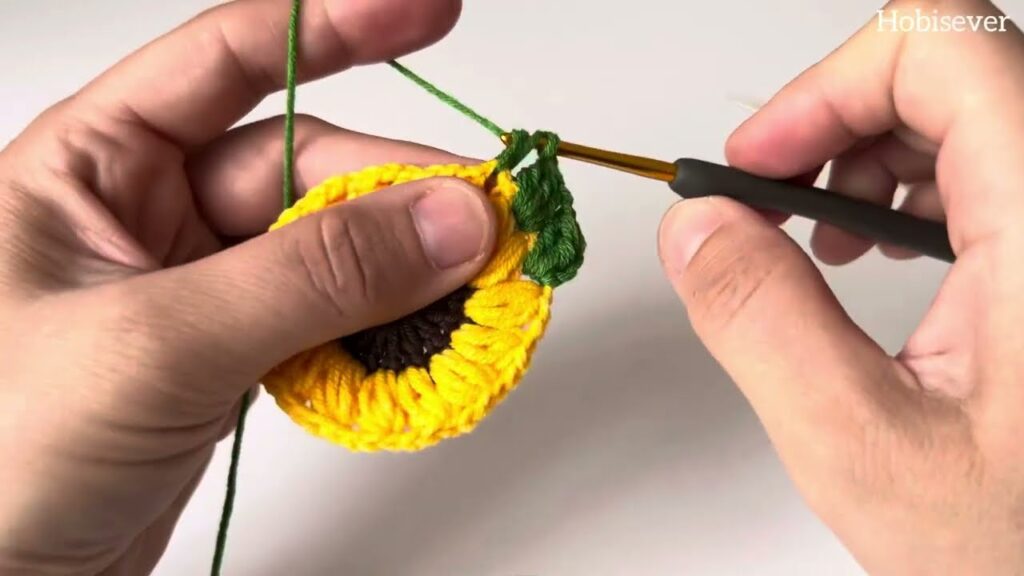
Part 3: The Green Sepals/Starting the Square
This round prepares your sunflower to become a square.
- Attach Green Yarn: Turn your work over to the back. You’ll see the 10 Sl St posts between the yellow petals from Round 2.
- Join your green yarn with a Sl St into any of these Sl St posts.
- Round 3 (Sepals/Foundation):
- Ch 3 (counts as first Dc)
- 2 Dc into the same Sl St post.
- To create the square corners, we’ll use a combination of stitches:
- Next 2 Sl St posts: 3 Dc into each.
- Next Sl St post (Corner 1): (3 Tr, Ch 2, 3 Tr) into the same Sl St post.
- Next 2 Sl St posts: 3 Dc into each.
- Next Sl St post (Corner 2): (3 Tr, Ch 2, 3 Tr) into the same Sl St post.
- Next 2 Sl St posts: 3 Dc into each.
- Next Sl St post (Corner 3): (3 Tr, Ch 2, 3 Tr) into the same Sl St post.
- Last 2 Sl St posts: 3 Dc into each.
- To complete the last corner: You’ve already started with Ch 3 and 2 Dc in the first Sl St post. Now, in that same first Sl St post, work (3 Tr, Ch 2, 3 Tr).
- Join with a Sl St to the top of the initial Ch 3.
- (You should now have a rough square shape with 4 corners made of Tr stitches and 4 sides made of Dc stitches.)
- Note: If your corners aren’t quite square, don’t worry, the next rounds will refine them.
- Fasten off (or continue with green if you want a solid green border). Weave in your ends.
Part 4: Squaring Off the Granny
Now we’ll refine the square shape using traditional granny square techniques. You can continue with green or change to a new color here.
- Attach New Color (or continue green): Join yarn with a Sl St into any Ch 2 corner space.
- Round 4 (First Square Round):
- Ch 3 (counts as first Dc)
- (2 Dc, Ch 2, 3 Dc) into the same Ch 2 corner space. (This is your first corner)
- Along the side: Ch 1, Sk 3 stitches, (3 Dc) into the next space between the 3-Dc clusters from the previous round.
- Repeat Ch 1, Sk 3 stitches, 3 Dc across the side until you reach the next Ch 2 corner space.
- Into the Ch 2 corner space: (3 Dc, Ch 2, 3 Dc).
- Repeat the pattern of sides and corners around the square.
- Join with a Sl St to the top of the initial Ch 3.
- Fasten off and weave in ends.
Part 5: Adding More Rounds (Optional)
You can make your granny square larger by adding more rounds.
- Attach New Color (or continue): Join yarn with a Sl St into any Ch 2 corner space.
- Subsequent Rounds:
- Ch 3 (counts as first Dc)
- (2 Dc, Ch 2, 3 Dc) into the same Ch 2 corner space.
- Along the side: Ch 1, (3 Dc) into each Ch 1 space from the previous round.
- Repeat Ch 1, 3 Dc across the side until you reach the next Ch 2 corner space.
- Into the Ch 2 corner space: (3 Dc, Ch 2, 3 Dc).
- Continue this pattern, working (3 Dc, Ch 2, 3 Dc) in each corner space and (3 Dc) in each Ch 1 space along the sides, with Ch 1 between each 3-Dc cluster.
- Join with a Sl St to the top of the initial Ch 3.
- Repeat this round until your square reaches your desired size.
Finishing Touches
- Weave in all loose ends with your yarn needle. This creates a neat and professional finish.
- Block your square (optional but recommended): Wet your finished square and gently shape it into a perfect square, pinning it to a blocking mat or towel. Let it dry completely. This helps to even out your stitches and gives your square a crisp shape.
Tips for Success
- Tension is key: Try to maintain consistent tension throughout your work for an even fabric.
- Count your stitches: Especially in the initial rounds, counting helps prevent mistakes.
- Don’t be afraid to experiment: Once you’re comfortable with the basic pattern, try different yarn weights or color combinations to create unique effects.
- Practice makes perfect: If your first square isn’t perfect, don’t worry! Keep practicing, and you’ll improve with each one.
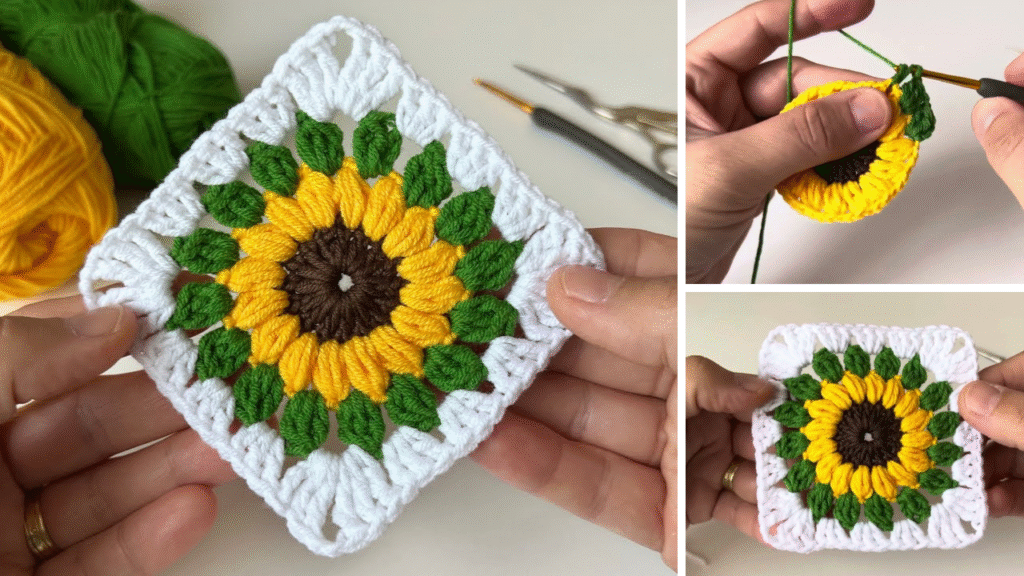
Conclusion: Blooming with Your Sunflower Granny Squares
You’ve now successfully journeyed through the steps of creating a vibrant sunflower granny square! From the cozy brown center to the radiant yellow petals and the framing green square, you’ve mastered a truly cheerful and versatile crochet motif.
These squares aren’t just beautiful; they’re incredibly adaptable. Whether you’re dreaming of a sun-drenched blanket, a charming tote bag, unique garments, or even decorative placemats, the sunflower granny square offers endless possibilities for adding a handmade touch to your world.
Don’t be afraid to experiment with different yarn weights, color combinations, or even subtle variations in stitch patterns to make your sunflower squares truly your own. Each square you create is a little piece of art, showcasing your growing skills and creativity. So, gather your yarn, let your hook dance, and continue to bloom with your beautiful crochet creations!
Video tutorial:


