
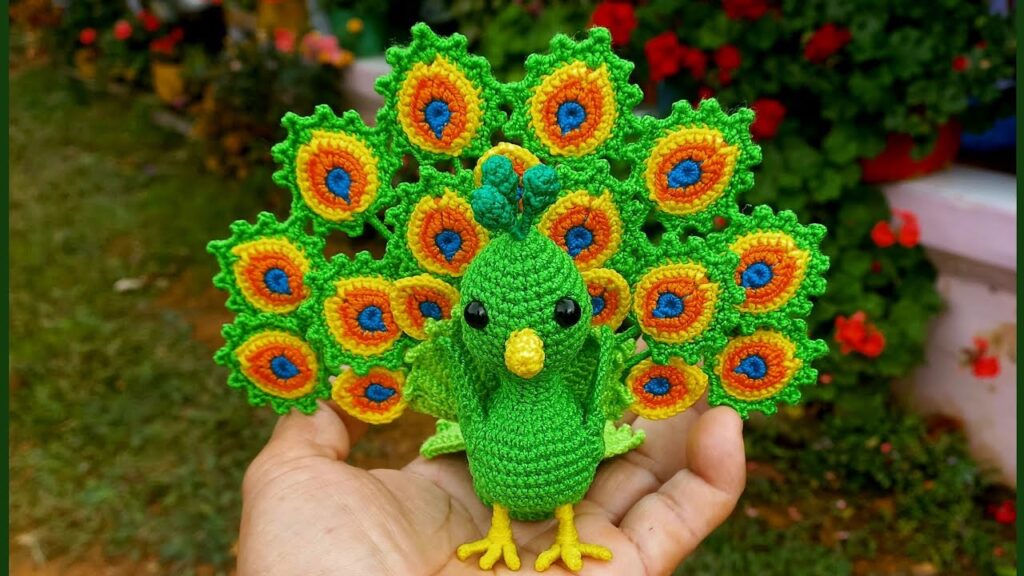
The peacock, with its dazzling display of iridescent feathers, is a creature of unparalleled beauty. Recreating its majestic charm in miniature form through crochet is a delightful project that combines basic amigurumi techniques with creative colorwork and shaping. A mini crocheted peacock makes for an adorable desk companion, a unique keychain, a charming appliqué, or a special gift.
This article will guide you through the conceptual steps and essential techniques needed to crochet your own mini peacock, emphasizing the key elements that give this bird its iconic look.
Graceful & Grand in Miniature: How to Crochet a Mini Peacock
Crocheting a mini peacock is a journey into shaping and color. While exact stitch counts will vary by specific pattern, understanding the components and techniques will empower you to create your own feathered friend.
What You’ll Need: The Artist’s Palette & Tools
- Yarn:
- Main Body Color: Often shades of blue (royal blue, turquoise, sapphire) or green.
- Accent Colors for Tail: Various shades of green, blue, gold/yellow, brown, and a small amount of black for the “eyes.”
- Beak Color: Small amount of yellow or orange.
- Weight: Fingering (1) or Sport (2) weight yarn is ideal for a truly mini peacock, but DK (3) or worsted (4) can be used for a slightly larger version. Choose acrylic or cotton for good stitch definition.
- Crochet Hook: Size appropriate for your chosen yarn weight (e.g., 2.0mm – 3.5mm).
- Stuffing: Polyester fiberfill.
- Safety Eyes (Optional): Small black safety eyes (e.g., 4mm – 6mm) for the face. Alternatively, embroider eyes.
- Tapestry Needle: For assembling pieces and weaving in ends.
- Scissors:
- Stitch Markers (Optional): Helpful when working in the round.
- Wire (Optional): For a posable neck or stand.
- Fabric Stiffener/Spray Starch (Optional): For shaping and stiffening the tail feathers.
Key Crochet Techniques & Stitches
Before you begin, ensure you’re comfortable with these fundamental crochet skills:
- Magic Ring (or Adjustable Ring): Essential for starting amigurumi pieces to create a tight, hole-free center.
- Single Crochet (SC): The primary stitch for amigurumi, creating dense fabric.
- Increase (Inc): Working two SC into one stitch to expand the piece.
- Decrease (Dec): Working two SC together (invisible decrease recommended) to shrink the piece.
- Working in the Round: Crocheting continuously in spirals without joining rounds (unless specified).
- Color Changes: Seamlessly switching between yarn colors.
- Slip Stitch (Sl St): For joining pieces or moving across stitches.
- Chain (Ch): For starting chains and creating the crest.
- Basic Embroidery: For eyes, beak, or details if not crocheted.
Deconstructing the Mini Peacock: Part by Part
A mini peacock is typically built from several distinct crocheted components that are then assembled.
1. The Body (Pear-shaped or Egg-shaped)
- Concept: This forms the main bulk of the peacock. It should be wider at the bottom and taper towards the top where the neck will attach.
- Method: Work in the round using the main body color.
- Start with a Magic Ring.
- Increase Rounds: Gradually increase your stitches in subsequent rounds to create the widest part of the body.
- Even Rounds: Work a few rounds without increases to create the “belly” or main body shape.
- Decrease Rounds: Gradually decrease stitches to shape the top of the body where the neck will join.
- Stuffing: Stuff firmly as you close up the body. Ensure even stuffing to maintain shape.
- Closing: Finish with a final decrease round and fasten off, leaving a tail for sewing.
2. The Neck and Head
- Concept: A slender neck leading to a small, rounded head.
- Method: Also worked in the round, typically starting from the bottom of the neck.
- Neck Base: Start with a small Magic Ring or a few chains joined to form a circle.
- Neck Length: Work several rounds in SC without increases or decreases to create the desired neck length. Keep it relatively thin.
- Head Shaping: Introduce increases at the top of the neck to gradually form the rounded head.
- Eye Placement: If using safety eyes, insert them before closing up the head, positioning them appropriately.
- Stuffing: Lightly stuff the head and neck.
- Closing: Decrease rounds to close off the head. Fasten off, leaving a long tail for sewing to the body.
3. The Beak
- Concept: A small, pointed beak.
- Method: Can be crocheted or embroidered.
- Crocheted: Often a tiny triangle worked in rows of SC (e.g., Ch 3, SC in 2nd ch from hook and next, Ch 1, turn. Dec over 2 stitches. Fasten off).
- Embroidered: Use orange or yellow yarn to stitch a small ‘V’ or triangular shape directly onto the head.
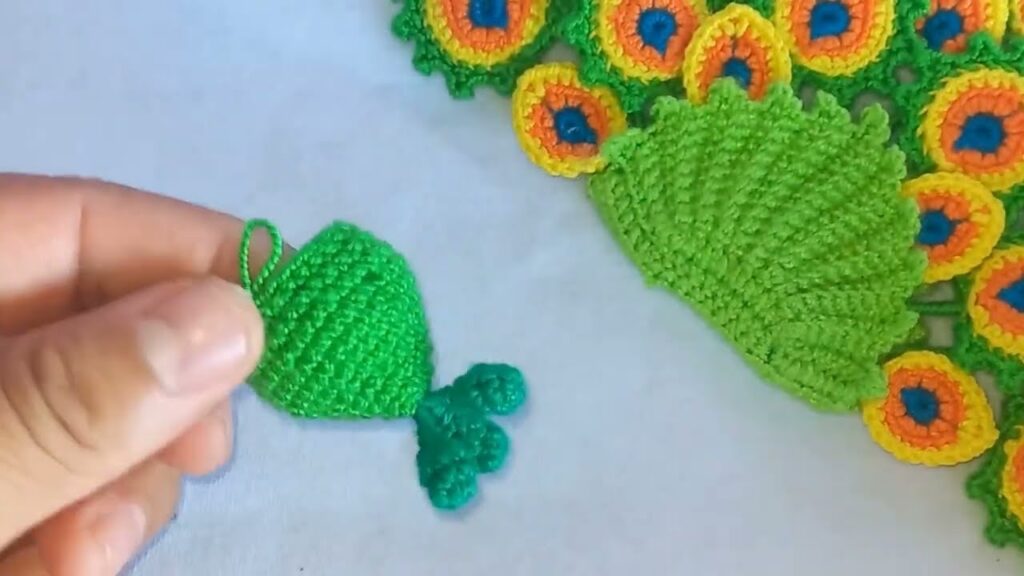
4. The Crest
- Concept: The distinctive crown of feathers on the peacock’s head.
- Method: Simple chain stitches.
- Using the main body color or a contrasting accent color (like black or dark blue), attach yarn to the top of the head.
- Chain a few stitches (e.g., Ch 5-7), then Sl St back down the chain to form a small loop or standing “feather.” Repeat this 2-3 times to create a cluster.
- Alternatively, you can make 2-3 tiny “I-cord” like tubes or small rounds of SC and sew them on.
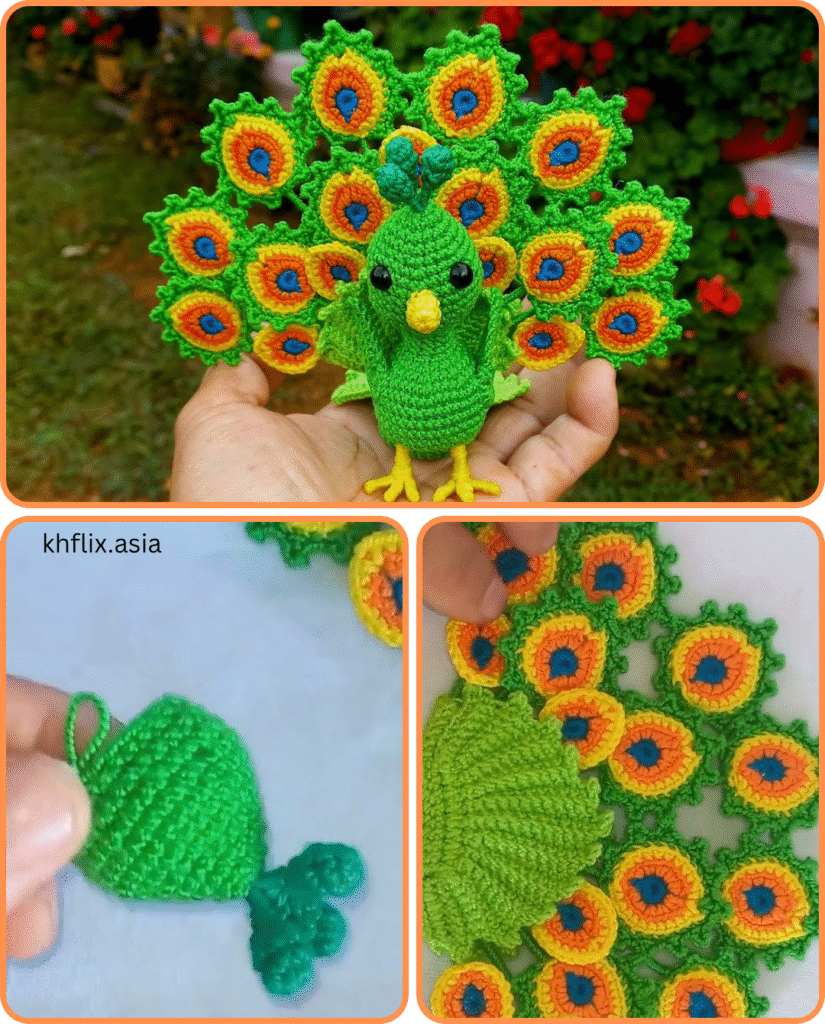
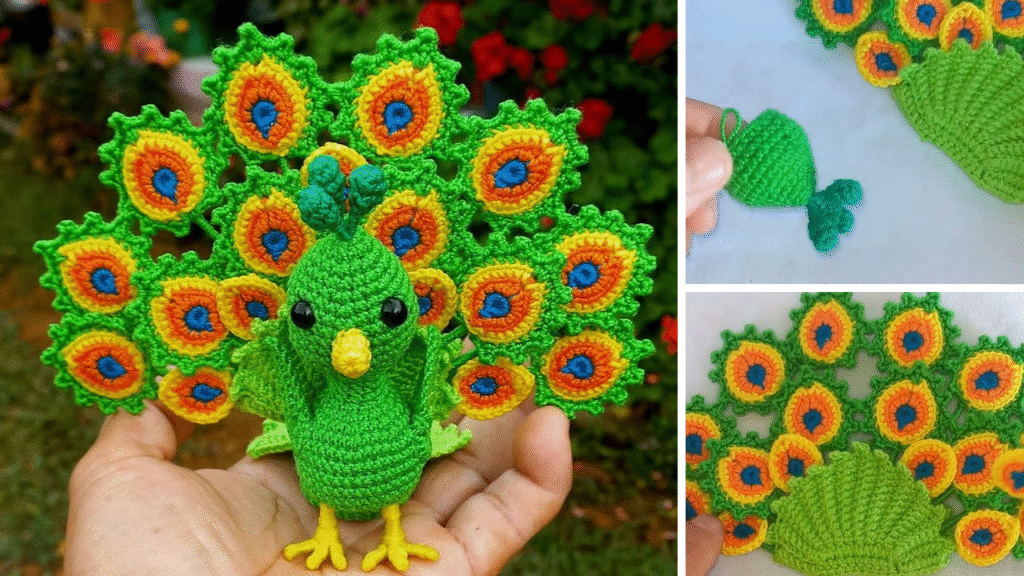
5. The Tail (The Star of the Show!)
This is where the magic happens and where the majority of your colorwork and creativity will be focused.
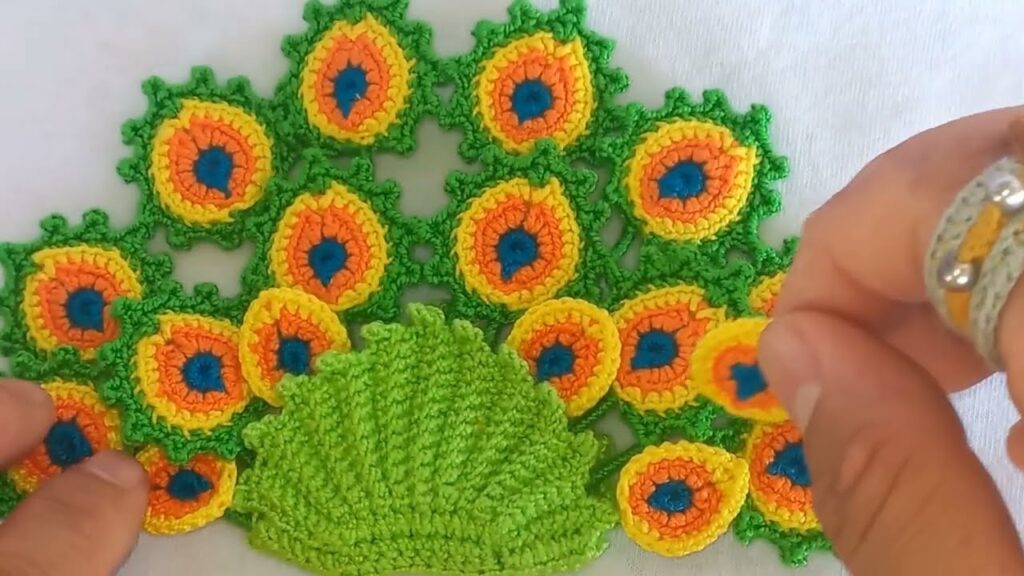
- Concept: A large, fanned shape with prominent “eye” spots.
- Method 1: Solid Fanned Piece (Most Common for Mini):
- Shape: This piece is typically worked in rows to create a semi-circle or fan shape.
- Start with a chain. Work rows of SC or HDC, increasing stitches significantly at the end of each row (or at regular intervals) to make the piece expand rapidly into a fan.
- Alternatively, you can work a large half-circle in the round, making increases in several spots to create the flat fan.
- Color Changes: This is crucial. Plan your color transitions to mimic the peacock’s iridescent tail:
- Start with a darker base (e.g., dark blue/green).
- Transition to lighter greens and blues as you work outwards.
- End with a border color (e.g., gold or a contrasting blue/green).
- The “Eyes” (Ocelli): There are several ways to add these:
- Surface Crochet: Once the fan is complete, use surface slip stitches or surface single crochet in contrasting colors (gold, then black, then a final small blue/green circle) to create concentric rings directly on the fan. This is very effective.
- Small Crocheted Circles: Crochet tiny flat circles in the appropriate colors (e.g., a tiny black circle, then a slightly larger blue circle around it, then a gold circle around that). Sew these onto the tail piece.
- Embroidery: Use embroidery floss or yarn to stitch concentric circles directly onto the tail.
- Shape: This piece is typically worked in rows to create a semi-circle or fan shape.
- Method 2: Individual Feathers (More Complex for Mini):
- Crochet several individual feather shapes (often a teardrop shape worked in rows or rounds, with increases and decreases).
- Add color changes or surface crochet to each individual feather for the “eye” spot.
- Arrange and sew these individual feathers onto a central “stump” or directly onto the back of the peacock body in a fanned arrangement.
6. Legs (Optional)
- Concept: Small, delicate legs.
- Method:
- Crocheted: Chain a few stitches, then slip stitch back down the chain. Make two.
- Wire: Wrap floral wire or craft wire in yarn, then bend into a leg shape.
- Often omitted in mini peacocks for simplicity.
Assembly
Once all your components are crocheted:
- Attach Neck and Head: Sew the neck/head piece securely to the top/front of the body using the long yarn tail.
- Attach Beak and Crest: Sew or embroider the beak onto the head. Attach the crocheted crests to the top of the head.
- Attach Tail: Position the large fanned tail piece at the back of the body. Sew it firmly in place along its straight edge. For extra support, you might sew a few stitches into the body through the tail’s center.
- Add Eyes: If not using safety eyes, embroider small black eyes onto the head.
- Weave in All Ends: This is critical for a neat, finished look. Use your tapestry needle to hide all yarn tails securely within the stitches.
Finishing Touches & Tips for Success
- Stuffing: Stuff firmly but evenly. Overstuffing can distort stitches; understuffing can make the piece floppy.
- Tension: Maintain consistent tension throughout your crocheting for a uniform look.
- Invisible Decreases: Learn how to do an invisible decrease (insert hook into front loop only of next 2 stitches, yarn over, pull through 2 loops, yarn over, pull through 2 loops) for smoother shaping in amigurumi.
- Yarn Choice: Stick to smooth yarns. Fuzzy or textured yarns can obscure stitch definition.
- Tail Stiffening (Optional): For a truly fanned tail, you can lightly mist the tail piece with water and then use a fabric stiffener or spray starch. Pin it into a fanned shape on a blocking mat and let it dry completely.
- Personalization: Experiment with different shades of blue and green, or even unconventional colors! Add beads or sequins for extra sparkle on the tail.
Creating a mini crochet peacock is a rewarding project that allows you to capture the essence of this magnificent bird in a tiny, tangible form. With patience, attention to detail, and a good pattern as your guide, you’ll soon have your own adorable, tiny symbol of beauty. Happy crocheting!
Video tutorial:


