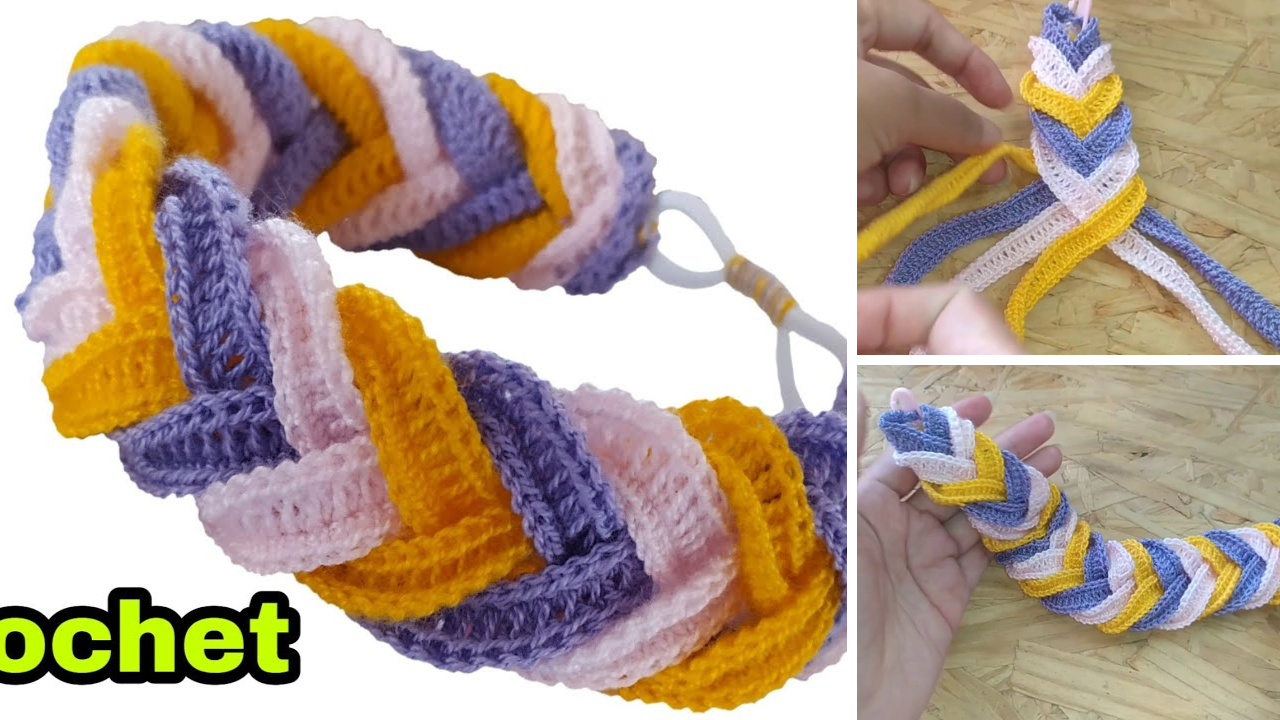
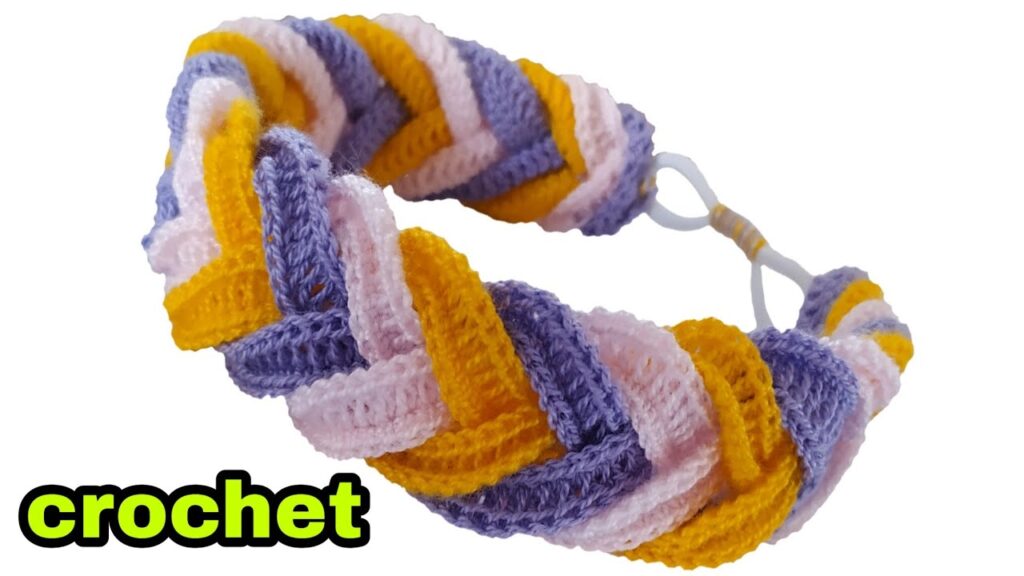
Headbands are a timeless accessory, offering both practical hair management and a touch of personal flair. While countless variations exist, the crochet headband with six crossed braids stands out for its unique texture, intricate design, and surprisingly achievable construction. This isn’t just a simple band; it’s a statement piece that blends the warmth and artistry of crochet with a captivating braided detail, perfect for adding a bohemian touch, a touch of elegance, or simply a chic accent to any outfit.
Why Six Crossed Braids? The Allure of Intricacy
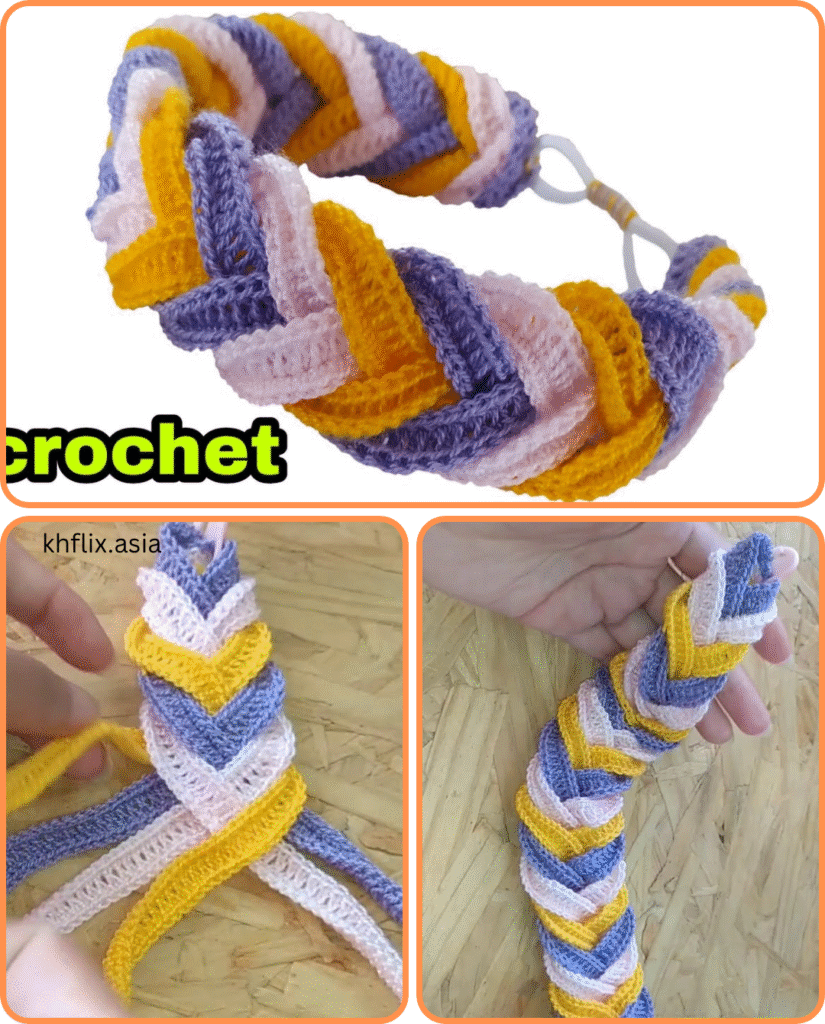
The “six crossed braids” element is what truly elevates this headband from ordinary to extraordinary. Instead of flat, parallel strands, the braids interlace and cross over each other, creating a dynamic, almost three-dimensional effect. This crossing not only adds visual interest and depth but also contributes to the headband’s overall structure and elasticity. It’s a design element that looks complex and sophisticated, yet with a methodical approach, it’s entirely within the reach of intermediate crocheters, and even adventurous beginners.
Materials You’ll Need
Before diving into the crochet process, gather your supplies. The beauty of this project lies in its relative simplicity regarding materials:
- Yarn: Opt for a soft, comfortable yarn that won’t irritate your skin.
- Weight: Light worsted (DK) or worsted weight yarn is generally ideal, offering a good balance of drape and stitch definition.
- Fiber: Cotton, acrylic, or a blend of the two are excellent choices. Cotton offers breathability and a natural feel, while acrylic provides durability and a wide range of colors. Wool blends can also work, especially for cooler weather, but ensure it’s not too scratchy.
- Color: This is where you can truly personalize your headband. A solid color will highlight the braided texture, while a variegated yarn can create a fun, multi-tonal effect.
- Crochet Hook: The size of your hook will depend on your yarn weight and your desired fabric density. As a general guideline:
- For DK weight yarn: 3.5mm – 4.5mm (E-G hook)
- For worsted weight yarn: 5.0mm – 5.5mm (H-I hook)
- Always check your yarn label for recommended hook sizes and adjust as needed to achieve a fabric that isn’t too stiff or too flimsy.
- Tapestry Needle: Essential for weaving in ends neatly and seamlessly.
- Scissors: For cutting your yarn.
- Measuring Tape: To ensure your headband fits comfortably.

Understanding the Construction: A Breakdown
While specific patterns will vary, the fundamental construction of a six-crossed-braid headband typically involves these key stages:
- Creating the Base Strands: The “braids” are not individually crocheted and then braided. Instead, you crochet six long, relatively narrow strips or “strands.” These strands are often worked in a simple stitch like single crochet (SC) or half double crochet (HDC) to create a consistent, flexible foundation for the braiding. The length of these strands will determine the circumference of your headband, so ensure they are long enough to wrap comfortably around your head with a little extra for the braiding and joining.
- The Braiding Process: This is the most distinctive part. Once your six strands are crocheted, you’ll carefully arrange and cross them over each other. There are various braiding techniques that can be adapted for six strands, but a common approach for this type of headband involves an alternating crossover pattern that creates the characteristic “crossed” look. Imagine dividing your six strands into two groups of three, and then systematically weaving and crossing them, securing each crossing point as you go.
- Securing the Braids: As you braid, you’ll typically use a small amount of yarn and your tapestry needle to periodically stitch the crossed sections together. This prevents the braids from unraveling and helps maintain the headband’s shape.
- Joining the Ends: Once the braiding is complete and the desired length is achieved, the ends of the braided section are joined together. This can be done by stitching them neatly, or by working a final few rows of crochet that bring the ends together into a seamless circle. Some patterns might incorporate an elastic band at the back for extra flexibility and a snug fit.
- Finishing Touches: Weave in all loose ends securely. You can also add embellishments like buttons, beads, or a small crocheted flower if desired.
Key Crochet Stitches You’ll Likely Use
- Chain (ch): The foundation of most crochet projects.
- Slip Stitch (sl st): Used for joining and moving across stitches invisibly.
- Single Crochet (SC): A basic, tight stitch, often used for the strands.
- Half Double Crochet (HDC): A slightly taller stitch than SC, offering good drape.
- Double Crochet (DC): A taller stitch, less common for the strands but could be used for decorative edging.
Tips for Success
- Gauge is Important: While not as critical as for garments, checking your gauge (the number of stitches and rows per inch) will help ensure your headband turns out the correct size and the braids have the desired thickness.
- Consistent Tension: Maintaining even tension throughout your crocheting will result in a more uniform and attractive fabric for your strands.
- Practice the Braiding: If you’re new to braiding with more than three strands, it might be helpful to practice the braiding technique with scrap yarn before working on your final headband.
- Refer to a Pattern: While this article provides a general overview, a specific pattern will offer detailed instructions, stitch counts, and visual aids (like charts or photos) which are invaluable. Search for “crochet headband six crossed braids pattern” on Ravelry, Pinterest, or your favorite crochet blog.
- Don’t Be Afraid to Experiment: Once you understand the basic construction, feel free to experiment with different yarn colors, slight variations in stitch patterns for the strands, or even the number of crossed sections to create your own unique twist.

The Versatility of the Six-Braided Headband
This crocheted accessory is incredibly versatile and can complement a variety of looks:
- Bohemian Chic: Pair it with flowing dresses, peasant blouses, and natural fabrics for a relaxed, artistic vibe.
- Casual Everyday: Elevate a simple t-shirt and jeans outfit with a pop of texture and color.
- Elegant Accent: Choose a sophisticated yarn color and pair it with a more formal ensemble for a subtle yet refined touch.
- Hair Management: Keep flyaways at bay while adding a stylish element to your hairstyle, whether your hair is up or down.
General Steps to Make a Crochet Headband with Six Crossed Braids
The core idea is to crochet six individual strips (the “braids”) and then physically braid or weave them together before joining the ends.
Step 1: Gather Your Materials
- Yarn: Light worsted (DK) or worsted weight cotton, acrylic, or blend. Choose a color you love! (e.g., 50-100 grams, depending on size and yarn weight).
- Crochet Hook: Size appropriate for your yarn (e.g., 4.0mm – 5.5mm, G-H). Check your yarn label for recommendations.
- Tapestry Needle: For weaving in ends and securing braids.
- Scissors:
- Measuring Tape: Crucial for getting the right fit.
- Stitch Markers (Optional but Recommended): To help keep track of your six strands and organize them during braiding.
Step 2: Determine Your Headband Length and Strand Width
- Headband Length: Measure the circumference of your head where you’d like the headband to sit. Subtract about 1-2 inches (2.5-5 cm) from this measurement. This allows for the natural stretch of crochet and the tightening effect of the braiding.
- Example: If your head is 22 inches (56 cm), aim for your unbraided strands to be around 20-21 inches (51-53 cm) long.
- Strand Width: Each individual strand should be relatively narrow, perhaps 0.5 to 0.75 inches (1.2 to 2 cm) wide. This will depend on your yarn weight and chosen stitch.
- Tip: You’ll need to make a small swatch to figure out how many chains you need for your desired width and what stitch works best for flexibility.
Step 3: Crochet the Six Strands
This is the most time-consuming part of the crocheting.
- Choose Your Stitch:
- Single Crochet (SC): Creates a dense, sturdy, and relatively flat fabric. Good for defined braids.
- Half Double Crochet (HDC): A bit taller than SC, offering slightly more drape and speed.
- Foundation Single Crochet (FSC): If you’re comfortable, this can create a very neat starting edge without a separate chain row.
- Make a Starting Chain: Chain enough stitches to achieve your desired strand width.
- Work in Rows: Work in rows until your strand reaches the calculated length (e.g., 20-21 inches).
- Example for SC: Chain (number for width + 1 for turning). SC in 2nd ch from hook and across. Chain 1, turn. SC in each stitch across. Repeat until desired length.
- Repeat 5 More Times: Make five identical strands. Ensure they are all the same length and width for consistent braiding. Fasten off each strand, leaving a slightly longer tail (6-8 inches/15-20 cm) on one end for weaving in later or for joining.
Step 4: Prepare for Braiding
- Lay Out Your Strands: Gather your six finished strands. It’s helpful to secure one end of all six strands together temporarily (e.g., with a safety pin, hair tie, or by tying a loose knot) to an immovable object or your lap to keep them steady.
- Organize for Braiding: Lay them out side-by-side. You might label them mentally or with stitch markers: 1, 2, 3, 4, 5, 6.
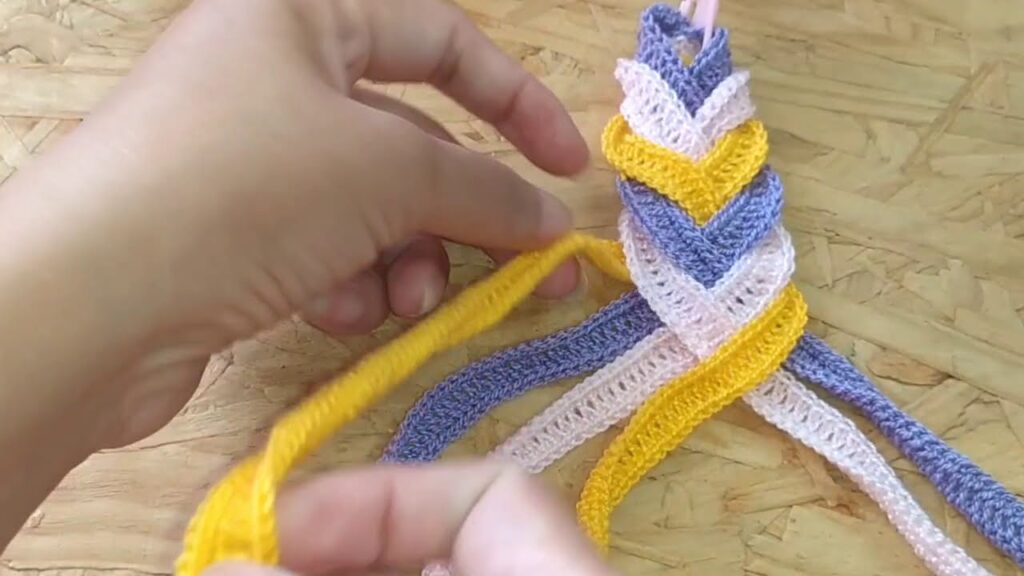
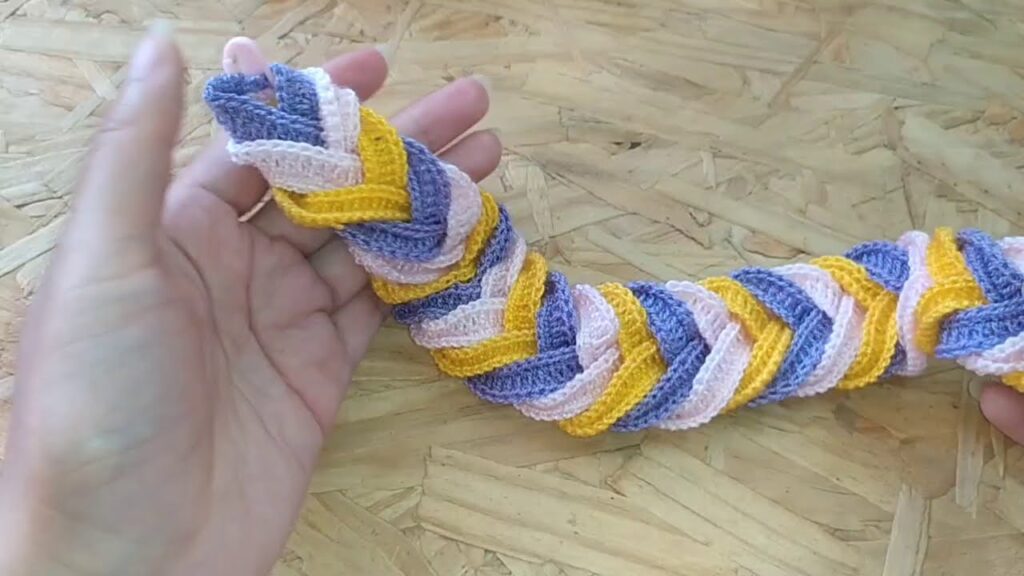
Step 5: The Six-Strand Crossed Braid
This is where the magic happens. There are several ways to do a 6-strand braid, but for the “crossed” look, you often use a method where strands pass over and under multiple other strands.
- Common Method (Simplified for illustration):
- Imagine three groups of two: (1,2), (3,4), (5,6)
- Start with the outermost strand (6): Take strand #6 and cross it over #5, then under #4, then over #3.
- Now take the new outermost strand (1): Take strand #1 and cross it over #2, then under #3 (the new #3), then over #4 (the new #4).
- Repeat: Continue this “over 2, under 1, over 1” (or similar sequence, it varies slightly by tutorial) motion, always working from the outermost strand towards the center.
- Crucial Step: Securing the Crosses! As you braid, you must periodically secure the braids.
- After every few crosses (e.g., every 1-2 inches), use your tapestry needle and a scrap piece of yarn (matching your headband) to make a few invisible stitches through the crossed strands. This prevents the braid from unraveling and gives the headband its structure.
- Alternatively, some patterns might have you make a few slip stitches or single crochet stitches through the center of the braid at intervals.
- Watch a Video Tutorial: For a six-strand braid, a visual tutorial is almost essential. Search YouTube for “6 strand braid tutorial” or “crochet headband crossed braid tutorial.” Look for one that shows securing the braids.
Step 6: Finish the Braiding
- Check Length: As you braid, periodically wrap the braided section around your head. Stop braiding when the braided length, combined with the remaining unbraided ends, is just long enough to comfortably fit your head. Remember, the braided section will be shorter than the sum of the unbraided strands due to the weaving.
- Leave Unbraided Ends: Leave a few inches (5-8 cm) of unbraided length at the end of your strands. This makes it easier to join them neatly.
Step 7: Joining the Ends
- Bring Ends Together: Bring the two ends of your braided headband together to form a circle.
- Align Strands: Carefully align the six loose ends from one side with the six loose ends from the other.
- Seamless Join (Recommended):
- Unravel a small portion of the starting chains of one side (if you didn’t leave long tails).
- Using your tapestry needle, carefully graft or whip stitch the corresponding ends of the strands together. This is like sewing the ends of the crocheted strips together to create a continuous band.
- Some patterns might instruct you to flatten the ends and then crochet a few rows of single crochet through both layers to join them.
- Secure: Ensure the join is very secure so it doesn’t come apart with wear.
Step 8: Finishing Touches
- Weave in Ends: Use your tapestry needle to carefully weave in all remaining loose yarn tails throughout the headband. Take your time to make them invisible.
- Adjust: Gently stretch and adjust your headband to ensure it sits comfortably.

Important Note on Finding a Pattern:
While this guide explains the process, finding a specific, detailed pattern (from a website like Ravelry, Pinterest, or a crochet blog) is highly recommended. A good pattern will provide:
- Exact starting chain counts for your strands based on recommended yarn and hook.
- Precise length measurements for your strands.
- Step-by-step instructions (with photos or diagrams) for the specific six-strand braiding technique used and how to secure it.
- Detailed joining instructions for a seamless finish.
By following these general steps and supplementing with a specific pattern for the details, you’ll be well on your way to crocheting your own beautiful six-crossed-braid headband!
The crochet headband with six crossed braids is a rewarding project that combines the satisfaction of creating something by hand with the joy of wearing a unique and beautiful accessory. Its intricate appearance belies a construction that is approachable for many crocheters, making it a perfect addition to your handmade wardrobe or a thoughtful gift for a loved one. So grab your hook, choose your yarn, and prepare to weave some magic into your next crochet project!
Video tutorial:


