Who doesn’t love slipping their feet into something warm and handmade after a long day? Crochet granny square slippers are the perfect project for instant cozy gratification. They’re quick, customizable, and a fantastic way to use up those colorful yarn scraps you’ve been hoarding. Whether you’re a beginner looking for a simple success or an experienced crocheter seeking a fast and fun make, these slippers are for you!
Why Crochet Granny Square Slippers?
- Fast to Make: You can whip up a pair in just a few hours, depending on your speed.
- Scrap Buster: Ideal for using up small amounts of leftover worsted-weight yarn.
- Customizable: Easily adjust the size and color combinations to suit anyone.
- Beginner-Friendly: Uses basic crochet stitches and the foundational granny square.
- Comfortable: Provides warmth and a soft landing for your feet.
- Great Gift Idea: A thoughtful and personal handmade present.
Materials You’ll Need:
Before you start, gather your supplies. The yarn weight and hook size can be adjusted based on your desired slipper size and how dense you want the fabric to be.
- Yarn: Worsted weight (Aran) yarn is ideal for slippers, as it’s warm and sturdy. You’ll need about 50-100 grams per slipper, depending on size. This is a perfect project for scrap yarn! Choose acrylic or a wool blend for warmth.
- Crochet Hook: A hook size appropriate for your chosen yarn, typically 5.0 mm (H/8) or 5.5 mm (I/9) for worsted weight.
- Yarn Needle (Tapestry Needle): For weaving in ends and seaming.
- Scissors: For cutting yarn.
- Stitch Markers (Optional but Recommended): Helpful for marking stitches, especially if you’re new to joining rounds.
- Non-Slip Fabric Paint or Puff Paint (Optional): For adding grip to the soles if you’re concerned about slipping.

Crochet Abbreviations (US Terminology):
- ch: chain
- sl st: slip stitch
- dc: double crochet
- sp: space
- st(s): stitch(es)
- FO: fasten off
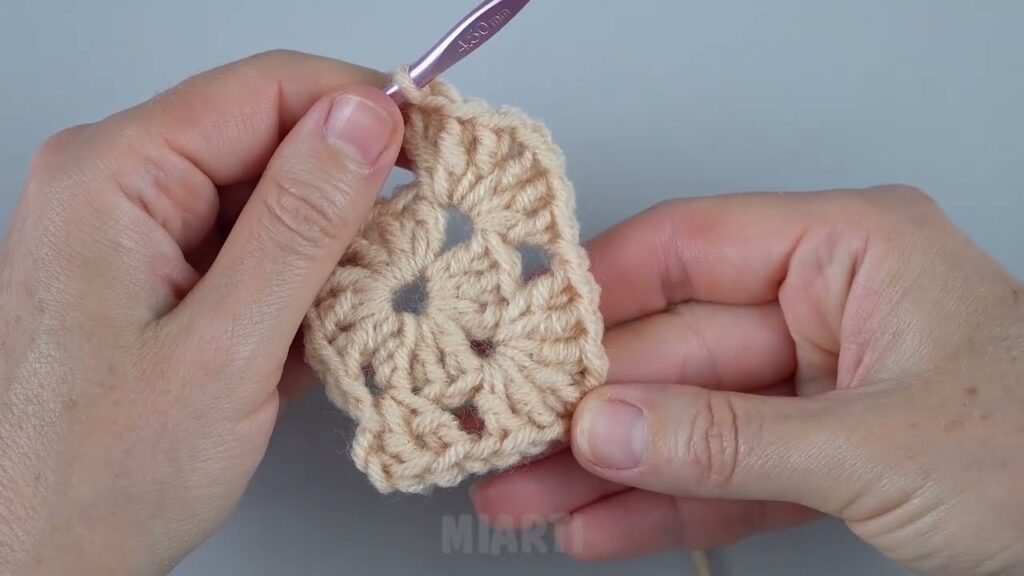
Part 1: Crocheting Your Granny Squares
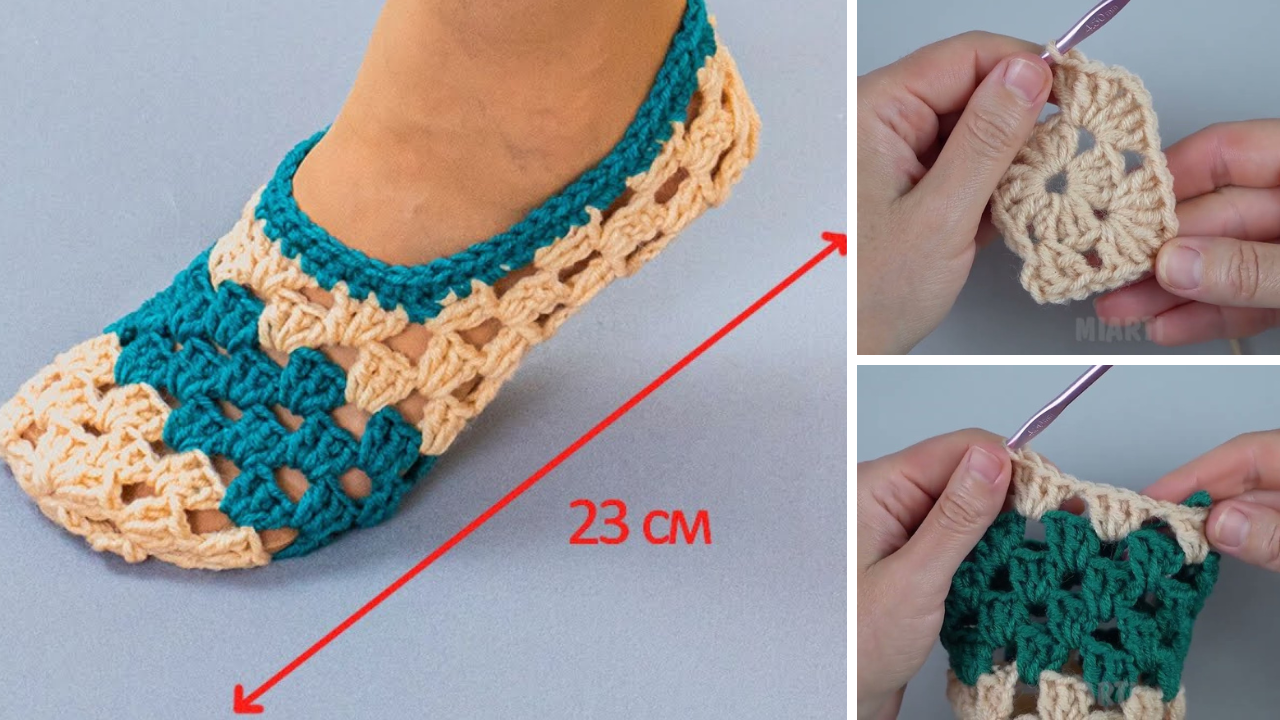
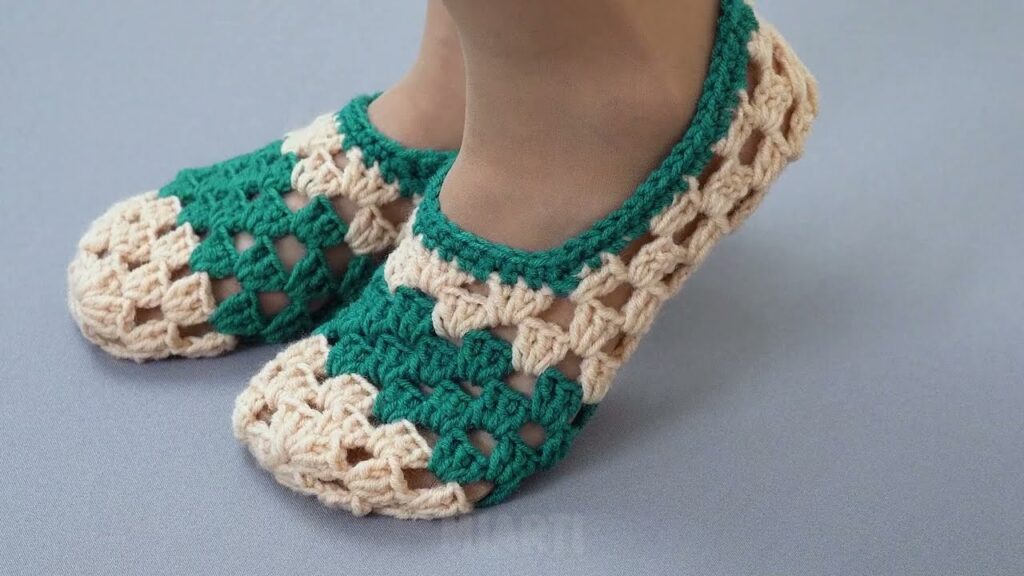
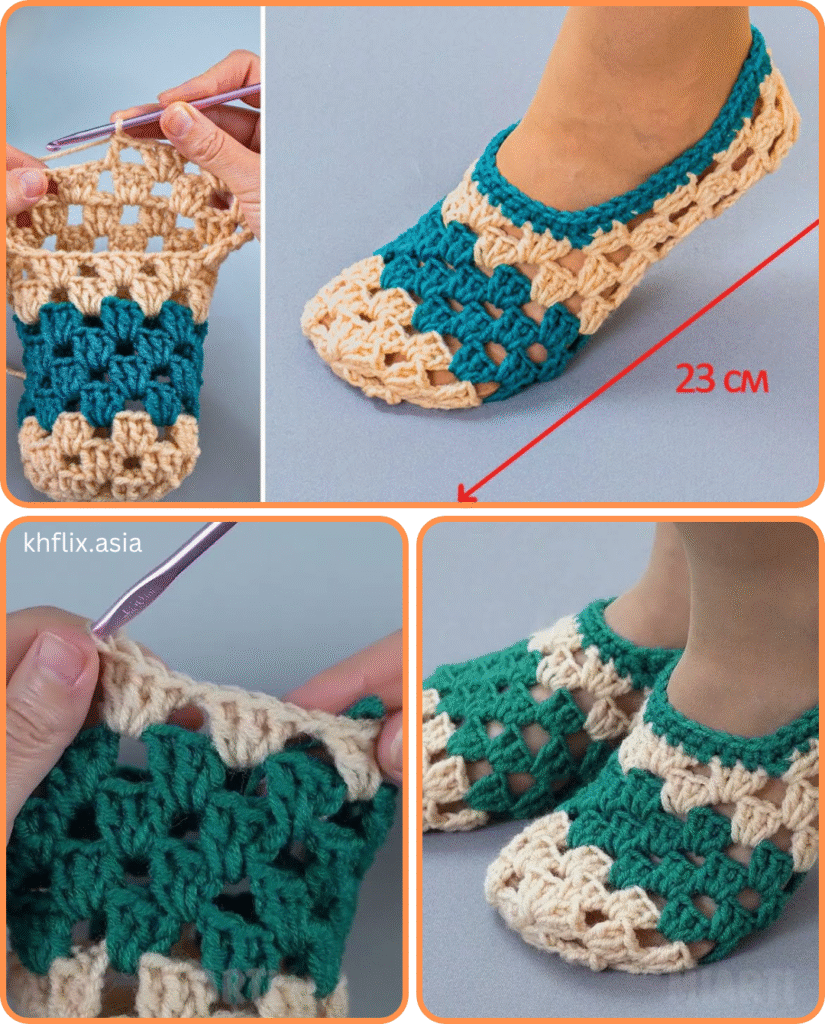
The core of these slippers is the classic granny square. You’ll typically need two squares per slipper, so a total of four squares for a pair. The size of your squares will determine the size of your slippers, so you may need to adjust the number of rounds.
Standard 3-Round Granny Square (for an adult small/medium slipper):
Round 1:
- Create a magic ring (or ch 4, sl st to first ch to form a ring).
- Ch 3 (counts as first dc).
- Work 2 dc into the ring.
- Ch 2 (this is your first corner space).
- Work 3 dc into the ring, ch 2. Repeat from * two more times.
- Sl st to the top of the initial ch 3 to join. (You should have four groups of 3 dc separated by ch-2 spaces).
- (Optional) Fasten off Color A if changing colors.
Round 2:
- If changing colors, join new color with a sl st in any ch-2 corner space. If continuing with the same color, sl st into the next 2 dc stitches, then sl st into the ch-2 corner space.
- Ch 3 (counts as first dc).
- Work (2 dc, ch 2, 3 dc) into the same ch-2 corner space (this forms your first corner).
- Ch 1. Work (3 dc, ch 2, 3 dc) into the next ch-2 corner space. Repeat from * two more times.
- Ch 1.
- Sl st to the top of the initial ch 3 to join.
- (Optional) Fasten off Color B if changing colors.
Round 3:
- If changing colors, join new color with a sl st in any ch-2 corner space. If continuing with the same color, sl st into the next 2 dc stitches, then sl st into the ch-2 corner space.
- Ch 3 (counts as first dc).
- Work (2 dc, ch 2, 3 dc) into the same ch-2 corner space.
- Ch 1. Work 3 dc into the next ch-1 space. Ch 1. Work (3 dc, ch 2, 3 dc) into the next ch-2 corner space. Repeat from * two more times.
- Ch 1. Work 3 dc into the last ch-1 space. Ch 1.
- Sl st to the top of the initial ch 3 to join.
- Fasten off. Weave in all your ends securely.
Sizing Your Squares:
- For larger feet: Add more rounds to your granny squares (e.g., a 4-round or 5-round square).
- For smaller feet (children’s sizes): A 2-round or small 3-round square might be sufficient.
- Test Fit: Place a finished square over the top of your foot. It should cover most of your toes and the arch of your foot.
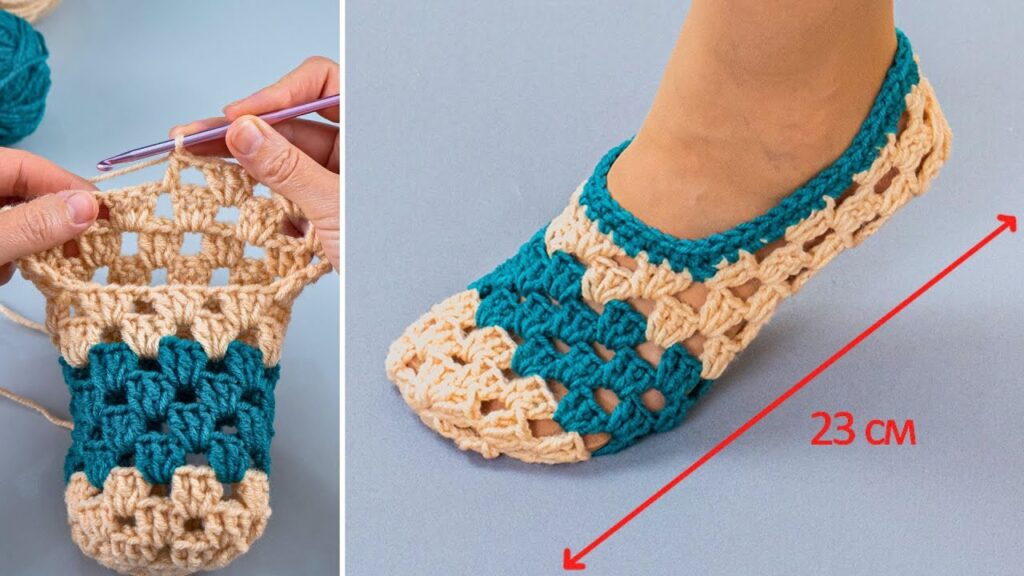
Part 2: Assembling Your Slipper
This is where the magic happens and your squares transform into a slipper shape!
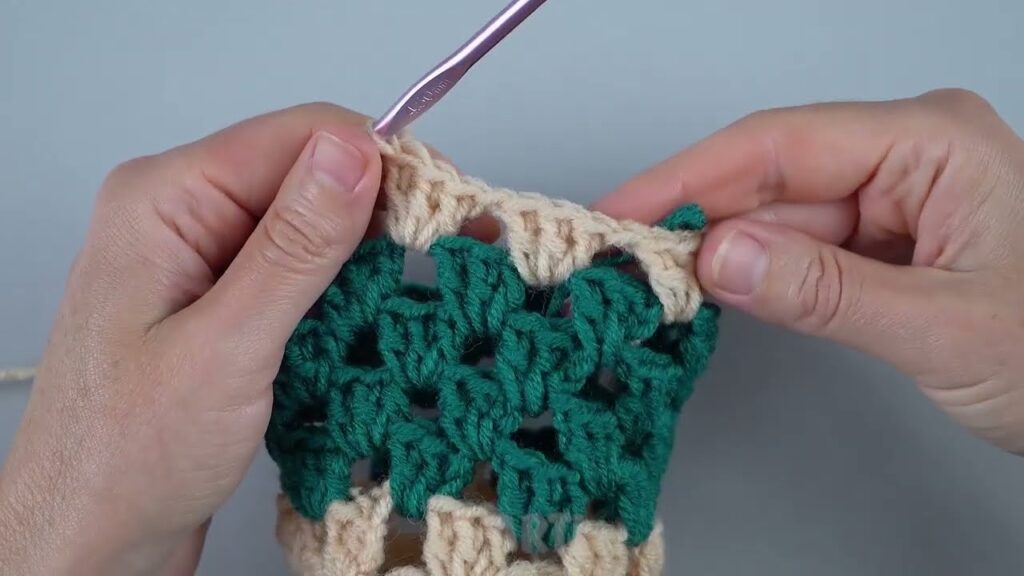
Step 1: Join Two Squares for the Top of the Foot
- Take two of your finished granny squares.
- Place them wrong sides together, aligning one full side (the length between two corners).
- Using your yarn needle and a length of your joining yarn (you can use one of your granny square colors or a contrasting color), whip stitch (or use your preferred joining method like slip stitch or single crochet join) them together along this one side. Make sure your stitches are neat and secure. This seam will run along the top of your foot.
Step 2: Fold and Form the Slipper
- Now, lay the joined piece flat. You’ll notice it forms a long rectangle with two squares connected.
- Fold this piece in half, bringing the unjoined short ends together. The seam you just made will be at the very top.
- You’ll now have a shape that roughly resembles a slipper. The two side edges are open, and the back “heel” section is open.
Step 3: Seam the Back (Heel)
- Using your yarn needle and joining yarn, whip stitch (or single crochet) the back edges of the folded squares together. This seam will form the heel of your slipper. Work from the top down to the bottom corner.
Step 4: Seam the Bottom (Sole)
- Continue from where you left off at the heel.
- Now you’ll seam the bottom edges together. This forms the sole of your slipper. Work along the remaining open bottom edge, from the heel seam to what will be the toe opening.
- Important: Do NOT seam all the way to the very front corner. You need to leave an opening for your toes! Stop seaming when you have about 3-4 inches (7-10 cm) remaining unseamed at the front (this will be the toe area). The exact measurement will depend on your foot size.
Part 3: Finishing Touches
Almost done! Just a few more steps to make them perfect.
Step 1: Add a Cuff/Border (Optional but Recommended)
A small border around the opening of the slipper gives it a cleaner finish and can help it stay on your foot better.
- Join your yarn to any stitch around the top opening of your slipper.
- Ch 1.
- Work single crochet (sc) stitches evenly around the entire opening. Aim for about 1 sc in each dc stitch and 1 sc in each ch-1 space.
- Sl st to the first sc to join.
- For a slightly thicker cuff: Ch 1 and work another round of sc, or even half double crochet (hdc), around the opening. Join and fasten off.
Step 2: Add Non-Slip Grip (Optional)
If you have hardwood or tile floors, you might want to add some grip to the soles to prevent slipping.
- Turn your slipper inside out (or apply directly to the bottom).
- Use non-slip fabric paint or puff paint to draw dots, lines, or a pattern on the sole of the slipper.
- Let it dry completely according to the product instructions.
Step 3: Weave in All Remaining Ends
Carefully weave in any loose yarn tails using your yarn needle. This ensures your slippers look neat and won’t unravel.
Care for Your Granny Square Slippers:
- Hand wash in cool water with a mild detergent.
- Gently squeeze out excess water (do not wring).
- Reshape and lay flat to dry to prevent stretching and maintain their shape.
- Avoid direct heat, as it can damage acrylic yarn.
Get Creative!
The beauty of these slippers is their versatility:
- Color Combos: Play with vibrant, contrasting colors for your squares, or keep it subtle with neutrals.
- Yarn Texture: Try a slightly bulkier yarn for extra squishiness, or a softer blend for luxury.
- Embellishments: Add a small crocheted flower, a pom-pom, or even a button to the top of the slipper for extra flair.
- Different Stitches: While the classic granny square is easy, you could adapt the pattern using other square motifs like solid granny squares or even mosaic squares for a different look.
These quick and easy granny square slippers are a perfect weekend project, a thoughtful last-minute gift, or just a wonderful way to treat your feet to some handmade comfort. Happy crocheting!
Video tutorial:


