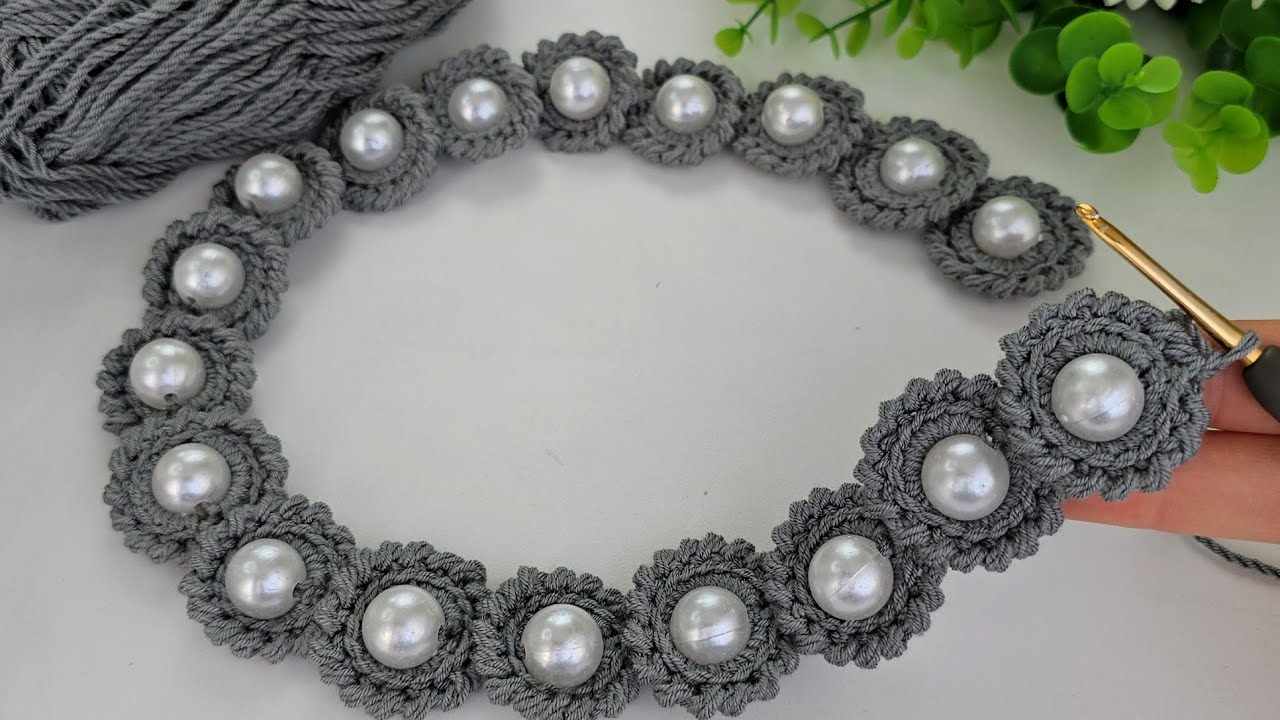
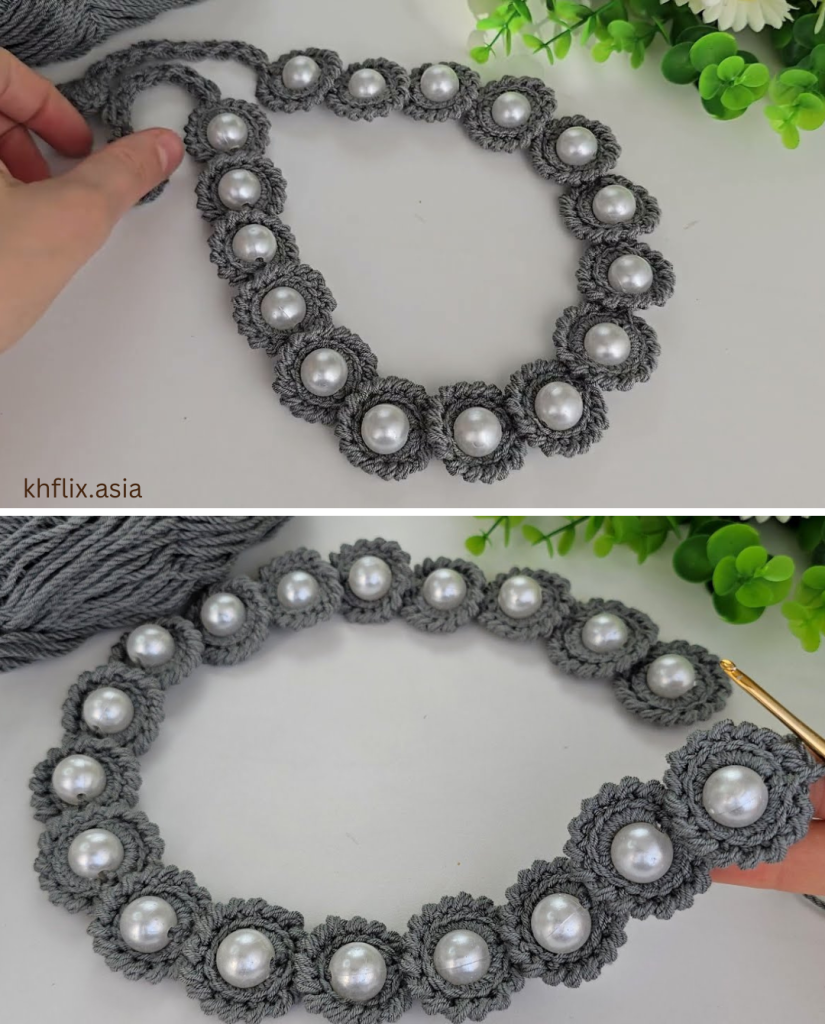
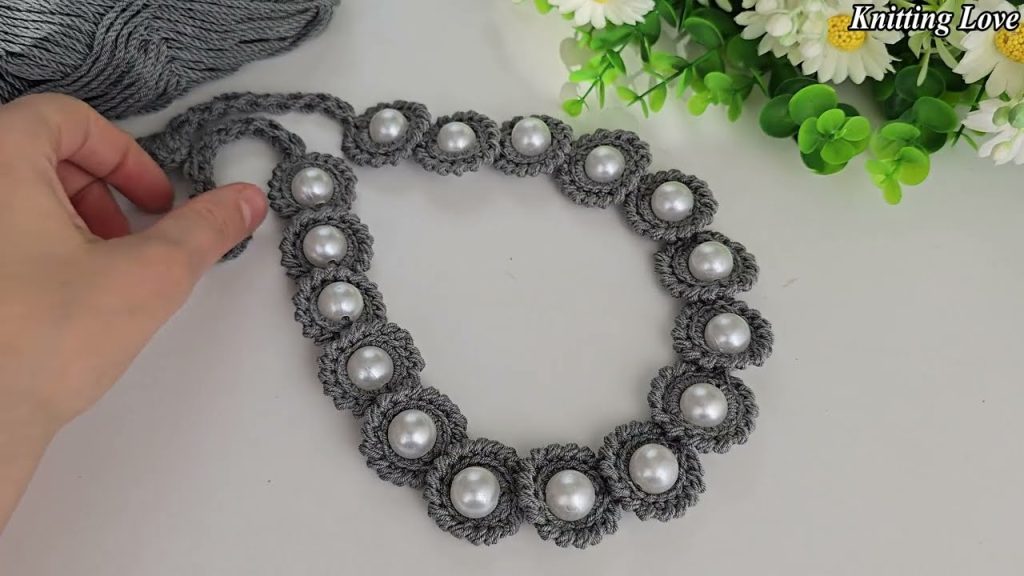
Hello, fabulous makers! Are you ready to elevate your crochet game from simple texture to pure elegance? Today, we are inspired by the gorgeous concept of combining the rustic warmth of crochet with the timeless shimmer of pearls, translating the beautiful idea from Knitting Love’s tutorial into a complete, written pattern: The Elegant Pearl Flower Strap.

This stunning, versatile piece is far more than just a strap. Depending on its length and finish, it can be transformed into a delicate headband, a chic handle for a clutch bag, or even a statement necklace. The unique, repeated pearl motif gives the illusion of tiny flowers blooming right on your yarn. Let’s gather our shimmering supplies and start creating!
1. Materials & Preparation: The Essential Trio
The magic of this pattern lies in the precise choice of your yarn, hook, and, most importantly, your beads.
Yarn & Hook
- Yarn: A smooth, mercerized cotton or fine silk blend is ideal (Fingering or Sport weight) to prevent snagging the pearls. A solid color (white, black, or gold) makes the pearls pop.
- Hook: A smaller size than your yarn calls for (e.g., B/1 or C/2.5 mm) is required to create the dense fabric needed to hold the beads securely.
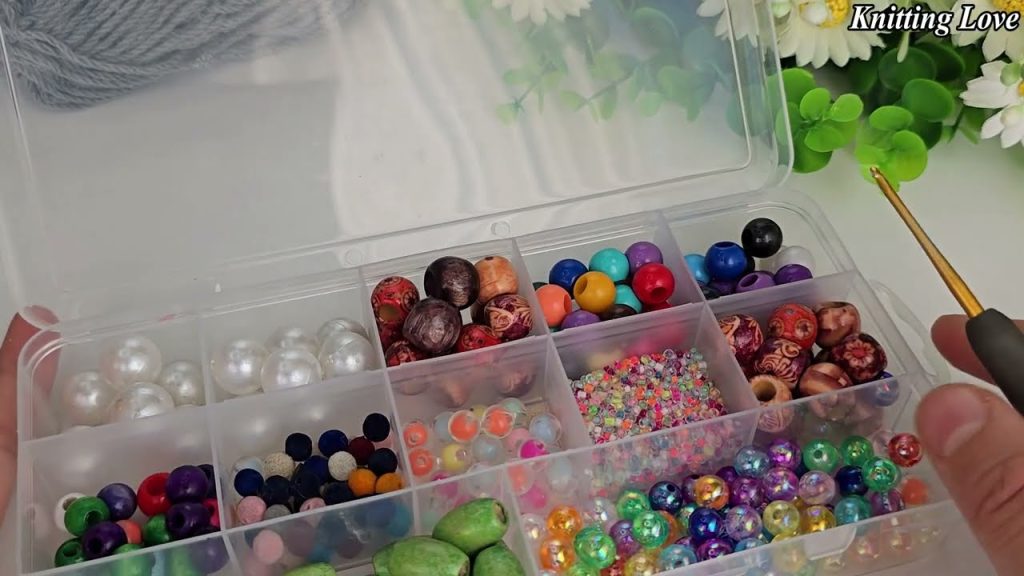
The Beads
- Type: Small, round pearls or seed beads (size 6/0 or 8/0) work best for the “flower” look. You will need a significant quantity, as each motif uses multiple beads.
- Beading Needle: A fine-gauge wire or floss threader is essential for stringing the beads onto your yarn.
- Preparation is Key: You must string all the beads onto your working yarn before you start crocheting. Estimate the total length you need and calculate the number of beads based on the repeat (our pattern uses 5 beads per flower motif).
2. The Core Pattern: The “Pearl Pop” Motif
This strap uses a simple Single Crochet (SC) base with an integrated bead technique, often referred to as the “Beaded Picot” method, adapted here to create a 5-petal flower cluster.
Stitch Abbreviations (US Terms):
- Ch: Chain
- SC: Single Crochet
- Sl St: Slip Stitch
- BP: Beaded Picot (Our special 5-Bead Flower motif)
Gauge & Sizing
The length of your starting chain determines the length of the strap. The pattern repeat is 5 stitches wide.
- Headband: Approx. 14–18 inches (plus elastic/ties for closure).
- Bag Handle (Shoulder): Approx. 30–35 inches.
- Bag Handle (Crossbody): Approx. 45–50 inches.
- Sample Repeat: To practice the motif, chain 16.
3. Step-by-Step Instructions
Row 1: The Foundation (Securing Your Length)
- Start: Chain the desired length for your project (e.g., Ch 66 for a short headband, ensuring the count is a multiple of 5, plus 1 for turning).
- Stitch: SC in the 2nd Ch from the hook and SC in every chain across. (You should now have a solid SC row).
- Turn: Ch 1, turn.
Row 2: The Base Row (Creating Structure)
- SC in the first SC.
- Ch 4, skip the next 4 SC.
- SC in the next SC.
- Repeat steps 2 and 3 across the row, ending with an SC in the last stitch.
- This row creates the base chain loops where your pearl flowers will sit.
- Turn: Ch 1, turn.
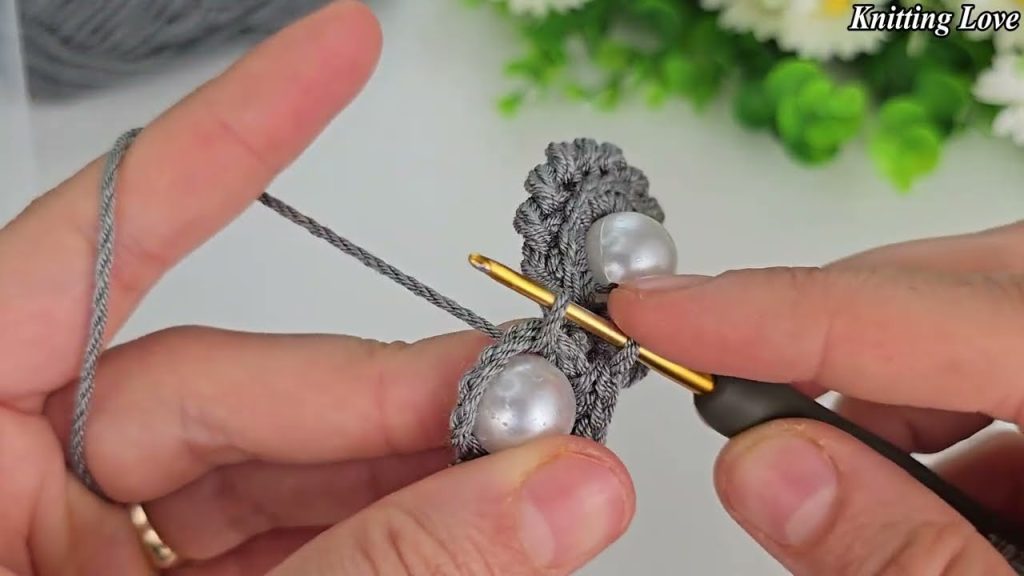
Row 3: The Pearl Flower Motif (The “Pearl Pop”)
This is where the magic happens! You will work into the Ch-4 spaces created in Row 2.
- Start: Sl St into the first SC.
- Work into Ch-4 Space: Sl St into the first chain of the Ch-4 loop to center your hook.
- The BP (Beaded Picot) Motif:
- Slide 1 Bead: Slide one bead up to your hook. Insert hook into the Ch-4 space. Yarn over and draw a loop through the Ch-4 space, ensuring the bead is locked on the front of the work. Sl St to secure.
- Repeat 4 Times: Repeat the “Slide 1 Bead, Sl St to secure” step four more times into the same Ch-4 space. (You should now have 5 beads tightly clustered, forming a petal-like flower.)
- Anchor: Sl St into the SC between the chain loops to anchor the flower securely.
- Repeat: Repeat steps 2, 3, and 4 in every remaining Ch-4 space across the row.
- Note: Your yarn now contains all the remaining beads for the project. Keep them pushed down the strand until you need them.
- Turn: Ch 1, turn.
Row 4: Locking the Flowers (Finishing the Band)
This row locks the bead clusters and provides a clean, finished edge.
- Stitch: SC in the first Sl St.
- SC over the cluster: Work 5 SC stitches, one over the top of each bead/petal, into the space where the beads are anchored. This can be tricky—just ensure you capture the top loops of the 5 Sl St that secured the beads.
- SC in Anchor: SC in the Sl St anchor between the bead clusters.
- Repeat steps 2 and 3 across the row.
- Finish: SC in the last stitch.
4. Finishing and Versatile Styling
You have completed the main body of the strap! Now, choose your finishing method based on how you plan to use it:
Option A: Elegant Headband
- Ties: Leave two very long tails of yarn and braid or twist them into simple ties.
- Elastic: Cut the yarn, leaving a long tail. Sew a 4-inch piece of thin, color-matched elastic to the last few stitches of each end to allow for comfortable stretch.
Option B: Chic Bag Handle
- Attachment: Cut the yarn, leaving a long tail. Using a tapestry needle, secure the strap end directly to the purse fabric or through a metal jump ring (or D-ring) on the bag.
- Lining: For heavy use, consider adding a thin fabric backing to the strap to prevent stretching and wear.
Option C: Beaded Necklace/Jewelry
- Clasp: Cut the yarn, leaving a long tail. Use the tail to sew the strap end around a jewelry finding (like a lobster clasp or toggle closure) and weave in the end securely.
We hope this detailed pattern inspires your next dazzling project! Share your beautiful Pearl Flower Straps with us—we can’t wait to see your color choices and creative uses. Happy beading and hooking!
Video tutorial:


