An easy crochet top is a fun and rewarding project for crocheters of all skill levels. Whether you’re a beginner looking for your first wearable garment or an experienced crafter seeking a quick and satisfying make, an easy crochet top offers endless possibilities for customization and style. This article will guide you through the process of creating a beautiful and comfortable crochet top, covering everything from choosing your materials to finishing touches.
Why an Easy Crochet Top?
The appeal of an “easy” crochet top lies in its simplicity and versatility. Many designs utilize basic stitches, minimal shaping, and straightforward construction, making them approachable for newcomers. For more experienced crocheters, these patterns provide a canvas for experimenting with different yarns, colors, and stitch patterns, or simply enjoying the meditative rhythm of a simple project.

Choosing Your Materials
The success of your crochet top heavily depends on your material choices.
- Yarn:
- Fiber Content:
- Cotton: Excellent for summer tops due to its breathability, absorbency, and drape. It’s also durable and easy to care for.
- Cotton Blends (e.g., cotton/acrylic, cotton/linen): Offer the best of both worlds, combining the properties of cotton with added softness, drape, or elasticity from other fibers.
- Acrylic: A budget-friendly and widely available option. It’s soft, easy to care for, and comes in a vast array of colors. While less breathable than cotton, modern acrylics can be surprisingly comfortable.
- Linen or Linen Blends: Provide a beautiful drape and a slightly rustic texture, perfect for sophisticated summer wear.
- Yarn Weight: For most easy crochet tops, light worsted (DK), worsted (Aran), or even sport weight yarns are common choices. Thinner yarns will create a lacier, more delicate fabric, while thicker yarns will work up faster and result in a more substantial garment.
- Yardage: Always check the pattern for recommended yardage. It’s better to overestimate slightly to avoid running out of yarn before your project is complete.
- Fiber Content:
- Hook Size: The pattern will specify the recommended hook size. However, always make a gauge swatch to ensure your tension matches the pattern’s. Adjust your hook size up or down as needed to achieve the correct gauge.
- Other Notions:
- Tapestry Needle: For weaving in ends.
- Scissors: For cutting yarn.
- Stitch Markers: Useful for marking the beginning of rounds, specific stitches, or key points in your pattern.
- Measuring Tape: Essential for checking your gauge and ensuring your top fits correctly.
Understanding Basic Crochet Stitches
Most easy crochet tops rely on a few fundamental stitches:
- Chain (ch): The foundation of almost all crochet projects.
- Slip Stitch (sl st): Used for joining rounds, seaming, and creating subtle decreases.
- Single Crochet (sc): A dense, sturdy stitch.
- Half Double Crochet (hdc): Taller than single crochet, offering a bit more drape.
- Double Crochet (dc): A taller stitch that creates a more open fabric and works up quickly.
Many easy patterns also incorporate simple stitch patterns like the “V-stitch” (dc, ch 1, dc in the same stitch/space) or variations of shell stitches, which add visual interest without being overly complex.

Common Construction Methods for Easy Crochet Tops
Easy crochet tops often follow one of these straightforward construction methods:
- Rectangular Panels: This is arguably the simplest method. You crochet two identical or nearly identical rectangular panels (front and back). These panels are then seamed together at the shoulders and sides, leaving openings for the neck and armholes. This method is excellent for beginners as it requires minimal shaping.
- Bottom-Up in the Round: You start by crocheting a foundation chain that forms the circumference of your top at the bottom hem. You then work upwards in continuous rounds, or joined rounds, until you reach the armholes. At this point, you might split the work for the front and back, or continue shaping for the sleeves.
- Top-Down in the Round: Similar to bottom-up, but you start at the neckline and work outwards, increasing as needed to create the body of the top. This method allows for easy try-on as you go, making it simple to adjust the length.
- Simple Yoke Construction: You start by crocheting a yoke (the upper part of the garment that covers the shoulders and upper chest) in the round. Once the yoke is complete, you divide the stitches for the body and sleeves, continuing to work the body in the round.
Steps to Crocheting Your Easy Top
- Choose a Pattern: Look for patterns explicitly labeled “easy,” “beginner-friendly,” or “quick.” Ravelry.com is an excellent resource with thousands of free and paid patterns, often with difficulty ratings and user reviews.
- Read the Entire Pattern: Before picking up your hook, read through the entire pattern to understand the construction, stitch abbreviations, and any special instructions.
- Make a Gauge Swatch: This step is crucial and cannot be skipped. Crochet a small square using the yarn and hook size specified in the pattern. Measure your swatch to ensure your stitch count and row count match the pattern’s gauge. If your swatch is too small, use a larger hook; if it’s too large, use a smaller hook.
- Gather Your Materials: Have all your yarn, hook, and notions ready before you start.
- Follow the Pattern Instructions: Work row by row or round by round, paying close attention to stitch counts and any shaping instructions.
- Seaming (if applicable): If your pattern involves seaming panels, use a tapestry needle and the method recommended in the pattern (e.g., whip stitch, mattress stitch) to create neat, invisible seams.
- Weave in Ends: This is often the least favorite part, but it’s essential for a polished finish. Weave in all loose yarn ends securely to prevent unraveling.
- Blocking (Optional but Recommended): Blocking is the process of wetting or steaming your finished crochet item and then shaping it to the correct dimensions while it dries. This relaxes the stitches, evens out tension, enhances drape, and can make a significant difference in the final look of your top.
Tips for Success
- Don’t Rush: Crochet is meant to be enjoyed. Take your time, especially if you’re new to garment making.
- Count Your Stitches: Regularly count your stitches to ensure you haven’t accidentally added or skipped any. Stitch markers can be incredibly helpful here.
- Watch Tutorials: If you’re unsure about a stitch or technique, there are countless free video tutorials available online (YouTube is a great resource).
- Embrace Mistakes: Everyone makes mistakes. Don’t be afraid to unravel a section if you need to correct an error. It’s part of the learning process.
- Personalize Your Top: Once you’re comfortable with the basics, feel free to experiment! Change colors, add stripes, incorporate a different border, or even add embellishments.
Troubleshooting Common Issues
- Fabric too Stiff/Floppy: Adjust your hook size. A smaller hook will create a denser fabric, while a larger hook will create a looser, more drapey fabric.
- Top Too Big/Small: Recheck your gauge! If you’re still struggling, you might need to go up or down a pattern size.
- Uneven Edges: This often happens with single crochet rows. Practice consistent tension and ensure you’re working into the correct stitch (the top of the previous stitch) and not into the turning chain (unless specified).
- Gaps in Fabric: This can be due to loose tension or skipping stitches. Ensure your stitches are worked evenly and you’re not missing any.
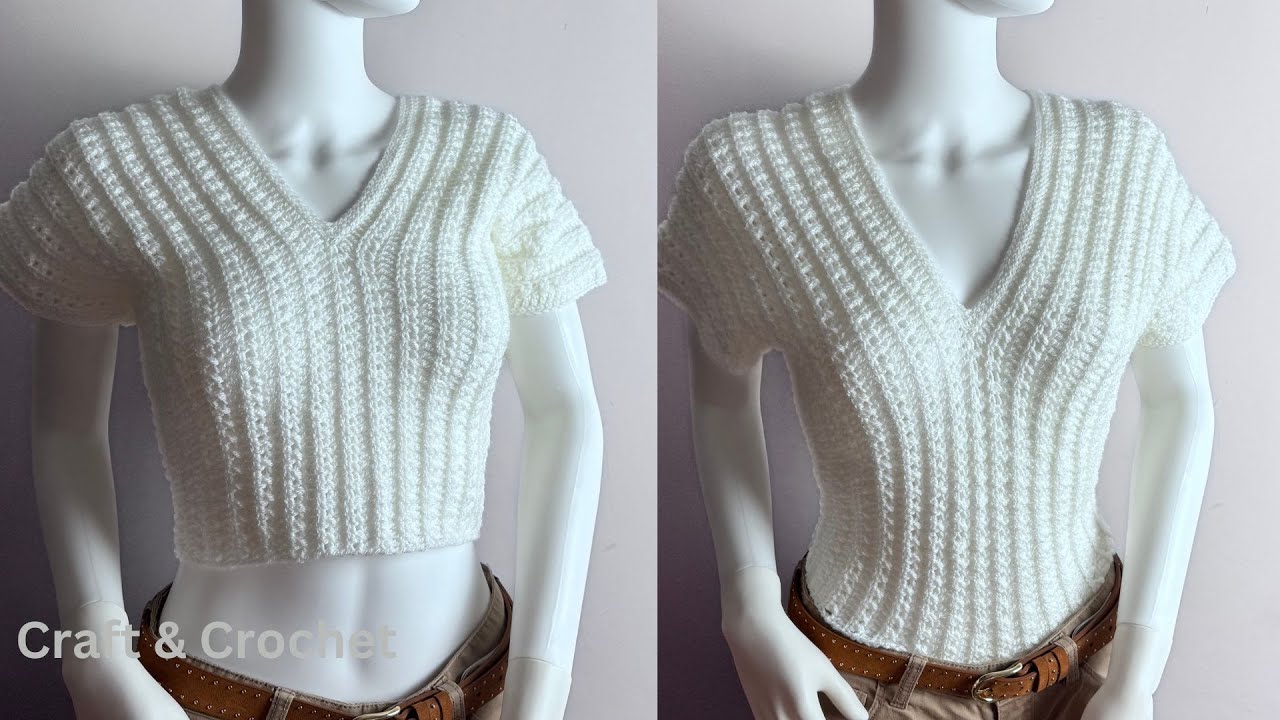
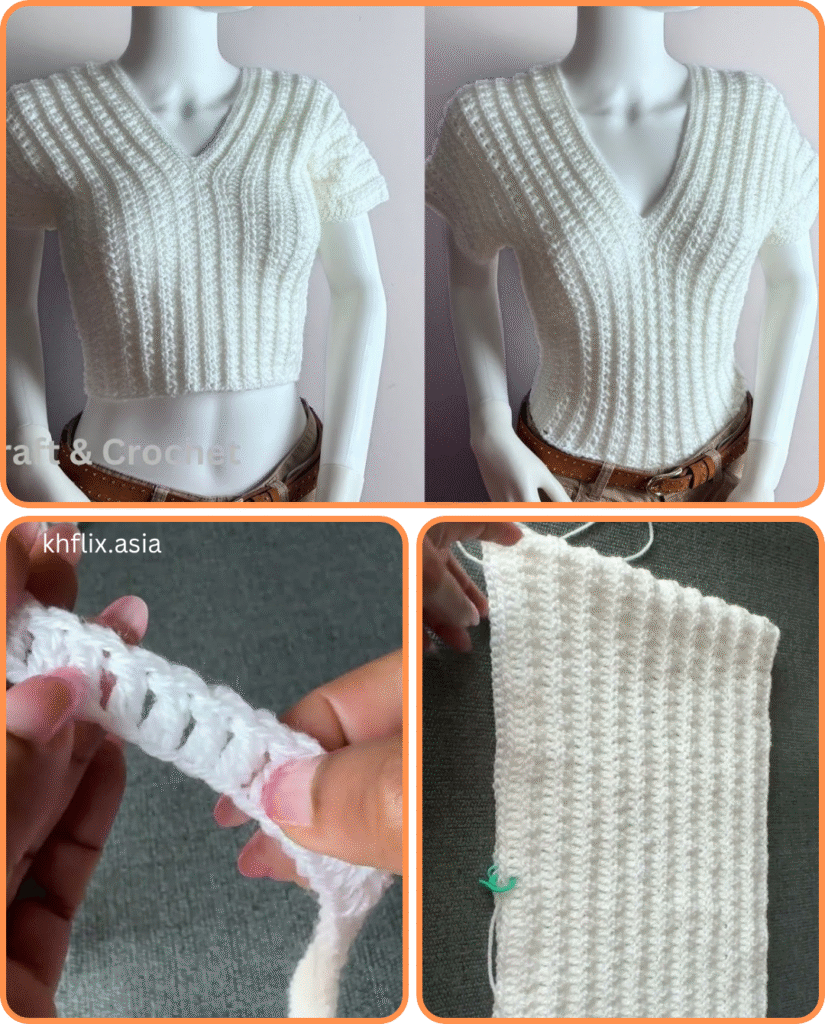
Easy Peasy Rectangle Tank Top (Beginner Friendly)
This tank top is made from two identical rectangular panels that are seamed together at the shoulders and sides, then simple straps are added. It’s a great project for learning how to create a wearable garment.
Skill Level: Beginner
Materials You’ll Need:
- Yarn: Approximately 300-500 yards of DK (light worsted / #3) or Worsted (#4) weight cotton or cotton blend yarn. (Exact yardage depends on size and yarn weight chosen. Look for patterns with good drape.)
- Example: Lion Brand 24/7 Cotton (worsted) or Comfy Cotton Blend (DK).
- Crochet Hook:
- For DK weight yarn: 4.0 mm (G-6) or 4.5 mm (7)
- For Worsted weight yarn: 5.0 mm (H-8) or 5.5 mm (I-9)
- Choose the hook size that gives you the recommended gauge.
- Tapestry Needle: For weaving in ends and seaming.
- Scissors
- Stitch Markers: Very helpful for marking rows and strap placement.
- Measuring Tape
Abbreviations (US Crochet Terms):
- ch: chain
- sc: single crochet
- hdc: half double crochet
- dc: double crochet
- sl st: slip stitch
- st(s): stitch(es)
- sk: skip
- rep: repeat
- WS: wrong side
- RS: right side
Gauge (Crucial!):
- For this example, let’s aim for: 14 hdc and 10 rows = 4 inches (10 cm) using your chosen yarn and hook.
- How to check your gauge:
- Chain 17.
- Row 1: Hdc in 3rd ch from hook and in each ch across. (15 hdc)
- Row 2: Ch 2 (counts as hdc), turn. Hdc in each st across. (15 hdc)
- Repeat Row 2 for a total of 12 rows.
- Measure the center of your swatch. If your swatch is larger than 4 inches, use a smaller hook. If it’s smaller, use a larger hook. Adjust until you get the correct gauge.

Sizing (Approximate Finished Bust Circumference):
- This pattern is highly adjustable. The width of your rectangle determines the overall circumference.
- Measure your actual bust circumference.
- The final top will have some ease (extra room for comfort).
- XS/S: ~32-34 inches (81-86 cm)
- M/L: ~36-40 inches (91.5-101.5 cm)
- XL/2XL: ~44-48 inches (112-122 cm)
- 3XL/4XL: ~52-56 inches (132-142 cm)
The “Magic” of the Rectangle:
This pattern uses a simple rectangle, and the length of your starting chain will determine the length of your top (from shoulder to hem), while the number of rows you crochet will determine the width (circumference around your body).
Pattern Instructions
Part 1: The Panels (Make 2 identical panels)
You will crochet two rectangular pieces.
1. Determine your Starting Chain (Length of your top):
- Measure from the top of your shoulder (where you want the strap to sit) down to where you want the hem of your top to fall.
- For a standard tank top/hip-length top:
- XS/S: Chain 60-70 (approx. 16-19 inches / 40-48 cm)
- M/L: Chain 70-80 (approx. 19-22 inches / 48-56 cm)
- XL/2XL: Chain 80-90 (approx. 22-25 inches / 56-63.5 cm)
- 3XL/4XL: Chain 90-100+ (approx. 25-28+ inches / 63.5-71+ cm)
- Adjust this number based on your desired length. Add more chains for a longer top, fewer for a crop top.
- Once you’ve decided on your desired length, make a foundation chain slightly longer than that measurement. Remember to account for the turning chain (ch 2 for hdc).
Let’s assume you’re making a Size M/L and you chained 75.
2. Panel Construction:
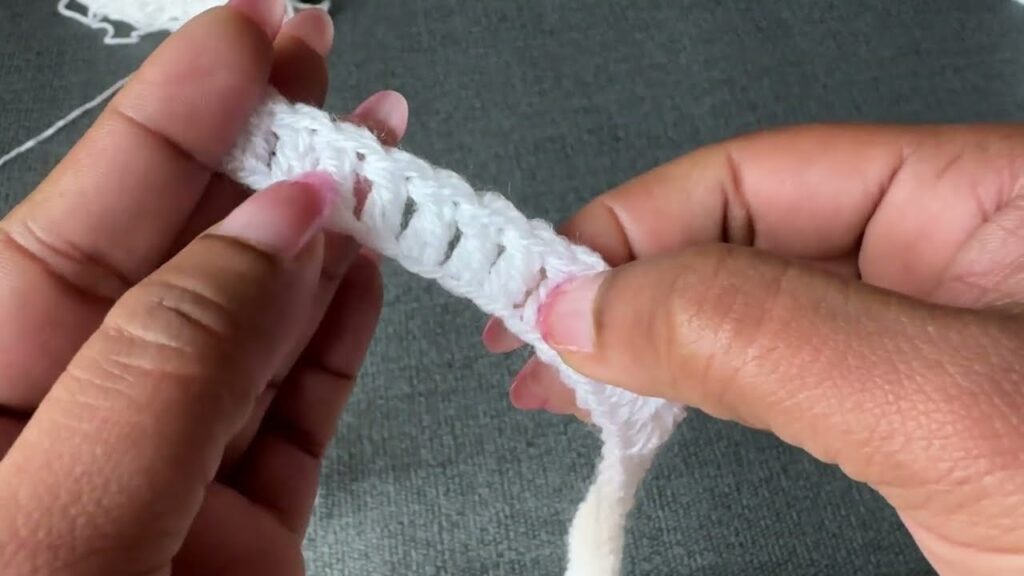
- Foundation Row (RS): Hdc in the 3rd chain from your hook, and then hdc in each chain across to the end.
- (Your stitch count for this row will be your starting chain number minus 2. For Ch 75, you’ll have 73 hdc).
- Row 1 (WS): Ch 2 (counts as first hdc), turn your work. Hdc in the back loop only of each stitch across.
- Working in the back loop only creates a subtle ribbed texture.
- Row 2 (RS): Ch 2 (counts as first hdc), turn your work. Hdc in the back loop only of each stitch across.
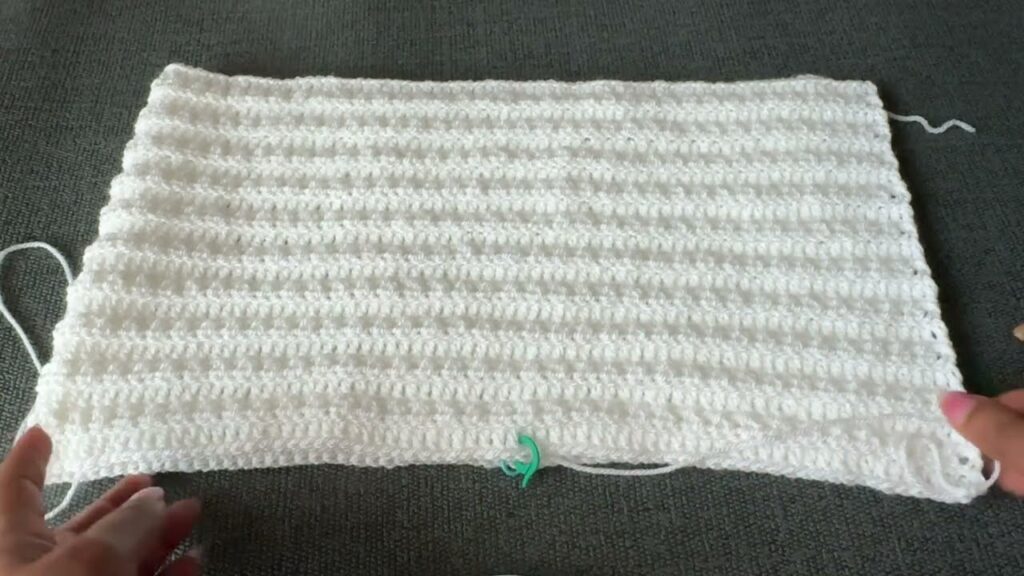
- Repeat Row 1 and Row 2 alternately until your panel reaches the desired width to wrap around half of your body (front or back).
- To determine the number of rows for your desired width:
- Take your finished bust circumference measurement (e.g., for M/L, let’s say 38 inches).
- Divide that by 2 (38 / 2 = 19 inches for one panel).
- Using your gauge (10 rows = 4 inches), calculate how many rows you need: (19 inches / 4 inches) * 10 rows = 47.5 rows. Round up to 48 or 49 rows.
- Important: The hdc in the back loop only will give the fabric some stretch. You might want the finished panel width to be slightly less than half your body circumference, as it will stretch to fit. Try on the first panel as you go! Hold it up to your body to gauge the width.
- To determine the number of rows for your desired width:
- Once you reach your desired width, fasten off, leaving a long tail (at least 20 inches/50 cm) for seaming.
- Make a second identical panel.
Part 2: Assembly
1. Seam the Sides:
- Lay your two panels flat, wrong sides facing each other. This means the ribbed texture will be on the outside.
- Using your tapestry needle and the long tail from one panel (or a new piece of yarn if you don’t have a long tail), sew the side seams.
- Side 1: Starting from the bottom corner, sew upwards along the side. Stop when you’ve reached where you want your armhole to begin.
- Common armhole depth: 7-9 inches (18-23 cm) for adult sizes. Mark this point with a stitch marker.
- Use a mattress stitch or whip stitch for a neat seam.
- Side 2: Repeat for the other side, ensuring both armholes are the same length.
2. Seam the Shoulders:
- Lay the top flat again, with the side seams aligned.
- Determine your desired neckline width. You can try the top on (carefully, without pulling seams) to get a feel for this.
- Mark the center of each shoulder with a stitch marker, leaving an opening for the head/neckline.
- Common neckline opening: 8-10 inches (20-25 cm) wide.
- Using a tapestry needle, seam the shoulders from the outside edge inwards, stopping at your stitch marker.
- Repeat for the second shoulder.
- Fasten off and weave in all remaining ends securely.
3. Add Straps (Optional, but recommended for a finished look):
- This method creates simple, integrated straps.
- Attach yarn with a slip stitch to the top corner of one of the front panels (near a shoulder seam).
- Chain for your desired strap length. Try on the top and drape the chain over your shoulder to the corresponding back panel. This will be an open chain for now.
- Common strap lengths: 10-15 inches (25-38 cm) of chain, depending on preferred fit and neckline drop.
- Sl st into the corresponding top corner of the back panel.
- Single Crochet Edging for Strap and Armhole:
- Ch 1. Now, sc evenly around the entire armhole opening, including into the chain you just made for the strap. Aim for 1 sc in each st/chain, or 2 sc for every 3 rows along the sides of the armhole.
- When you reach the starting point, join with a sl st to the first sc.
- You can add a second round of sc for a slightly wider or sturdier strap/armhole edge if desired.
- Repeat for the second strap/armhole.
4. Bottom Edging (Optional):
- Attach yarn with a sl st to any stitch along the bottom hem.
- Round 1: Ch 1, sc evenly around the entire bottom edge. Aim for roughly 1 sc per stitch or 2 sc for every 3 rows if you have vertical rows at the bottom. Join with a sl st to the first sc.
- You can add 1-2 more rounds of sc, or even a round of hdc or dc, for a more substantial bottom hem.
- Fasten off and weave in any remaining ends.
Finishing Touches
- Weave in all remaining loose ends. This is crucial for a neat and durable garment.
- Blocking (Highly Recommended):
- Gently wet your finished top (either by submerging in cool water with a tiny bit of wool wash, or by steaming).
- Carefully squeeze out excess water (don’t wring!).
- Lay your top flat on a clean, dry surface (like blocking mats or a towel). Gently shape it to the desired dimensions, ensuring seams are straight and the neckline/armholes are even.
- Allow it to dry completely. Blocking opens up the stitches, evens out any tension inconsistencies, and gives your top a professional, polished look and better drape.
Conclusion
An easy crochet top is a rewarding project that allows you to create a unique and stylish garment with relatively simple techniques. By choosing the right materials, understanding basic stitches, and following a well-written pattern, even beginners can successfully crochet a beautiful and wearable top. So, grab your hook and yarn, and embark on your next creative adventure!
Video tutorial:


