
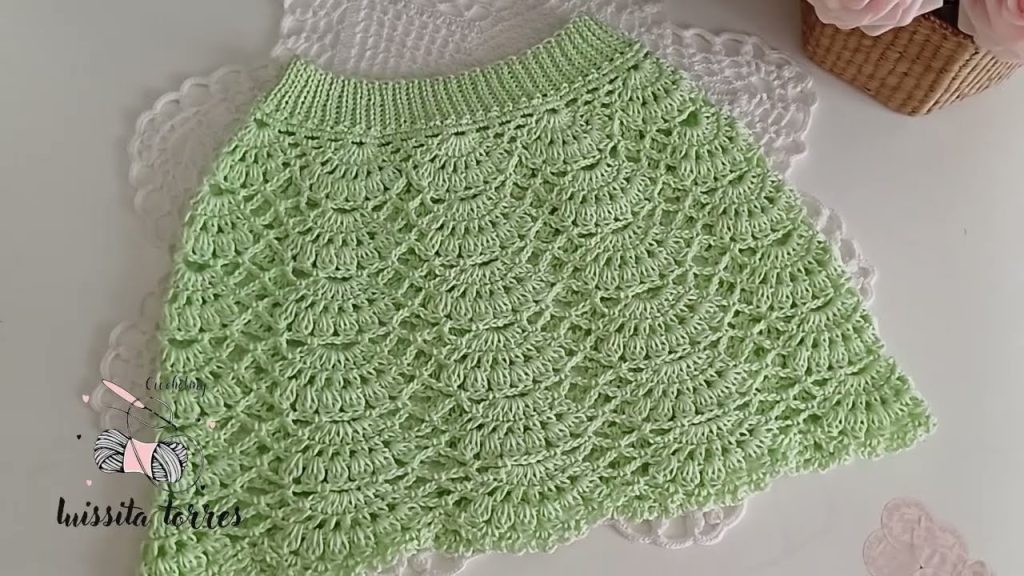
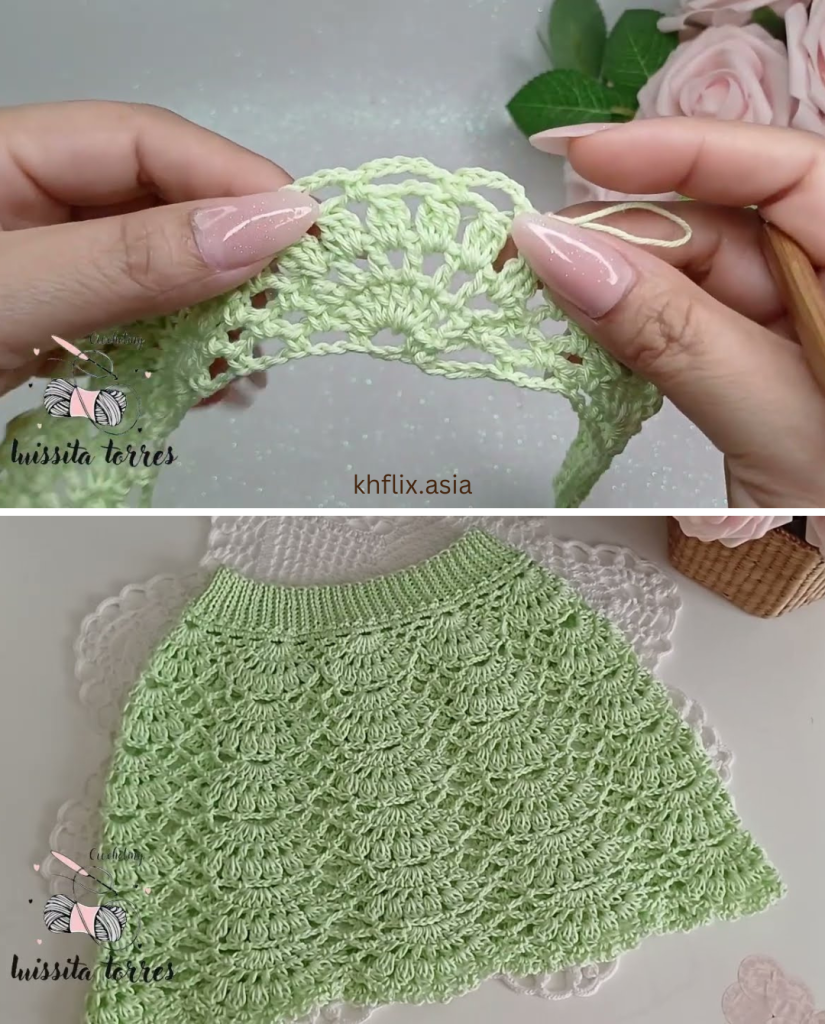
Welcome to the blog, my lovely crocheters! I’m thrilled to share a brand new, beautifully textured skirt pattern that is surprisingly easy to master. Inspired by the charming, breezy design of a recent tutorial, I’ve developed this detailed guide for a light, lacy skirt I’m calling “The Aura Skirt.”
This pattern features a stunning three-round repeat that creates a delicate shell and cluster effect, perfect for warm weather or layering. Get ready to create a piece that looks incredibly complex but flows effortlessly off your hook!
🌟 Project Overview & Supplies
This pattern is easily adaptable to any size by adjusting the starting chain. The following instructions are sized based on the reference video, which is a lovely infant/toddler size.
| Item | Details |
| Finished Size | Approximately 1 year old (easily adjustable). |
| Yarn | Approx. 120g of a 1mm fine-weight cotton yarn (e.g., Yarn Art Lily, or any light, breathable cotton). |
| Hook | 2 mm crochet hook. |
| Gauge | Gauge is not critical, but aim for a fabric that drapes nicely. |
| Difficulty | Intermediate (Requires basic familiarity with clusters/shells). |
🧶 Key Crochet Stitches
- Ch: Chain
- SS: Slip Stitch
- SC: Single Crochet (Medio Punto)
- DC: Double Crochet (Punto Alto)
- Punto Piña (Cluster): A cluster of three incomplete double crochets closed together (3 DC together).
📝 The Aura Skirt Pattern
Part 1: The Foundation and Waistline
Round 1: Initial Chain
- Chain 110 chains. (For a larger size, chain a length that comfortably fits around the desired waist/hip, ensuring the final number of chain loops in Round 2 will be a multiple of four.)
- Carefully ensure the chain is not twisted.
- Join with a SS into the very first chain to form a ring.
Round 2: Foundation Chain Loops
This round sets up the placement for the shell stitches.
- Ch 1, make 1 SC into the same stitch.
- Ch 3.
- Skip 2 chains in the foundation ring, and make 1 SC in the next chain.
- Repeat the sequence (Ch 3, skip 2, SC) all the way around the ring.
- You must have a number of Chain 3 loops that is a multiple of four.
- Join with a SS to the starting SC.
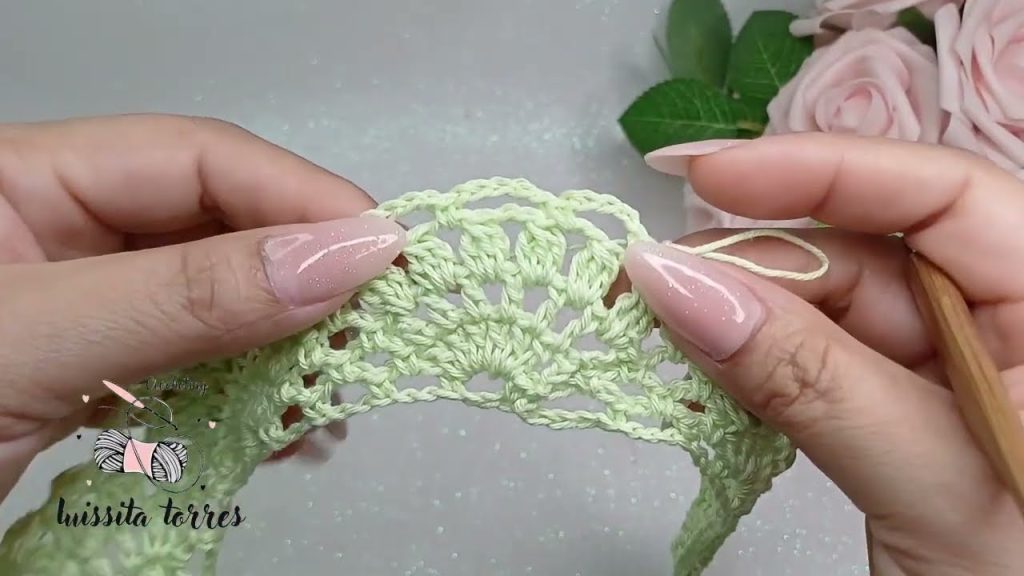
Part 2: The Main Lace Motif (3-Round Repeat)
The entire length of the skirt is built by repeating Rounds 3, 4, and 5, with Round 6 serving as a transition to shift the pattern.
Round 3: The Shell Round
- SS into the first Ch 3 loop/arch.
- Ch 3 (counts as 1 DC). Make 6 DC into the same Ch 3 loop (total of 7 DC, forming the shell).
- SC into the next Ch 3 loop.
- Ch 3, SC into the next Ch 3 loop.
- Ch 3, SC into the next Ch 3 loop. (This creates two small arches between your shells.)
- In the next Ch 3 loop, repeat the shell: 7 DC.
- Repeat the sequence (7 DC shell, SC, Ch 3, SC, Ch 3, SC) all the way around.
- Join with a SS to the top of the initial Ch 3.
Round 4: The Separated Double Crochet Round
- Ch 4 (Ch 3 for the DC, plus Ch 1 for separation).
- In the next DC, make (DC, Ch 1).
- Repeat (DC, Ch 1) in each of the remaining 6 DC stitches from the shell below. (You will have 7 DCs each separated by a Ch 1 space).
- Skip the first Ch 3 arch. SC into the center Ch 3 arch.
- Ch 3, SC into the same center Ch 3 arch.
- Repeat the shell section on the next group: (DC, Ch 1) 7 times.
- Repeat this sequence all the way around.
- Join with a SS to the 3rd chain of the initial Ch 4.
Round 5: The Cluster (Punto Piña) Round
- SS into the first Ch 1 space.
- Ch 2. Make 2 incomplete DC, then close all 3 loops together (Cluster Stitch).
- Ch 2.
- In the next Ch 1 space, repeat the (Cluster, Ch 2) sequence.
- Repeat this across the shell section for a total of 6 Clusters.
- Ch 2.
- SC into the single Ch 3 arch from the previous round.
- Ch 2.
- Repeat the (Cluster, Ch 2) sequence across the next shell section.
- Repeat this sequence all the way around.
- Join with a SS to the top of the first Cluster.
Round 6: The Transition/Shifting Round
This round uses larger chain loops to offset the placement of the next shell repeat.
- SS over to the next Ch 2 space.
- Ch 1, SC in the same space.
- Ch 5, SC in the next Ch 2 space.
- Ch 5, skip the next Ch 2 space, SC in the following space.
- Ch 5, SC in the next Ch 2 space. (This gives you 3 Ch 5 loops over the Cluster section.)
- Ch 5, SC into the SC stitch between the shell groups.
- Repeat the sequence (Ch 5, SC) across the next Cluster group, aiming to create 3 Ch 5 loops over the shell section and 1 Ch 5 loop over the previous arch section.
- The next Shell group will be worked into the middle Chain 5 loop of the three loops created in this round.
- Join with a SS to the first SC.
Repeat for Length
- Repeat Rounds 3, 4, and 5 until the skirt reaches the desired length.
- Remember that the shell (Round 3) will always be worked into the center Chain 5 loop from the previous Transition Round (Round 6).
- The tutorial suggests working approximately 5 full ‘hileras’ (repeats of the 3-round motif).

Optional Edging (Final Row)
For a soft, delicate bottom edge:
- Ch 1, SC in the first loop.
- Ch 3, SC in the next loop.
- Repeat (Ch 3, SC) around the entire bottom edge.
- Join with a SS and fasten off.
Part 3: The Elastic Waistband (Pretina)
The waistband is created with a ribbed effect using slip stitches in the back loop, offering beautiful stretch and detail.
- Preparation (Optional): Work a round of SC around the top edge of the skirt to create a neat base for the ribbing.
- Start Ribbing: Ch 10 (This determines the width of your waistband. For a wider band, chain more; for a narrower band, chain less).
- Starting in the 2nd chain from the hook, work a SS in the back loop only of each chain back down toward the skirt edge (you should have 9 SS).
- SS into the next stitch on the skirt’s waistline.
- SS into the following stitch on the skirt’s waistline (2 SS into the skirt total).
- Turn your work.
- Skip the 2 slip stitches you just made into the skirt.
- Working in the back loop only of the previous ribbing row, SS into each of the 9 stitches.
- Ch 1, Turn your work.
- Working in the back loop only, SS into each of the 9 stitches.
- Repeat steps 4-10 all the way around the waistline, moving along the skirt one section at a time.
- Once you reach the beginning, seam the first and last rows of ribbing together using a slip stitch seam.
Congratulations! You’ve completed The Aura Skirt. This pattern is a gorgeous example of how simple stitches can combine to create a stunning, intricate lace design. Don’t forget to block your finished skirt to open up those lovely lace details!
Video tutorial:


