
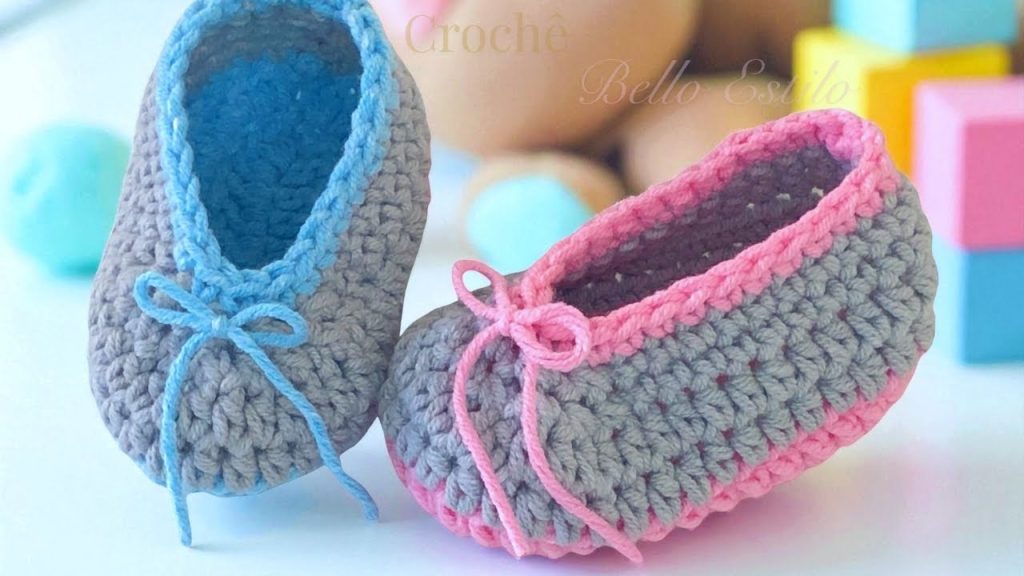
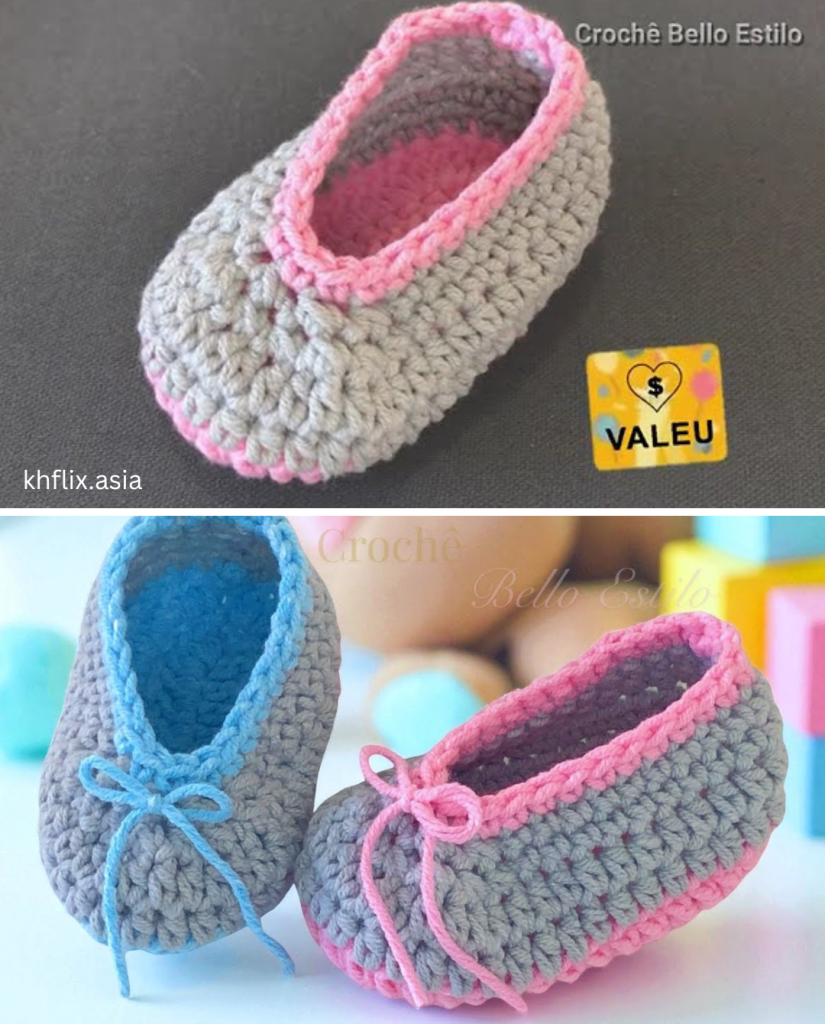
Hello, fellow makers! If you’re looking for a quick, charming, and surprisingly easy project for the newest little treasure in your life, you’ve come to the right place. I’m thrilled to share the pattern for the Little Gem Crochet Booties, a super soft and simple baby shoe design.
Inspired by a fantastic video that eliminates tedious stitch counting, this pattern is designed for speed and simplicity. We’ll start with a foundation chain, work up a perfectly shaped sole, and then seamlessly transition into the body and toe shaping of the bootie. The result is a beautifully finished shoe, perfect for babies aged 0–3 months.
Grab your softest yarn and let’s create a tiny pair of gems!
Why You’ll Love Crocheting These Booties:
- No Complex Counting: The sole is built up with a clever, intuitive increase method.
- Seamless Construction: Worked in rounds, eliminating the need for bulky seams.
- Perfectly Sized: Designed for the sweet spot of 0–3 months (with easy size adjustments!).
- Quick Project: Ideal for last-minute gifts, baby showers, or market stock.
What You’ll Need:
- Yarn: DK weight (Light Worsted, Category 3) yarn. The video uses “Fio Balon Amigo” (a cotton/acrylic blend) for its softness and drape.
- Color A: Beige/Nude (for the sole and middle body)
- Color B: Grey (for the main body)
- Color C: Pink/Rose (for the final trim)
- Crochet Hook: 3.0 mm hook (or a size that achieves a tight, neat fabric with your chosen yarn).
- Yarn Needle (Tapestry Needle): For weaving in all loose ends.
- Scissors:
Essential Crochet Abbreviations:
- ch: chain
- sl st: slip stitch
- sc: single crochet
- hdc: half-double crochet
- dc: double crochet
- dec: decrease (working two stitches together)
- st(s): stitch(es)
- inc: increase (2 stitches worked in the same stitch)
The Pattern: Little Gem Crochet Booties (0–3 Months)
Finished Sole Length: Approximately 9 cm (The video notes that to make a larger size, simply start with a longer foundation chain—add two chains for the next size up).
Part 1: The Sole (Color A)
The sole is worked in rounds around the foundation chain.
- Foundation:
Ch 13. - Round 1:
Inc(2dc) in the 3rdchfrom the hook.Dcin the next 9ch. Work 6dcinto the very lastch(this forms the rounded toe). Working down the opposite side of the chain,dcin the next 9st. Work 3dcinto the very lastst(the same one you started the round in).Sl stinto the top of the initialch 2to join. (30 dc total) - Round 2:
Ch 2(counts as firstdcfor this round). Work1 dcin the samest(inc). Work1 incin the next 2st. (3 inctotal at the heel).Dcin the next 9st. Work1 incin the next 6st(this forms the 6-stitch increase at the toe).Dcin the next 9st. Work1 incin the last 3st.Sl stto the top of the initialch 2to join. (42 dc total) - Round 3:
Ch 2(counts as firstdcfor this round). Work1 incin the first 6st(these are the increases at the heel).Dcin the next 9st. Work1 incin the next 6st(these are the increases at the toe).Dcin the next 18st.Sl stto the top of the initialch 2to join. (54 dc total). Fasten off Color A.
Part 2: Body Foundation (Color B – Grey)
This part creates the vertical wall of the bootie. Attach Color B where you fastened off.
- Round 4 (HDC Round):
Ch 2(counts as firsthdcfor this round). Work Back Loop Only (BLO)hdcin eachstaround.Sl stto the top of the initialch 2to join. (54 hdc) - Round 5 (HDC Round):
Ch 2(counts as firsthdc). Workhdcin eachstaround.Sl stto the top of the initialch 2to join. (54 hdc)
Part 3: Toe Shaping (Color B – Grey)
This is where we shape the front of the bootie using decreases. Before starting the decreases, fold the bootie flat to find the exact center of the toe.
- Marking the Toe: From the center toe line, count 8 stitches to the right and place a stitch marker. Count 16 stitches from the marker and place a second marker (or 8 stitches to the left of the center line). This section of 16 stitches is the area for the main decreases.
- Round 6 (Decrease Row 1):
Ch 1(does not count as a st).Scin eachstuntil you reach the first marker. (You will now begin decreases).- Work a sc decrease over the next 16 stitches (8 decreases total). The video shows working a decrease over every two stitches in this section.
Scin the remaining stitches around the heel.Sl stto the firstscto join. (46 sc total)
- Round 7 (Decrease Row 2):
Ch 1.Scin eachstuntil you reach the start of the previous row’s decreases (this is approximately 4 stitches before the first decrease of the previous round).- Work a sc decrease over the next 8 stitches (4 decreases total). The video shows visually where the decreases were placed and making a decrease over every two stitches again.
Scin the remaining stitches around the heel.Sl stto the firstscto join. (42 sc total)

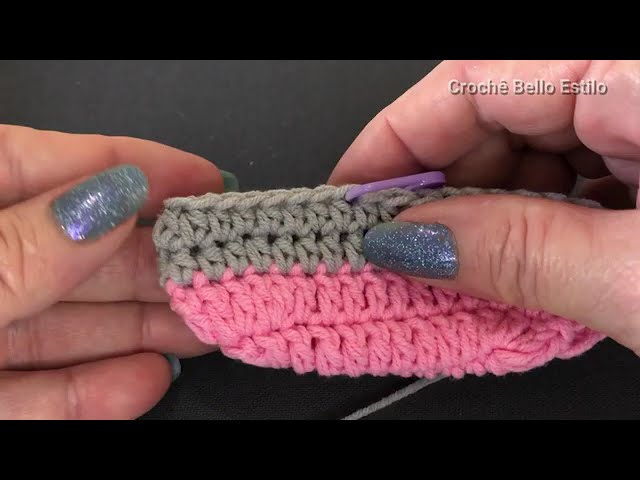
Part 4: Final Trim (Color C – Pink)
The final section is a simple row of single crochet for a neat finish. Fasten off Color B and Attach Color C at the back heel.
- Round 8 (SC Trim):
Ch 1(does not count as a st). Workscin eachstaround the entire opening of the bootie. Optional: Weave in the starting yarn ends along this row for extra stability.Sl stto the firstscto join. (42 sc total) - Finishing:
Sl stto secure, cut the yarn, and weave in all remaining ends.
Congratulations! You have created the Little Gem Crochet Booties. Repeat the process to make the matching pair. Enjoy your speedy and beautiful creation!
Video tutorial:


