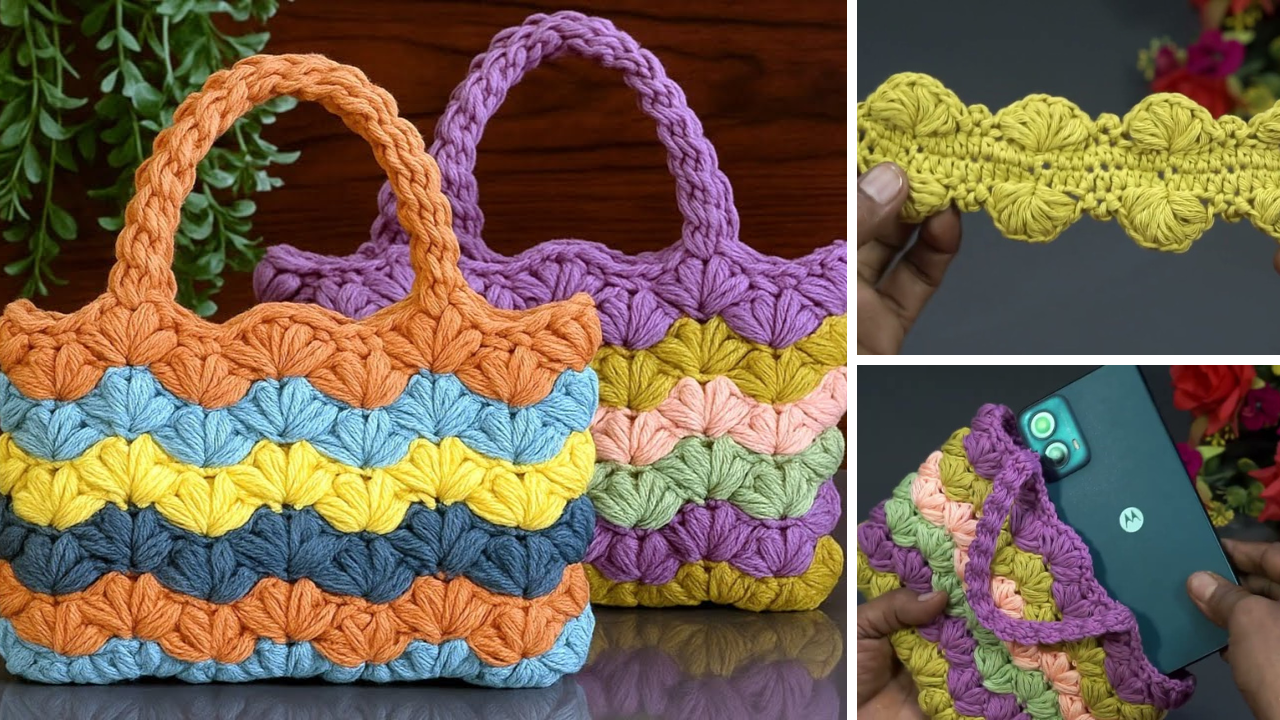
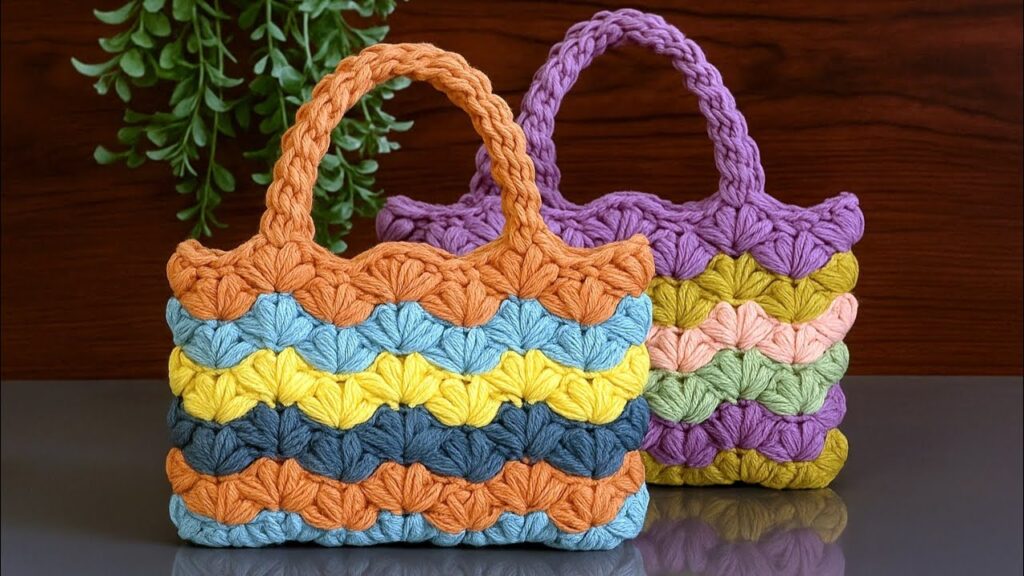
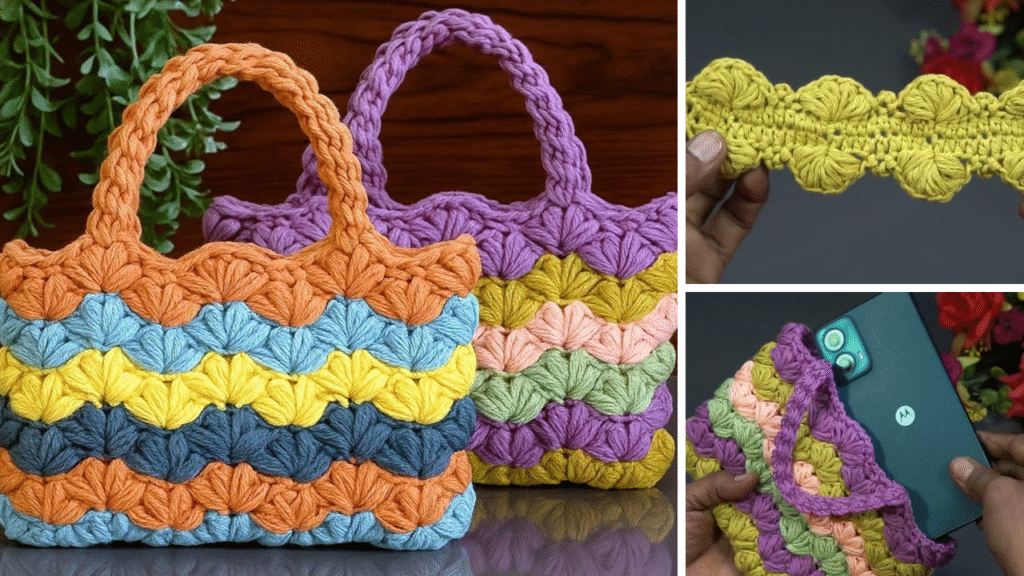
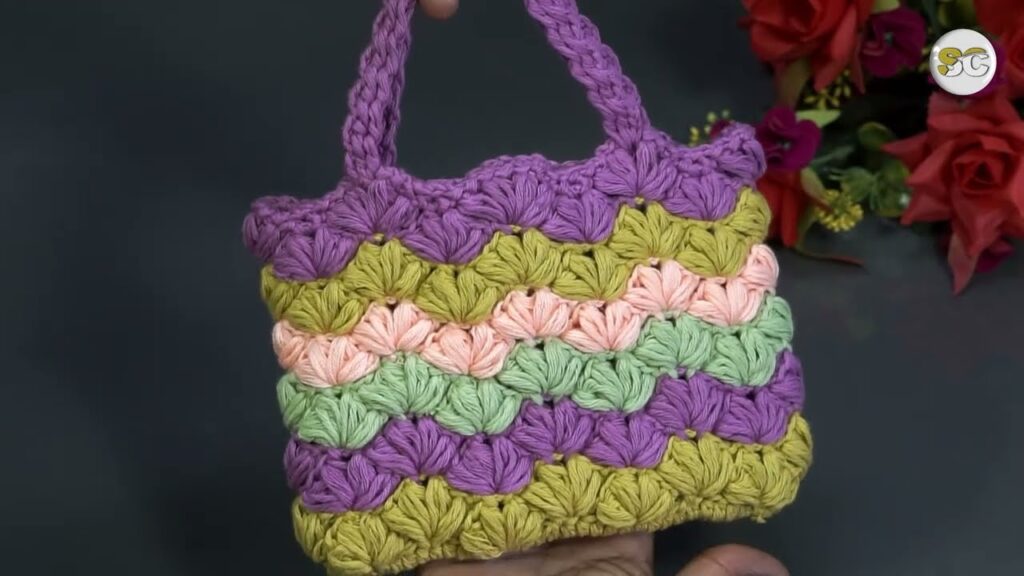
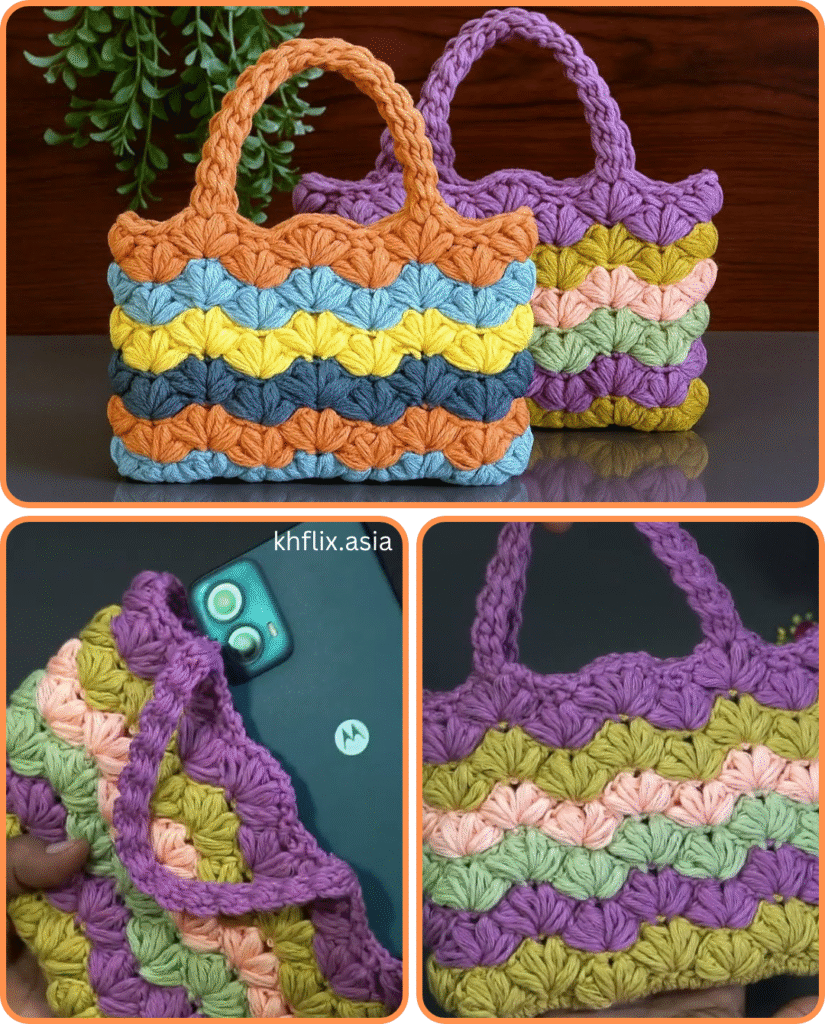
Ride the Wave: Crochet a Multicolored Ocean Wave Bag
Bring the serene beauty of the ocean to your everyday style with a stunning multicolored bag featuring the mesmerizing ocean wave stitch! This detailed guide will walk you through everything you need to create a unique and eye-catching accessory that’s perfect for summer days, beach outings, or adding a vibrant touch to any outfit.
Why the Ocean Wave Stitch?
The ocean wave stitch (also sometimes called the “wave stitch” or “ripple stitch”) is a fantastic choice for a bag because it creates a beautiful textured pattern that mimics the undulating motion of waves. When worked in multiple colors, it truly comes alive, allowing you to blend hues like a sunset over the sea or the many shades of a coral reef. Beyond its aesthetic appeal, the stitch creates a relatively dense fabric, making it durable enough for a functional bag.
What You’ll Need
Before you dive in, gather your materials. Quality yarn and the right tools will make your crocheting experience much more enjoyable.
- Yarn:
- Weight: Worsted weight (Aran) cotton or cotton blend yarn is highly recommended for bags. Cotton provides durability, good stitch definition, and holds its shape well.
- Colors: Choose at least three complementary colors. Think about ocean-inspired palettes:
- Deep blues, turquoises, and sandy beiges for a classic look.
- Greens, teals, and purples for a more vibrant, tropical feel.
- Pastels for a soft, dreamy aesthetic.
- Don’t be afraid to add a pop of contrasting color!
- Quantity: Approximately 200-300 yards total, depending on the desired size of your bag and your hook size.
- Crochet Hook: A hook size appropriate for your chosen yarn (typically H/5.0mm or I/5.5mm for worsted weight). Check your yarn label for the recommended hook size.
- Stitch Markers: Essential for marking the beginning of rounds and keeping track of your repeats.
- Yarn Needle: For weaving in ends.
- Scissors: For cutting yarn.
- Optional:
- Fabric lining: To give your bag more structure and prevent small items from slipping through the stitches.
- Bag handles: Leather, wooden, or crocheted handles can be added for a polished finish.
- Magnetic snap or button: For a closure.
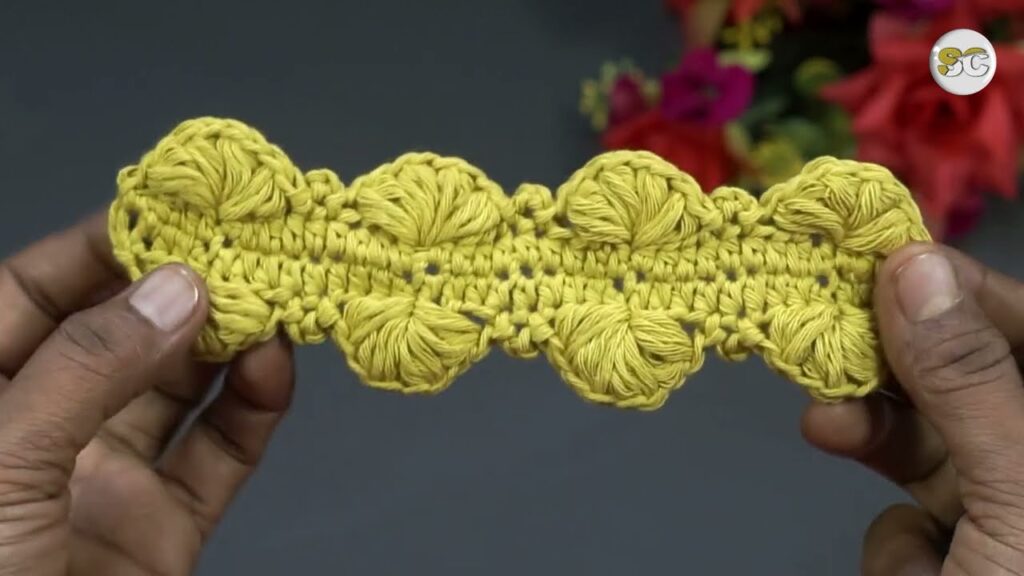
Understanding the Ocean Wave Stitch Pattern
The ocean wave stitch is built upon a repeating sequence of double crochets (dc) and double crochet decreases (dc2tog or dc3tog) that create the peaks and valleys of the wave. The key is maintaining your stitch count within each repeat.
Basic Stitch Pattern (typically worked over a multiple of 10 or 12 stitches):
Let’s use a multiple of 10 for this example.
- Foundation Chain: Chain a multiple of 10, plus 3 for your turning chain. For a medium-sized bag, a starting chain of 73 (7 x 10 + 3) stitches is a good starting point.
- Row 1: (Start with your first color)
- Dc in the 4th chain from hook (counts as 1 dc).
- Dc in the next 3 chains. (Total 4 dc)
- Dc3tog (double crochet 3 together) over the next 3 chains. (This creates a valley)
- *Dc in the next 4 chains.
- 3 dc in the next chain. (This creates a peak)
- Dc in the next 4 chains.
- Dc3tog over the next 3 chains.* (This completes one wave repeat)
- Repeat from * to * across the row until you have 7 chains remaining.
- Dc in the next 4 chains.
- 3 dc in the last chain.
- Chain 3, turn.
- Row 2 and beyond: (Change colors as desired at the beginning of each new “wave” section)
- Dc in the same stitch (the first dc of the previous row).
- Dc in the next 3 stitches.
- Dc3tog over the next 3 stitches.
- *Dc in the next 4 stitches.
- 3 dc in the next stitch (which will be the middle dc of the 3-dc group from the previous row).
- Dc in the next 4 stitches.
- Dc3tog over the next 3 stitches.*
- Repeat from * to * across the row until you have 7 stitches remaining.
- Dc in the next 4 stitches.
- 3 dc in the last stitch.
- Chain 3, turn.
Important Notes for Color Changes:
- To create clean color changes, join your new color on the last yarn over of the final stitch of the previous row.
- You can carry your yarn up the side if your color changes are frequent, but for a cleaner look, it’s often better to cut the yarn and weave in ends at each change.
Bag Construction: Step-by-Step
You can construct your bag in a few ways. Here, we’ll outline a simple method: crocheting two panels and seaming them, or working in the round for a seamless bottom.
Method 1: Two Panels (Front and Back)
- Crochet two identical panels:
- Follow the ocean wave stitch pattern (as described above) to create two rectangular panels of your desired bag height and width. Aim for a symmetrical number of “waves” across.
- Work until your panels reach your desired height. Remember to weave in ends as you go for a neater finish.
- Base (Optional but Recommended):
- To give your bag a flat bottom, crochet a separate rectangular base using single crochet (sc) or half double crochet (hdc). Make it slightly wider and longer than the bottom of your main panels.
- Seaming:
- Side seams: Place your two wave panels right sides together. Use a yarn needle and whip stitch or slip stitch to sew the sides together, starting from the bottom corners.
- Attach base (if using): Align the base with the bottom edges of your seamed panels. Sew securely around the perimeter. If not using a separate base, simply seam the bottom edges of the two wave panels together.
- Top Edging:
- Once the body is assembled, work a few rounds of single crochet or half double crochet around the top opening of the bag. This creates a clean, sturdy edge.
Method 2: Working in the Round (Seamless Bottom)
- Foundation Chain: Chain a multiple of 10 or 12 that will give you the desired circumference of your bag. Join with a slip stitch to the first chain to form a ring.
- Establishing the Base: Work several rounds of single crochet or half double crochet in the round, increasing evenly in each round to create a flat, circular or oval base. The number of increases depends on how wide you want the base to be. Mark the beginning of each round with a stitch marker.
- Transition to Wave Stitch: Once your base is complete, you’ll transition to the ocean wave stitch. This can be tricky in the round as the “peaks” and “valleys” need to align.
- You’ll essentially work the same “dc in 4, dc3tog, dc in 4, 3dc” sequence, but instead of turning, you’ll continue in the round. You’ll need to carefully manage your stitch count to ensure the waves align seamlessly.
- Some patterns adapt the wave stitch slightly for working in the round. Look for a pattern specifically designed for this if you’re a beginner.
- Continue Body: Continue working in the ocean wave stitch pattern, changing colors as desired, until your bag reaches the desired height.
- Top Edging: Finish with a few rounds of single crochet or half double crochet around the top opening.
Adding Handles
- Crocheted Handles: You can create simple crocheted straps by chaining a desired length and working several rows of single crochet or half double crochet. Attach them securely to the top corners of your bag.
- Store-Bought Handles: For a more professional look, purchase leather, bamboo, or wooden handles from a craft store. Attach them by sewing them directly to the top edge of the bag or by creating small crocheted tabs to loop through the handle rings.
Finishing Touches
- Weave in all ends: This is crucial for a neat and durable finish. Take your time to hide all those yarn tails securely.
- Lining (Highly Recommended): If you want a truly functional bag, consider adding a fabric lining. You can sew a simple fabric pouch that fits inside your crocheted bag and hand-stitch it to the top edge. This adds structure and prevents stretching.
- Closure: Sew on a magnetic snap, a button and loop closure, or even a simple drawstring.
Tips for Success
- Swatching: Always swatch! This is the most important tip. Crochet a small sample of the ocean wave stitch with your chosen yarn and hook. This will help you:
- Check your gauge (how many stitches and rows per inch) to ensure your bag will be the size you intend.
- Practice the stitch pattern and get comfortable with the repeats and color changes.
- See how your chosen colors interact in the stitch.
- Read the Pattern Carefully: Even if you’re using this guide, if you follow a specific pattern, read through the entire thing before you start.
- Stitch Markers are Your Friend: Use them to mark the beginning of rows/rounds, the peaks, and the valleys, especially when you’re learning the stitch.
- Don’t Be Afraid to Experiment: Play with color combinations! Try different numbers of rows for each color stripe. Make it uniquely yours.
- Block Your Bag (Optional): Once finished, gently wet your bag and shape it, then let it dry flat. This can help even out stitches and give your bag a more polished look.
Creating an ocean wave stitch bag is a rewarding project that combines beautiful artistry with practical use. With a little patience and these detailed instructions, you’ll soon be carrying a unique, handmade accessory that evokes the calming beauty of the sea. Happy crocheting!
Video tutorial:


