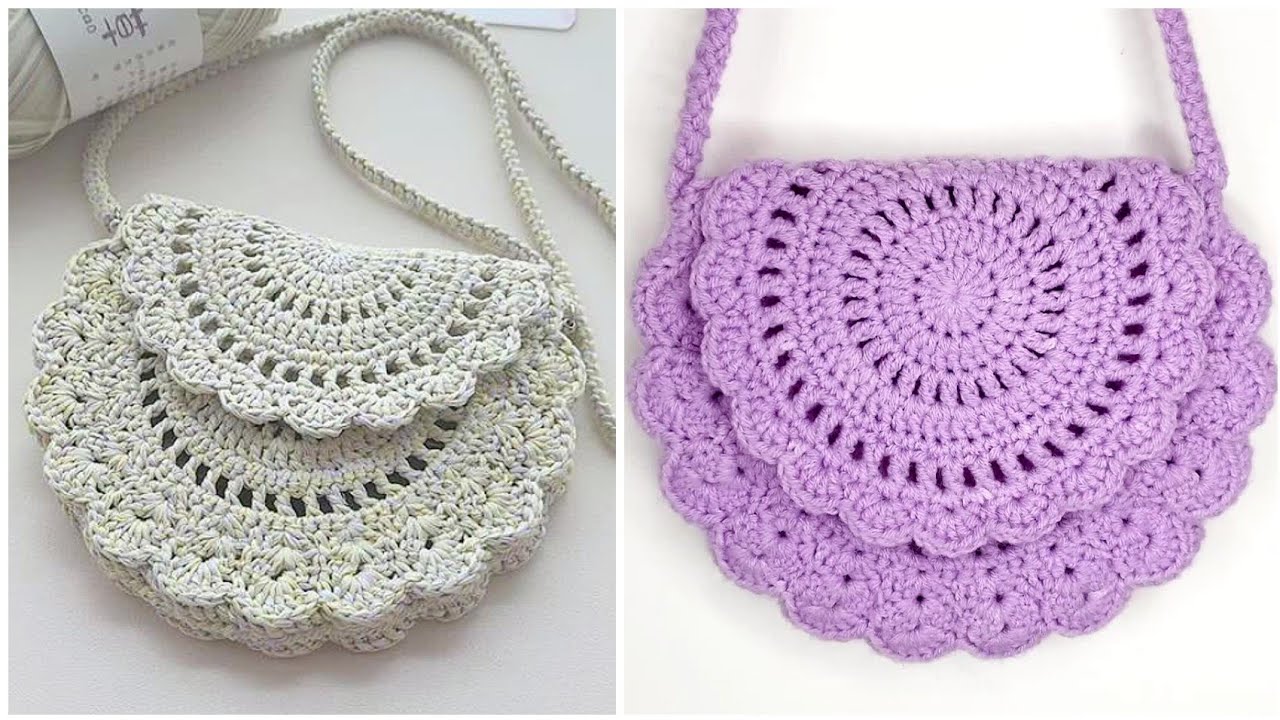
A handmade bag isn’t just a place to store your essentials; it’s a statement piece, a reflection of your unique style, and a testament to the joy of crafting. Far too often, “beautifully designed” can imply “difficult to make,” but this article will guide you through creating a crochet bag that is both stunning in its simplicity and wonderfully straightforward to construct. It’s perfect for confident beginners ready to tackle a functional project, and a delightful, quick make for more experienced crocheters.

Why Crochet This Beautifully Designed, Easy Bag?
- Style Meets Simplicity: Achieve a chic, modern aesthetic using basic crochet stitches and a clever construction method.
- Customization Galore: From vibrant solids to sophisticated neutrals, or even playful stripes, you choose the colors and textures that truly speak to you.
- Practical & Durable: With the right yarn and stitch, this bag will be sturdy enough for daily use, keeping your belongings secure and organized.
- Skill Building (Without the Stress): Practice working in the round, creating a strong fabric, and adding essential bag features like handles and closures.
- Thoughtful Gift: A handmade bag tailored to someone’s taste is an incredibly personal and cherished present.
- Eco-Friendly Fashion: Use sustainable fibers or clear out your yarn stash, making a conscious choice for handmade style.
Key Considerations for Your Easy & Beautiful Bag
Before you start hooking, a few mindful choices will ensure your bag is both beautiful and functional.
- Purpose & Size:
- Everyday Essentials? A medium-sized bag will work perfectly.
- Project Bag? You’ll want it a bit larger to hold yarn and tools.
- This tutorial will focus on a versatile medium-sized tote suitable for daily essentials. You can easily adjust the starting chain and number of rows to change its dimensions.
- Yarn Choice (The Heart of Your Bag’s Look & Feel):
- Fiber: For a bag that holds its shape well and offers great stitch definition, prioritize cotton, cotton blends, linen, jute, or sturdy acrylic yarns. These fibers resist stretching and sagging. Avoid overly soft or fuzzy yarns unless you plan on a very stiff lining.
- Weight: Worsted weight (Category 4) is highly recommended. It works up quickly, provides good structure, and is widely available in a vast array of colors. You could also use two strands of DK (Category 3) held together for a similar effect.
- Colors: Solid colors will beautifully highlight the stitch texture. Variegated yarns can add effortless interest, while color-blocking allows for bold design statements.
- Hook Size: To ensure your bag is sturdy and doesn’t have large gaps that allow items to slip through, use a hook size one or two sizes smaller than what the yarn label typically recommends for garments. This creates a denser fabric. For worsted weight yarn, a 4.0mm (US G/6) or 4.5mm (US 7) hook is usually ideal.
- Stitch Pattern:
- The beauty of this “easy” design comes from using simple, dense stitches that create texture without complexity. We’ll use a combination of single crochet (sc) and half double crochet (hdc), possibly with some back loop only (BLO) work, to achieve a pleasing look and strong structure.
- This design avoids intricate lace or complex cables, focusing on a clean, modern aesthetic.
- Handles & Closure:
- Handles: Crocheted straps are easy and integrated, or you can opt for pre-made leather or wooden handles for a different look. This tutorial will focus on simple, crocheted handles.
- Closure: A simple button and loop, a magnetic snap, or even no closure for an open tote are all easy options.
- Lining (Recommended for a Professional Finish): While not part of the crochet instructions, adding a fabric lining significantly enhances your bag’s durability, prevents stretching, protects your belongings, and gives it a polished, store-bought quality.

Materials You’ll Need
- Yarn: Approx. 200-300 yards of Worsted weight (Category 4) cotton, cotton blend, or sturdy acrylic yarn. (The exact amount depends on your desired bag size.)
- Crochet Hook: Size G/6 (4.0mm) or US 7 (4.5mm) – adjust based on yarn and desired fabric density.
- Yarn Needle (Tapestry Needle): Essential for weaving in ends and any seaming.
- Scissors:
- Stitch Marker (optional but very helpful): To mark the beginning of rounds.
- Optional: Fabric for lining, matching thread, sewing needle, 1 decorative button (if using a button closure).
The Beautifully Designed & Easy Crochet Bag Tutorial (Medium Tote Style)
This bag will be constructed by creating a flat oval base and then working the sides up from it, finishing with integrated handles.
Target Dimensions: Approx. 10 inches (25 cm) wide x 8 inches (20 cm) tall x 3.5 inches (9 cm) deep.
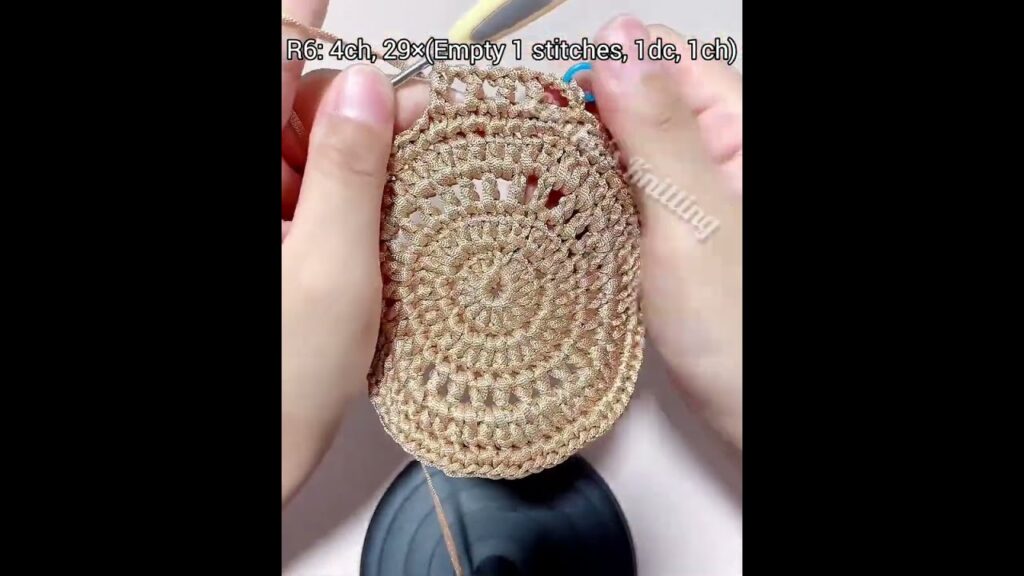
Part 1: The Sturdy Oval Base
This forms the bottom of your bag, allowing it to stand nicely. We’ll work in continuous rounds, using a stitch marker to track the beginning of each round.
- Starting Chain: Ch 21. (To adjust the length of your bag, add or subtract chains in multiples of 2.)
- Round 1: Hdc in 3rd ch from hook. Hdc in next 17 ch. Work (5 hdc) in the very last ch. Working along the opposite side of the starting chain: Hdc in next 18 ch. Work (4 hdc) in the very first chain stitch where you made your first hdc. Do NOT join with a sl st. Place stitch marker in the last hdc. [46 hdc]
- Round 2: Hdc inc in first st. Hdc in next 18 sts. Hdc inc in next 5 sts. Hdc in next 18 sts. Hdc inc in next 4 sts. Move stitch marker. [56 hdc]
- Round 3: Hdc in first st. Hdc inc in next st. Hdc in next 18 sts. (Hdc in next st, hdc inc in next st) 5 times. Hdc in next 18 sts. (Hdc in next st, hdc inc in next st) 4 times. Move stitch marker. [66 hdc]
- Your base should now lie flat and be approximately 10 inches (25 cm) long.

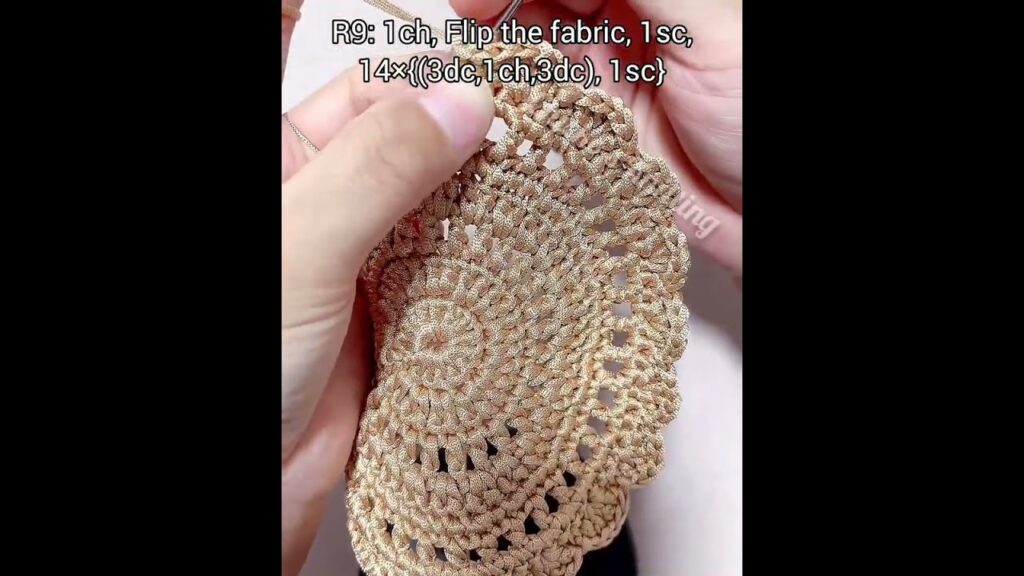
Part 2: Building the Bag Body (Textured Sides)
This section builds the walls of your bag. We’ll use a simple stitch pattern that creates a beautiful, subtle texture.
- Round 4 (Defining Wall): Ch 1 (does NOT count as a st). Sc in the back loop only (BLO) of each st around. Join with a sl st to the first sc. [66 sc]
- This BLO round creates a distinct ridge, making a clean separation between the base and the body, and helps the bag stand upright.
- Round 5 (Body Texture – Lemon Peel Stitch): Ch 1. Sc in first st. Hdc in next st. *Sc in next st, Hdc in next st.* Repeat from * around. Join with a sl st to the first sc. [66 sts – a mix of sc and hdc]
- Round 6: Ch 1. Hdc in first st. Sc in next st. *Hdc in next st, Sc in next st.* Repeat from * around. Join with a sl st to the first hdc. [66 sts]
- Notice how in Round 6, you place an Hdc into an Sc from the previous round, and an Sc into an Hdc from the previous round. This creates the alternating, textured pattern.
- Rounds 7 – 20: Repeat Round 5 and Round 6 alternately until your bag reaches your desired height (approx. 7-8 inches / 18-20 cm from the top of the base). End on a Round 5 repeat.
Part 3: Integrated Handles
These handles are crocheted directly into the top of the bag for a seamless and sturdy finish.
- Round 21 (Handle Placement): Ch 1. Sc in first 10 sts (front side). Ch 25 (for handle length). Skip next 13 sts. Sc in next 20 sts (back side). Ch 25 (for handle length). Skip next 13 sts. Sc in remaining 10 sts (front side). Join with a sl st to the first sc. [40 sc + 50 chs]
- Adjust the number of skipped stitches and chain stitches to make your handles longer/shorter or place them closer/further apart. Ensure they are symmetrical.
- Round 22 (Securing Handles): Ch 1. Sc in first 10 sc. Work 25 sc across the chain of the first handle. Sc in next 20 sc. Work 25 sc across the chain of the second handle. Sc in remaining 10 sc. Join with a sl st to the first sc. [90 sc]
- Round 23: Ch 1. Sc in each sc around. Join with a sl st to the first sc. [90 sc]
- FO, leaving a short tail to weave in.
Part 4: Finishing Touches
- Weave in All Ends: Meticulously weave in every loose yarn tail using your yarn needle. For a bag, secure ends prevent unraveling and create a polished look.
- Blocking (Optional but Recommended): Gently mist your bag with water (or wet block if using cotton/linen). Stuff the bag with towels or tissue paper to help it hold its shape, and allow it to air dry completely. Blocking helps to even out stitches and set the overall form of the bag, making it look more professional.
- Add a Fabric Lining (Optional but Highly Recommended):
- Measure the inside dimensions of your finished crocheted bag.
- Cut fabric pieces to create a simple fabric pouch that fits snugly inside. Hem the top edge of your fabric lining.
- Carefully hand-stitch or machine-stitch the fabric lining to the inside top edge of your crocheted bag. This significantly enhances durability, prevents stretching, protects your belongings, and provides a polished finish.
- Optional Closure: If you desire a closure, sew a magnetic snap to the inside top edges of the bag, or a button and loop to the center front/back.

Tips for Success & Making Your Bag Truly Beautiful:
- Consistent Tension: Maintaining even tension is key for a sturdy, well-shaped bag that won’t sag.
- Counting Stitches: Always count your stitches, especially in the base and handle rounds, to ensure symmetry and even shaping.
- Yarn Experimentation: While the recommended yarns work well, don’t hesitate to experiment with different fibers or textures for future bags once you’re comfortable with the pattern.
- Color Play: Bold stripes, a contrasting color for the handles, or a variegated yarn can transform the bag’s appearance with minimal effort.
- Embellishments: Consider adding a fun tassel, a crocheted charm, or even some simple embroidery to personalize your bag.
- Care: Refer to your yarn label for specific washing instructions. Most crocheted bags can be hand-washed and laid flat to dry.
With your beautifully designed and easy-to-make crochet bag now complete, you have a functional and stylish accessory that showcases your crafting prowess. Carry your essentials with pride, knowing you made it with your own hands!
Video tutorial:


